Contents
the email tool that makes email marketing simple


Configurar webhooks
Published: · Last updated: · By Marcus Biel
In brief
Aprenda a criar endpoints de webhook no Maildroppa, escolher eventos, verificar assinaturas, testar entregas, analisar tentativas e repetir eventos.
Webhooks let Maildroppa notify another application when something important happens in your account.
Instead of repeatedly asking Maildroppa whether a subscriber was created, updated, unsubscribed, or assigned a tag, your application can receive an HTTPS request shortly after the event occurs.
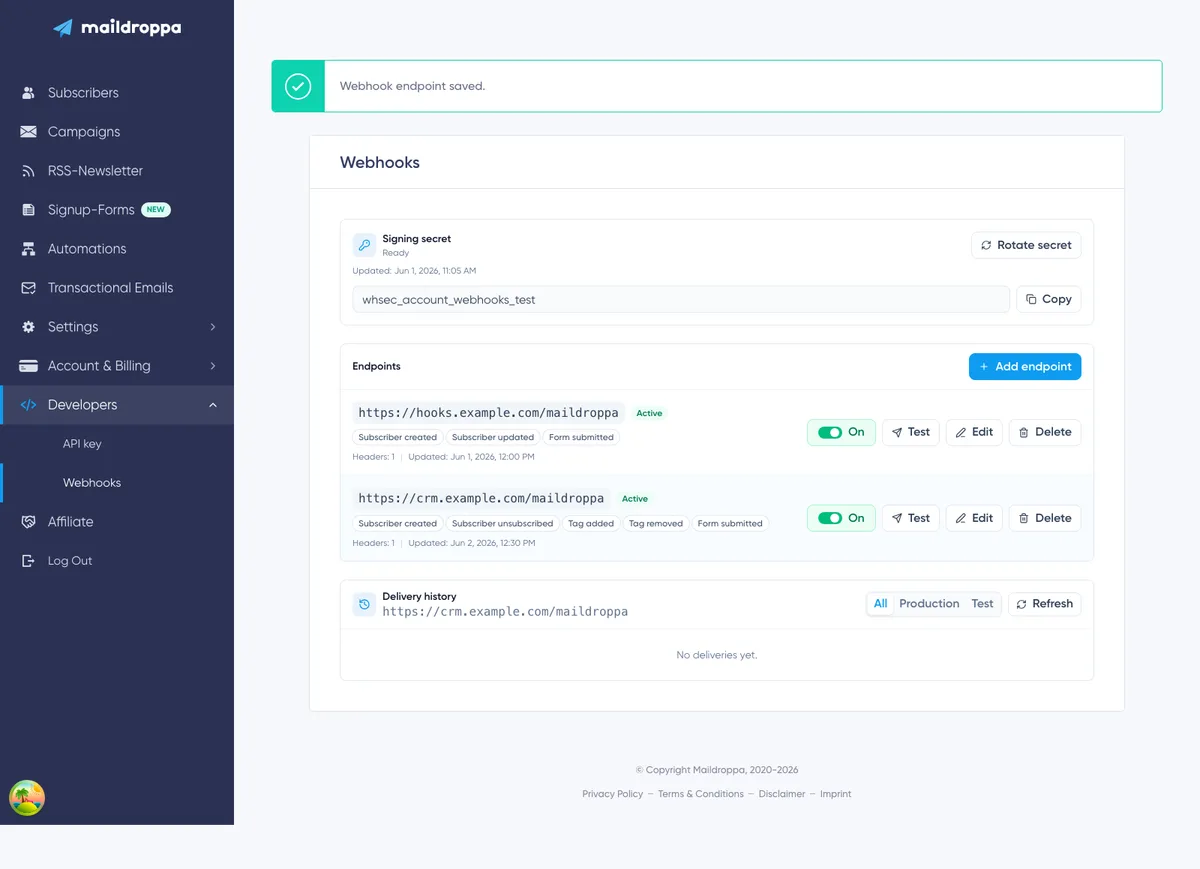
The Webhooks page is the central place for this account-wide integration. You can create several endpoints, choose the events each endpoint receives, add authentication headers, test the connection, inspect delivery attempts, and replay a production event when necessary.
How Account Webhooks Work
An account webhook follows this process:
- An event occurs in Maildroppa, such as a subscriber being created.
- Maildroppa finds every active endpoint that is subscribed to that event.
- Maildroppa creates one delivery for each matching endpoint.
- The JSON payload is signed with your account's webhook Signing secret.
- Maildroppa sends an HTTPS
POSTrequest to the saved endpoint URL. - Your endpoint verifies the signature, stores or processes the event, and returns an HTTP response.
- Maildroppa records the result in Delivery history and retries temporary failures automatically.
If several endpoints subscribe to the same event, each endpoint receives its own delivery. The business event has the same Event ID for all of them, while every delivery has its own Delivery ID.
Account webhooks are different from a “Send a webhook” step inside an Automation. Account webhooks listen for selected account events across Maildroppa. An Automation webhook is sent only when a subscriber reaches that particular step. Both use the account's webhook Signing secret, so rotating the secret affects every outgoing webhook receiver that verifies Maildroppa signatures.
Opening the Webhooks Page
Open “Settings”, expand “Developers”, and select “Webhooks”.
The page contains three main areas:
- Signing secret
- Endpoints
- Delivery history for the selected endpoint
When you have more than one endpoint, select an endpoint row to display its Delivery history. If you have not selected one explicitly, Maildroppa shows the history of the first endpoint in the list.
Before You Create an Endpoint
Prepare a receiver on your server before configuring Maildroppa. The receiver should:
- Be available through a public HTTPS URL.
- Accept
POSTrequests with anapplication/jsonbody. - Preserve the raw request body until the Maildroppa signature has been verified.
- Return a
2xxstatus only after the event has been accepted safely. - Process repeated deliveries idempotently by using the Event ID.
- Respond quickly instead of performing slow work during the request.
A reliable pattern is to verify the request, store the Event ID and payload in a durable queue or database, return 200 or 204, and process the business action afterward.
Do not expose a development computer, local network address, or unprotected script as a production webhook receiver. Maildroppa accepts only public HTTPS targets and checks the destination again when a delivery is sent.
Step 1: Generate the Signing Secret
Every Maildroppa webhook request is signed. Your receiver uses the Signing secret to verify that the request was created by Maildroppa and that the body was not changed in transit.
At the top of the page, the Signing secret panel shows one of these states:
- Missing — No Signing secret exists yet.
- Ready — A Signing secret is configured.
- Loading — Maildroppa is retrieving the current status.
Click “Generate secret” when the status is Missing.
Maildroppa displays the new secret immediately. It begins with whsec_. Click “Copy” and store it in the secret manager or protected environment configuration used by your receiver.
The complete value is shown only immediately after generation or rotation. When you reload or leave the page, Maildroppa shows only that a secret exists and when it was last updated. It does not reveal the stored secret again.

If You Lose the Secret
If the receiver no longer has the current secret, click “Rotate secret” and save the newly displayed value.
Rotation replaces the previous secret immediately. Maildroppa does not retain both values for a transition period. Update every receiver that uses this account secret before sending further tests or relying on production deliveries.
New deliveries, scheduled retries, tests, and replays are signed with the current secret at the time of the HTTP request. This means that a delivery created before rotation can still be signed with the new secret when it is attempted afterward.
Treat the Secret Like a Password
Do not place the Signing secret in browser code, a public repository, a URL, an error page, or an ordinary application log.
Only the server-side receiver needs the secret. If you believe it has been exposed, rotate it and update all receivers immediately.
Verifying a Webhook Signature
Each request contains these Maildroppa headers:
X-Maildroppa-Event-Id— Identifies the business event.X-Maildroppa-Delivery-Id— Identifies this particular delivery.X-Maildroppa-Timestamp— The signing time as Unix seconds.X-Maildroppa-Signature— The versioned HMAC signature.
Maildroppa also sends:
Content-Type: application/jsonUser-Agent: Maildroppa-Webhooks/1.0
The signature has this format:
v1=<lowercase hexadecimal HMAC>
Maildroppa creates it with HMAC-SHA256. The signed content is the timestamp, followed by a period, followed by the exact raw JSON request body:
<timestamp>.<raw request body>
Use the Signing secret as the HMAC key.
The following Node.js example shows the essential verification step. rawBody must be the original request bytes, not JSON that has already been parsed and serialized again.
import crypto from 'node:crypto';

export function verifyMaildroppaWebhook({ rawBody, timestamp, signature, signingSecret }) {
  const signedPayload = Buffer.concat([Buffer.from(`${timestamp}.`, 'utf8'), rawBody]);

  const expectedSignature = `v1=${crypto
    .createHmac('sha256', signingSecret)
    .update(signedPayload)
    .digest('hex')}`;

  const received = Buffer.from(signature, 'utf8');
  const expected = Buffer.from(expectedSignature, 'utf8');

  return received.length === expected.length && crypto.timingSafeEqual(received, expected);
}
After verifying the signature, also compare the timestamp with your server time. Reject requests outside a short tolerance chosen for your infrastructure, such as five minutes. This reduces the risk that a captured valid request is replayed much later.
Only parse and process the JSON after both checks have passed.
Common Causes of Signature Errors
A signature usually fails for one of these reasons:
- The receiver uses an old secret after rotation.
- Middleware parsed or changed the JSON before the signature was calculated.
- The receiver signs only the body and omits
<timestamp>.. - The timestamp is treated as a formatted date instead of the exact header value.
- The
v1=prefix is omitted from the comparison. - The calculated HMAC is encoded differently instead of lowercase hexadecimal.
Log the Event ID and Delivery ID when verification fails, but never log the Signing secret or sensitive custom header values.
Step 2: Add an Endpoint
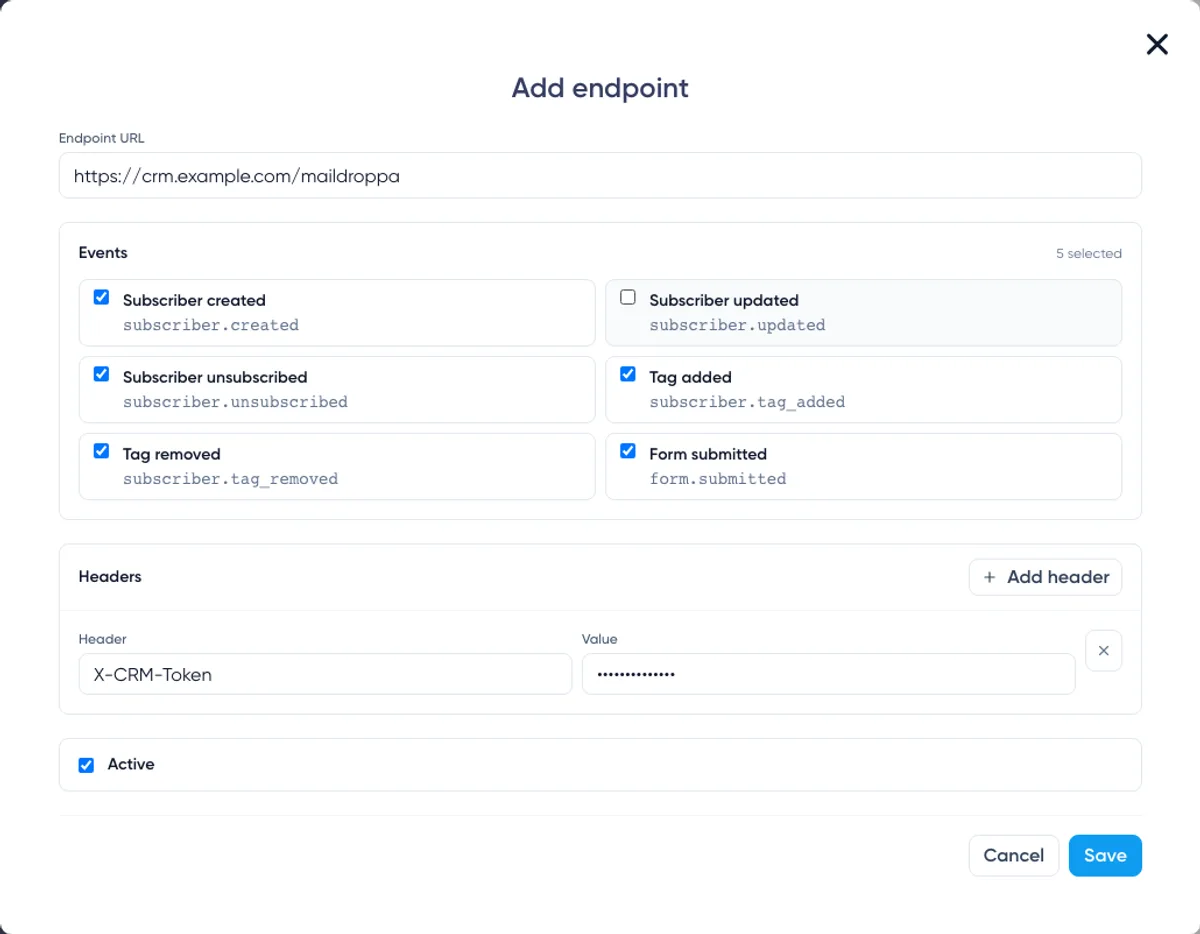
Click “Add endpoint” in the Endpoints section.
The editor contains four parts:
- Endpoint URL
- Events
- Custom headers
- Active status
New endpoints start as Active, and all events shown in the editor are selected initially. Review the selection before saving so the receiver gets only the notifications it actually needs.
Configuring the Endpoint URL
Enter the complete public URL that should receive Maildroppa requests, for example:
https://integrations.example.com/webhooks/maildroppa
The URL must meet these requirements:
- It must use
https://. - It must contain a valid public hostname.
- It can be up to 2,048 characters long.
- It cannot contain template variables with
{or}. - It cannot contain a username or password before the hostname.
- It cannot contain a URL fragment beginning with
#. - It must use the standard HTTPS port
443. - It cannot use
localhost, a raw IP address, or a hostname that resolves to a blocked private or reserved network.
Query parameters are supported, but do not put API keys or other secrets in the URL. URLs are visible in the endpoint list and delivery data. Use a Custom header for credentials instead.
Maildroppa does not follow redirects. Save the final HTTPS destination rather than a URL that returns 301, 302, 307, or 308.
The destination hostname is resolved again before sending. A hostname that later resolves to a private or blocked address is rejected even if it was valid when the endpoint was saved.
Choosing Events
Select at least one event. An endpoint receives only the event types selected in its editor.
The page offers these event choices:
Subscriber Created — subscriber.created
Sent when a subscriber is created in the Maildroppa account.
Use this event to create the corresponding contact in a CRM, customer data platform, internal database, or another permission-aware system.
Do not interpret this event as proof that every signup has completed Double Opt-in. The subscriber status in the payload describes the current state.
Subscriber Updated — subscriber.updated
Sent when built-in subscriber information or custom field values change.
Use the complete subscriber object in the payload as the current Maildroppa representation. Avoid assuming that only one particular property changed.
Tag assignments and removals have their own event types so they can be handled separately.
Subscriber Unsubscribed — subscriber.unsubscribed
Sent when the subscriber moves to the unsubscribed state through an unsubscribe action.
Use this event to suppress the contact in connected systems. Do not automatically resubscribe the person because another system still marks the contact as active.
Tag Added — subscriber.tag_added
Sent when a tag is assigned to a subscriber.
The payload contains the subscriber and the tag involved in this particular change.
Tag Removed — subscriber.tag_removed
Sent when a tag is removed from a subscriber.
The payload contains the updated subscriber and the removed tag. The removed tag is provided separately even though it is no longer present in the subscriber's current tags array.
Form Submitted — form.submitted
Sent when a visitor submits a Maildroppa signup form.
Treat this as a form-submission signal, not as confirmation that Double Opt-in has been completed. Any workflow that requires a confirmed subscription must continue to respect the subscriber's current status and the confirmation process.
Use Separate Endpoints When Responsibilities Differ
You can send different events to different systems. For example:
- Send subscriber and tag events to a CRM.
- Send unsubscribe events to a suppression service.
- Send form submission events to an analytics pipeline.
Separate endpoints reduce unnecessary traffic and make failures easier to diagnose. Each endpoint has its own event selection, URL, custom headers, active status, tests, and Delivery history.
Adding Custom Headers
Custom headers are optional. Use them when the receiver requires an API key, bearer token, tenant identifier, or another fixed header.
Click “Add header”, then enter the Header name and Header value. Suitable examples include:
Authorization: Bearer your-token
X-Integration-Key: your-secret-key
You can add up to 20 custom headers.
Header names:
- Are required.
- Can contain up to 128 characters.
- Must use valid HTTP header-name characters.
- Must be unique without regard to uppercase and lowercase spelling.
Header values:
- Are required.
- Can contain up to 2,000 characters.
- Cannot contain line breaks.
The following names are reserved and cannot be replaced by a custom header:
Content-TypeContent-LengthHostUser-Agent- Any name beginning with
X-Maildroppa-
This prevents a custom value from replacing Maildroppa's delivery and signature headers.
How Header Secrets Are Stored
Maildroppa encrypts custom header values before storing them. Saved values are not returned to the browser in readable form.
When you edit the endpoint later, the value field shows “Stored value kept”. Leave it empty when the existing secret should remain unchanged. Enter a new value to replace it.
If you change the header name, enter the value again. Maildroppa keeps a stored secret only while its original header name remains unchanged.
Removing a header row removes that header from future deliveries after the endpoint is saved.
Custom header values are treated as sensitive in stored request information. They are masked rather than displayed in Delivery history.
Setting the Endpoint Active or Inactive
Leave “Active” selected when the endpoint is ready to receive events immediately.
Clear it when you want to save the configuration without starting deliveries. You can activate the endpoint later from the endpoint list.
An inactive endpoint:
- Does not receive newly occurring events.
- Cannot send a Test webhook.
- Remains visible and editable.
- Keeps its existing Delivery history available.
Activating an endpoint does not backfill events that occurred while it was inactive.
Click “Save” when the URL, event selection, headers, and status are correct.
Understanding the Endpoint List
Each endpoint row shows:
- The destination URL.
- An Active or Inactive badge.
- The subscribed event types.
- The number of custom headers.
- The time the endpoint was last updated.
The available actions are:
- On/Off — Activates or deactivates the endpoint.
- Test — Sends one immediate test request to an active endpoint.
- Edit — Changes the URL, events, headers, or active status.
- Delete — Permanently removes the endpoint configuration after confirmation.
Select the main part of a row to open that endpoint's Delivery history below the list.

How Saved Changes Affect Existing Deliveries
An account event creates a delivery with a snapshot of the endpoint URL, payload, and custom headers at that time.
Editing the URL or custom headers affects newly created deliveries. A delivery that was already queued keeps its original destination and stored header configuration.
Changing the selected events also affects only events that occur afterward. Maildroppa does not create deliveries retroactively for event types that were not selected when the event occurred.
The Signing secret is different: it is read when the HTTP request is prepared. A pending delivery or replay can therefore use a newly rotated Signing secret even when its payload and endpoint snapshot were created earlier.
Testing an Endpoint
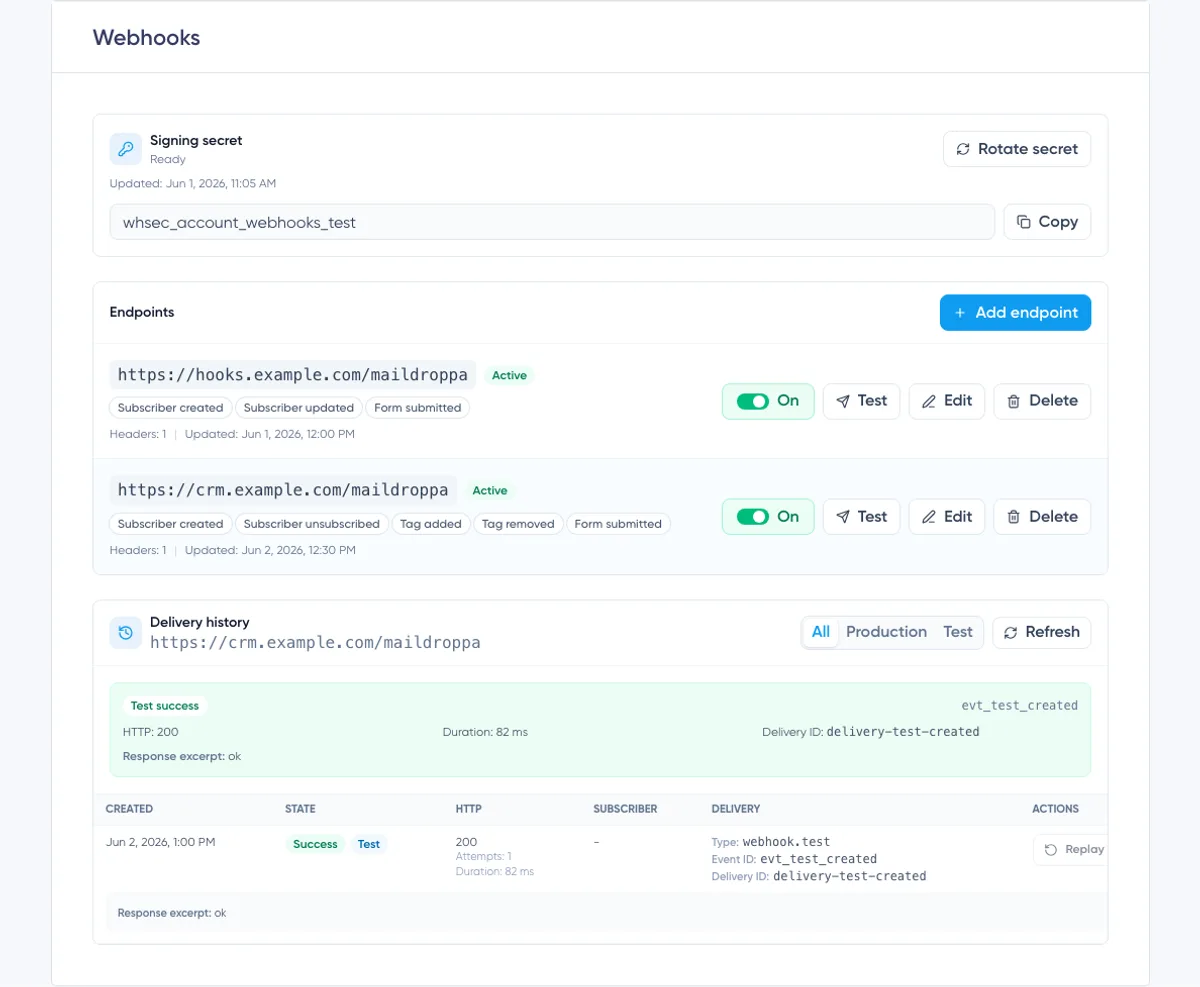
Click “Test” on an active endpoint after the receiver and Signing secret are ready.
Maildroppa immediately sends one signed request using the saved endpoint URL and saved custom headers. Unsaved changes in an open editor are not part of the test.
The test payload uses the event type webhook.test and sets livemode to false:
{
  "id": "evt_test_example",
  "type": "webhook.test",
  "schema_version": "1",
  "created_at": "2026-07-16T10:30:00Z",
  "livemode": false,
  "data": {
    "message": "This is a test webhook from Maildroppa."
  }
}
The generated IDs and timestamp are different for every real test.
A test makes exactly one HTTP attempt. Test deliveries are not placed on the production retry schedule and cannot be replayed.
After the request finishes, the result panel shows:
- Test success or Test failed
- Event ID
- HTTP status, when a response was received
- Duration
- Delivery ID
- Error information, when available
- A response excerpt, when the receiver returned a body
The test also appears in Delivery history with a Test badge. Use the “Test” filter to show only test requests.
Understanding the Production Payload
Production account events use a common JSON envelope:
{
  "id": "evt_example",
  "type": "subscriber.created",
  "schema_version": "1",
  "created_at": "2026-07-16T10:30:00Z",
  "livemode": true,
  "data": {}
}
The top-level properties mean:
id— The Event ID. It matchesX-Maildroppa-Event-Id.type— The event key selected in the endpoint editor.schema_version— The payload schema version. Use it when deciding how to parse the event.created_at— The time the event payload was created, in UTC.livemode—truefor production events andfalsefor test events.data— The event-specific content.
Route events by the exact type value. Ignore additional properties your integration does not need so compatible payload additions do not break the receiver.
Subscriber Event Payload
Subscriber events contain the current subscriber representation inside data.subscriber:
{
  "id": "evt_example",
  "type": "subscriber.updated",
  "schema_version": "1",
  "created_at": "2026-07-16T10:30:00Z",
  "livemode": true,
  "data": {
    "subscriber": {
      "id": "7f49d0e9-77d6-4c24-8b90-12c9d53d82cc",
      "email": "alex@example.com",
      "first_name": "Alex",
      "status": "active",
      "registered_at": "2026-07-15T08:15:00Z",
      "fields": [
        {
          "id": "b6594e58-0c4b-4138-9ad8-fc4747e076eb",
          "personalization_tag_name": "company",
          "value": "Example Ltd."
        }
      ],
      "tags": [
        {
          "id": "c69af5de-39d3-42a4-8f55-ddf86d10a51c",
          "name": "Customers"
        }
      ]
    }
  }
}
fields and tags are arrays. They can be empty. A subscriber property can also be null when no value exists, so your receiver should follow the payload schema instead of assuming every optional profile value is present.
Tag Event Payload
Tag events contain both the subscriber and the tag that caused the event:
{
  "id": "evt_example",
  "type": "subscriber.tag_added",
  "schema_version": "1",
  "created_at": "2026-07-16T10:30:00Z",
  "livemode": true,
  "data": {
    "subscriber": {
      "id": "7f49d0e9-77d6-4c24-8b90-12c9d53d82cc",
      "email": "alex@example.com",
      "first_name": "Alex",
      "status": "active",
      "registered_at": "2026-07-15T08:15:00Z",
      "fields": [],
      "tags": []
    },
    "tag": {
      "id": "c69af5de-39d3-42a4-8f55-ddf86d10a51c",
      "name": "Customers"
    }
  }
}
For subscriber.tag_removed, data.tag still identifies the removed tag even though the subscriber's current tags array no longer contains it.
Event IDs, Delivery IDs, and Idempotency
The Event ID and Delivery ID serve different purposes.
Event ID
The Event ID identifies the business event. It appears in:
- The payload's top-level
idproperty. - The
X-Maildroppa-Event-Idrequest header. - Delivery history.
The same event can be sent to several subscribed endpoints. Those deliveries share the Event ID.
Retries and manual replays also retain the original Event ID. Store processed Event IDs and make the business action idempotent so a repeated request does not create duplicate contacts, repeat an irreversible action, or apply the same change twice.
Delivery ID
The Delivery ID identifies one delivery record. It appears in:
- The
X-Maildroppa-Delivery-Idrequest header. - Delivery history.
Each endpoint delivery has its own Delivery ID. A manual replay creates a new Delivery ID while preserving the original Event ID.
Use the Delivery ID for technical tracing and support. Use the Event ID for business-level deduplication.
Returning the Correct HTTP Response
Maildroppa classifies responses as follows:
- Any
2xxresponse marks the delivery as successful. 408 Request Timeout,429 Too Many Requests, and5xxresponses are temporary failures and can be retried.- Network failures that can be temporary are retried.
- Redirects and other
3xxresponses are not followed and are treated as terminal failures. - Other
4xxresponses are treated as terminal failures and are not retried.
Return 200, 202, or 204 only when the event has been accepted safely. If processing takes time, store the event first and return a success response before doing the slower work asynchronously.
Do not return a redirect to another webhook URL. Configure the final URL in Maildroppa instead.
Automatic Retry Schedule
Production deliveries can make up to seven HTTP attempts.
After a retryable failure, Maildroppa schedules the next attempt with these delays:
- After attempt 1: 1 minute
- After attempt 2: 5 minutes
- After attempt 3: 30 minutes
- After attempt 4: 2 hours
- After attempt 5: 12 hours
- After attempt 6: 24 hours
If attempt 7 still receives a retryable failure, the delivery becomes Dead and no further automatic attempt is scheduled.
The schedule is measured from the individual failed attempts. Actual delivery time can be slightly later because deliveries are processed asynchronously and are also subject to system protection limits.
Fix a temporary receiver problem before the displayed “Next retry” time whenever possible. If the automatic attempts have ended, use Replay after the receiver is healthy again.
Understanding Delivery History
Delivery history belongs to the currently selected endpoint. The endpoint URL appears in the section header so you can confirm which history you are viewing.
Use these filters:
- All — Shows production and test deliveries.
- Production — Shows only live event deliveries.
- Test — Shows only manual tests.
Click “Refresh” to retrieve the latest state. The history does not need to be left open while Maildroppa sends or retries a delivery.
The page shows the latest 50 matching deliveries for the selected filter.
Delivery Columns
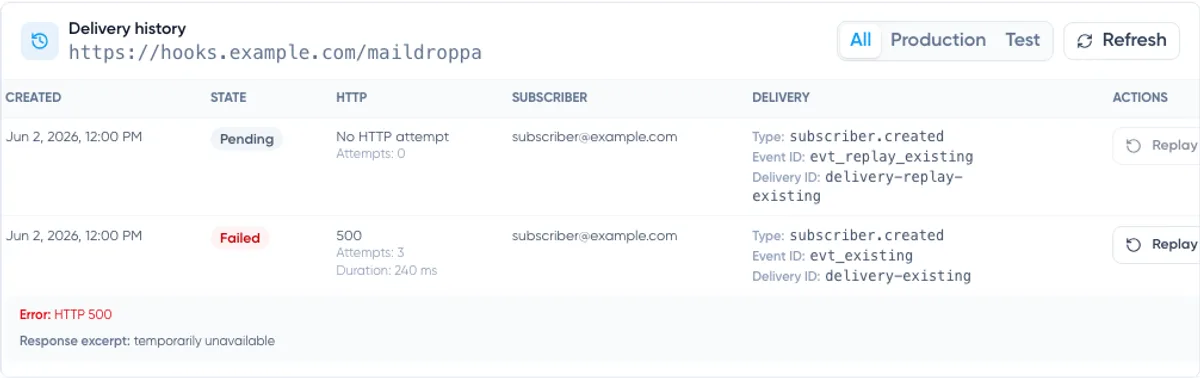
Each row contains:
- Created — When the delivery record was created.
- State — Pending, Success, Failed, or Dead.
- HTTP — Response status, attempt count, duration, and the next retry time when applicable.
- Subscriber — The subscriber email when the event is connected to a subscriber.
- Delivery — Event type, Event ID, and Delivery ID.
- Actions — Replay when the delivery is eligible.
If no HTTP request was made, the HTTP column shows “No HTTP attempt”. This can happen when Maildroppa rejects the request before sending, for example because the Signing secret is missing or the saved destination can no longer be used safely.
When available, the row also shows an Error and a Response excerpt returned by the receiver. Do not return secrets or sensitive personal data in a webhook response body because part of that response can appear in the account's delivery log.
Delivery States
Pending means that the delivery is waiting for its first attempt or a scheduled retry. “Next retry” appears when another attempt has been scheduled.
Success means that the receiver returned a 2xx response. No further automatic attempt is required.
Failed means that the delivery ended with a non-retryable problem, was rejected before an HTTP attempt, or was stopped before it could be sent.
Dead means that all automatic attempts for a retryable problem were used without receiving a successful response.
History Retention
Delivery records are retained for a limited time:
- Successful production deliveries: 30 days
- Failed production deliveries: 90 days
- Dead production deliveries: 90 days
- Test deliveries: 30 days
Keep your own integration logs when you need a longer audit history. Store Event IDs and Delivery IDs, but avoid storing secrets unnecessarily.
Replaying a Delivery
Click “Replay” when a completed production delivery should be attempted again.
Replay is available for production deliveries in Success, Failed, or Dead state. It is not available while a delivery is Pending, and test deliveries cannot be replayed.
A replay:
- Creates a new Pending delivery.
- Creates a new Delivery ID.
- Keeps the original Event ID.
- Keeps the original event type and JSON payload.
- Uses the original saved target URL and custom header snapshot.
- Uses the current Signing secret when the new request is prepared.
Replay does not rebuild the payload from the subscriber's current data. It re-sends the original event snapshot. This makes the replay auditable and prevents a historical event from silently changing meaning.
Only one replay of the same source delivery can be Pending at a time. Wait until that replay finishes before requesting another one.
Make sure the endpoint is Active before replaying. If the endpoint is inactive, the queued replay cannot be delivered successfully.
Because a receiver may have completed the business action even when Maildroppa did not receive its success response, replay can produce a duplicate request. Event ID deduplication protects the connected system from repeating the action.
Editing an Endpoint
Click “Edit” to change the URL, event selection, custom headers, or active status.
Before saving:
- Confirm that the new URL is already available.
- Leave stored header values blank when they should remain unchanged.
- Enter a new value for every renamed header.
- Review the event selection so required notifications are not removed accidentally.
- Save and send a new Test webhook.
Remember that queued deliveries retain their existing URL and custom header snapshot. Test the new configuration for future deliveries rather than assuming it changes an older queued request.
Deactivating an Endpoint
Use the On/Off switch when you want to pause an integration without deleting its configuration and history.
When an endpoint is turned Off:
- New events are no longer queued for it.
- Pending deliveries that have not already been claimed for sending are marked Failed.
- Test is disabled.
- The endpoint remains available for editing and later activation.
A request already in progress at the moment of deactivation can still finish. Check Delivery history after switching the endpoint Off if this distinction matters to your integration.
Events missed while the endpoint is inactive are not backfilled when you turn it On again.
Deleting an Endpoint
Click “Delete” and confirm the warning when the endpoint should no longer exist.
Deleting removes the endpoint from the page, stops future event deliveries, and fails pending deliveries that were not already claimed for sending.
Delete is not a way to pause temporarily. Use the On/Off switch when you may need the configuration or its visible history again.
Before deletion, record any Event IDs or Delivery IDs you still need for your integration audit.
Troubleshooting
The Endpoint Cannot Be Saved
Check that:
- The URL begins with
https://. - The URL uses a public hostname and port 443.
- The URL contains no variables, login information, or fragment.
- At least one event is selected.
- Every Custom header has a unique name and a value.
- Reserved Maildroppa and HTTP headers are not used as custom names.
Test Is Disabled
Test is available only for an Active endpoint. Turn the endpoint On or edit it and select “Active”, then save before testing.
Test Shows No HTTP Attempt
Generate a Signing secret if the status is Missing. Also check whether the destination hostname is public and still resolves correctly.
A request can be rejected before sending when its secret, URL, custom headers, or destination safety check is invalid.
The Receiver Returns 401 or 403
Check the saved Custom header name and credential. Edit the endpoint and enter the value again if it has changed.
Also verify that the receiver is not confusing its own API credential with the Maildroppa signature. A Custom authorization header and X-Maildroppa-Signature serve different purposes and can be checked independently.
The Receiver Returns a Redirect
Maildroppa does not follow redirects. Replace the endpoint URL with the final public HTTPS URL and test again.
The Signature Does Not Match
Confirm that the receiver:
- Uses the current Signing secret.
- Uses the exact
X-Maildroppa-Timestampvalue. - Signs
<timestamp>.<raw request body>. - Uses HMAC-SHA256 and lowercase hexadecimal output.
- Compares the complete value including
v1=. - Performs the comparison before JSON parsing changes the body.
The Same Event Arrives More Than Once
This can happen after a network interruption, retry, or manual replay. It is normal for webhook delivery systems to provide at-least-once delivery rather than exactly-once delivery.
Use the Event ID as an idempotency key. Return a 2xx response when an already processed Event ID is received again and no additional action is needed.
A Delivery Is Pending
Look at “Next retry” in the HTTP column. A retryable 408, 429, 5xx, or temporary network failure remains Pending until the next scheduled attempt.
Click “Refresh” after the retry time to load the latest state.
A Delivery Is Dead
All automatic attempts were used. Fix the receiver first, make sure the endpoint is Active, send a Test webhook, and then use Replay on the production delivery.
Recommended Production Checklist
Before relying on an endpoint in production, confirm all of the following:
- The receiver uses a stable public HTTPS URL with a valid certificate.
- The Signing secret is stored outside the source code.
- The signature is checked against the unmodified raw body.
- Old timestamps are rejected according to a documented tolerance.
- The receiver stores and deduplicates Event IDs.
- The receiver logs Event IDs and Delivery IDs for tracing.
- Slow processing happens after the event has been accepted durably.
- A
2xxresponse is returned only for accepted events. - Custom credentials are stored in headers rather than the URL.
- Only required event types are selected.
- A Test webhook succeeds and appears correctly in Delivery history.
- Monitoring alerts you when production deliveries begin returning errors.
With these safeguards in place, the Webhooks page provides both sides of a reliable integration: secure event delivery to your application and a clear operational history inside Maildroppa.
Ready to Send Better Emails?
Stop juggling bloated tools or overpriced plans. Maildroppa offers personal support, privacy-conscious controls, and powerful email marketing - starting free forever.
No credit card required. No time limit.