Signup Form Builder
Published: December 23, 2024
Capturing leads effectively is crucial for any online business. Maildroppa's Signup Form Builder empowers you to create, customize, and optimize signup forms that align with your branding and engagement goals. This guide walks you through the process of designing compelling forms that convert visitors into subscribers.
Choosing the Right Form Type
After clicking "Create Form" on the Signup Form Overview page, you'll be prompted to select the type of form you wish to create. Each form type offers unique advantages, and the best choice depends on your website's audience and your specific goals.

Slider Signup Form
The Slider Form appears subtly on the edge of your webpage after a set delay, gradually opening to catch the visitor's eye without being intrusive. Its movement naturally draws attention, making it an excellent choice for gently prompting user engagement.
Page Inline Form
The Inline Form is the least intrusive option, statically placed at a specific spot on your webpage where it remains always visible. Common placements include the top right corner or at the end of high-performing articles. While it may receive fewer views, it often yields a higher conversion rate because users opt in after consuming valuable content.
The Popup Form demands immediate attention by appearing in the center of the page after a few seconds and must be actively closed to disappear. Despite being the most assertive form type, it often leads to high conversion rates due to its visibility and prominence.
Tip: Experiment with different form types to see which one resonates best with your visitors.
Getting Started with the Form Builder
 Maildroppa's Form Builder is designed for ease of use and is divided into two main sections:
- Live Preview (Left Side): This area shows a real-time preview of your signup form. You can make basic edits directly within this section, allowing you to see instant changes as you customize your form.
- Customization Menu (Right Side): Here, you can fine-tune every aspect of your form, from general styles to specific elements. This menu provides detailed options to ensure your form aligns perfectly with your brand and objectives.
Customizing General Styles
These settings influence the overall look and behavior of your signup form.
Form Name
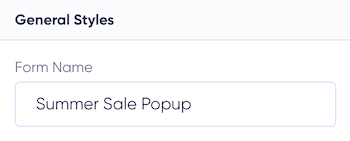 Assign a unique name to your form for easy identification—for example, "Summer Sale Popup". This is especially helpful when managing multiple forms.
Form Position (Slider Forms Only)
Choose where the slider appears on your page - Top Left, Top Center, Top Right, Center Left, Center Right, Bottom Left, Bottom Center or Bottom Right.

Background and Borders
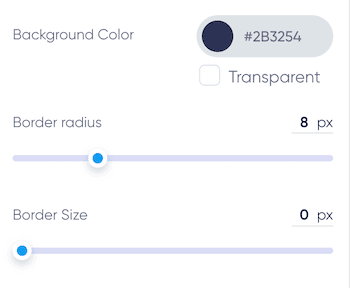
- Background Color: Set a color that complements your website's design or opt for transparency.
- Border Radius and Size: Adjust the roundness and thickness of your form's borders.
Font Family
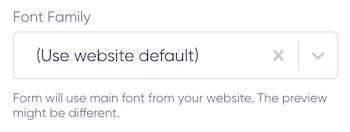 Select a font that matches your website's default font or choose a custom font to make your form stand out.
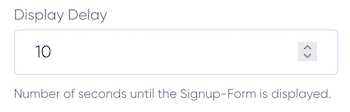
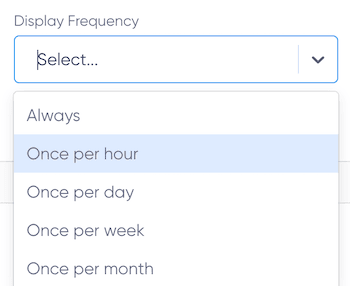
Display Delay and Frequency (Slider and Popup Forms Only)
Control when and how often the form appears to visitors:
- Display Delay: Specify the number of seconds to wait before showing the form.
- Display Frequency: Define how often the form should appear for returning visitors.
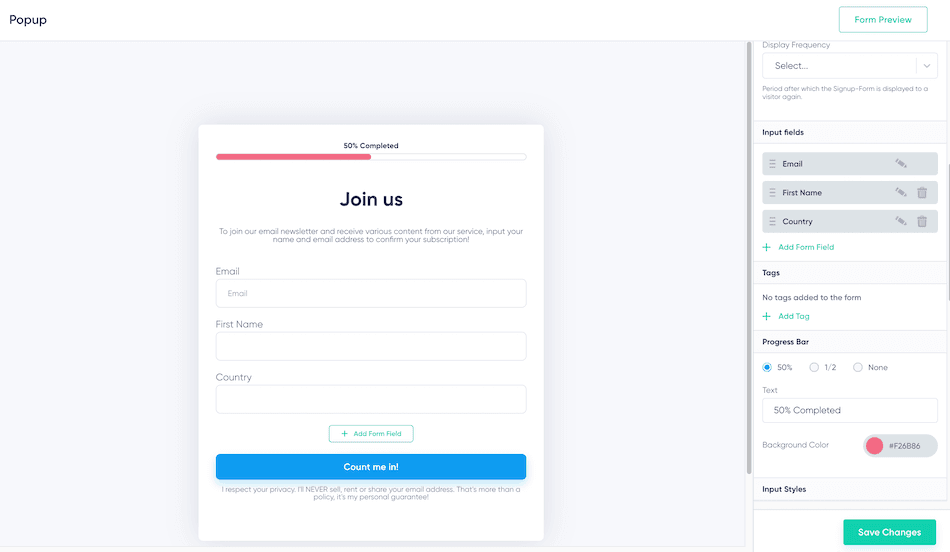
Adding and Customizing Input Fields
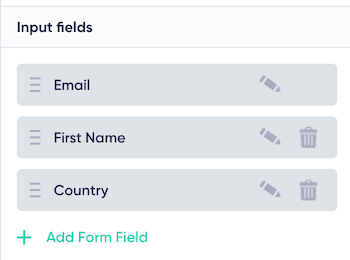
Capturing the right information is essential for effective lead generation. You can add new fields and customize existing ones to suit your needs.
Adding Fields
 To add a new field click "Add Form Field" either in the live preview on the left side or within the customization menu on the right.
Customizing Fields
There are two ways to customize your input fields:
Via the Live Preview:
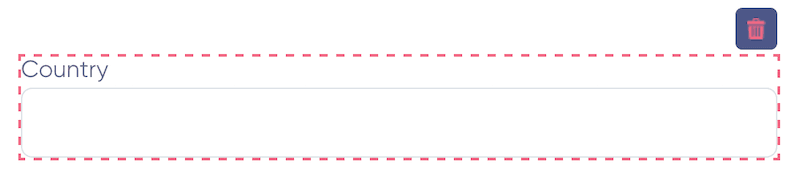
- Select a Field: Click on the visible field you want to customize in the live preview on the left side. The selected field will be highlighted. The field's settings will open in the menu on the right.
Via the Customization Menu:

- Edit Field: In the customization menu on the right, locate the field you wish to edit under the "Fields" section.
- Click the Pencil Icon: On the right side of each field, there's a pencil icon. Click it to open the field's settings.
Field Customization Options
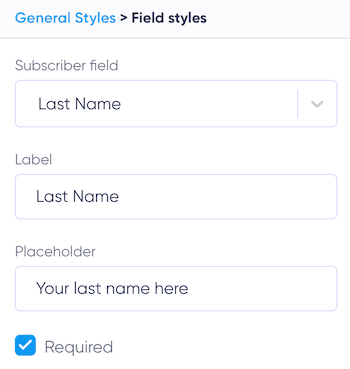
- Field Type: Choose the type of data you want to collect, such as Email Address, First Name, or other custom fields.
- Label and Placeholder Text: Provide clear instructions by setting informative labels (displayed above the field) and placeholders (text inside the field before input).
- Required Fields: Indicate whether a field is mandatory for form submission by toggling the required option.
Deleting Fields
- From Live Preview: Click on the field in the live preview to highlight it, then click the trash icon to delete it.
- From Customization Menu: Click the trash icon next to the field in the customization menu.
Utilizing Tags
 Assign tags to subscribers to help segment your audience for targeted campaigns. In the Tags section:
- Add Tags: Input relevant tags that will be automatically assigned to anyone who signs up through this form.
- Remove Tags: Click the delete icon next to a tag to remove it from the form.
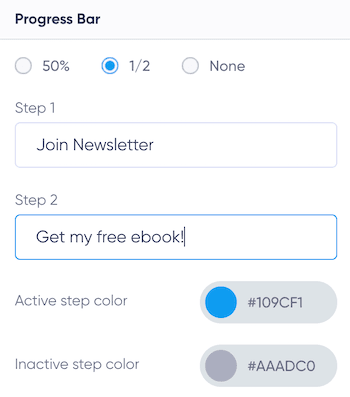
Progress Bar
Adding a progress bar can motivate users to complete the signup process by giving them a sense of advancement, even if the form is a single step.
Progress Bar Options
-
50% Completed: Display a simple bar indicating that the user is halfway through, encouraging them to finish.

-
1/2 Completed (Step-by-Step): Show an indicator suggesting the user is nearly done, boosting completion rates.
-
None: Exclude the progress bar.
Customization
- Text: Personalize the progress bar labels.
- Colors: Adjust the background and step colors to match your brand.
- Note: The progress bar serves as a psychological motivator, making users feel they are progressing toward a goal.
Styling Input Fields and Labels
Ensure your form is visually appealing and user-friendly.
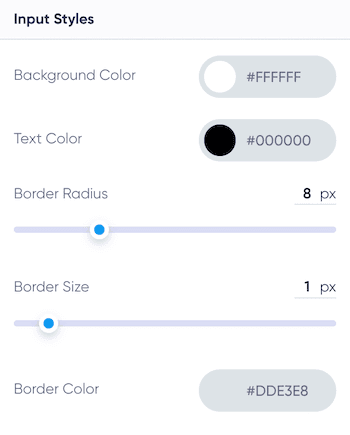
Input Fields
Customization Options: Adjust background color, text color, border radius, border size, and border color.
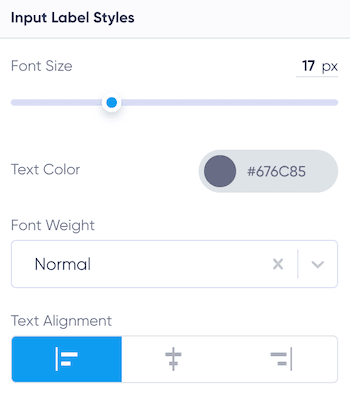
Input Labels
Customization Options: Modify font size, text color, font weight, and text alignment.
For popup forms, additional settings allow you to control how and when the form appears.
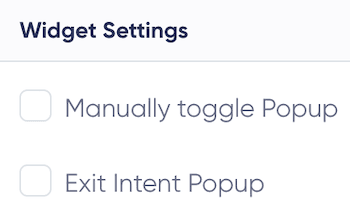
Link the form to a specific button or element on your page. When users click this element, the form will appear, offering a controlled user experience.
Trigger the form when a user moves their cursor toward the edge of the screen, indicating they may be about to leave your site. This timely prompt can effectively capture attention.
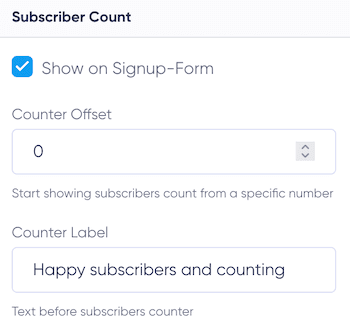
Leveraging Social Proof with Subscriber Count
Displaying the number of subscribers can build trust and encourage new signups.
Subscriber Counter Settings
- Show on Signup Form: Enable or disable the subscriber count.
- Counter Offset: Set a starting number if you're a new business.
- Counter Label: Add custom text that will always appear before the counter number. Ensure the text fits naturally, such as "Join over" or "More than."
Personalizing Configurable Elements
Tailor every component of your form to align with your brand and messaging. You can customize individual elements easily:
Click on any element in the live preview on the left side—such as the progress bar, header, body text, input fields, button, or footer disclaimer.
Adjust Settings: The related settings for that element will appear on the right side. Here, you can modify text content, styles, and other properties specific to the selected element.
Elements You Can Customize
- Progress Bar: Personalize the text and style to motivate users to complete the signup process.
- Header Content: Craft a compelling headline by adjusting the text and its appearance.
- Body Content: Provide additional information or incentives, customizing the message and style.
- Input Fields: Change field types, labels, placeholders, and set whether they are required.
- Button Styles: Customize the call-to-action button's text and design to encourage clicks.
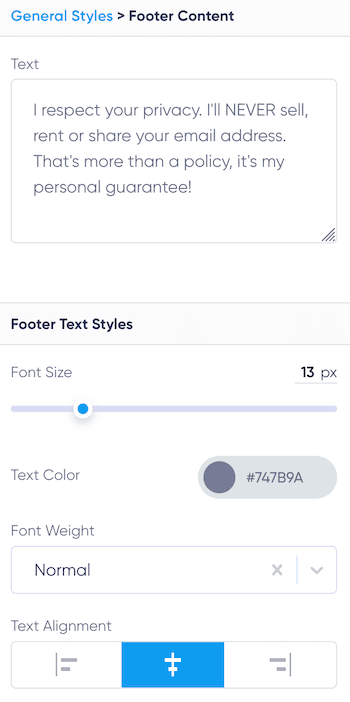
- Footer Disclaimer:Add a privacy assurance message and adjust its styling to build trust.
Previewing Your Signup Form
 Use the Preview feature to see how your form will appear and function on your website before it goes live. This helps ensure that everything looks and works as intended.

Optimizing for Conversion
Creating a signup form is not just about aesthetics; it's about encouraging users to take action. Here are some strategies to optimize your form:
Use Psychological Triggers
Incorporate elements like progress bars and subscriber counts to motivate users.
- Progress Bar: Gives users a sense that they are nearly complete, encouraging them to finish the signup.

- Subscriber Counter: Shows that others have joined, building trust.

Keep It Simple
Ask only for essential information to minimize friction. The fewer fields users need to fill out, the more likely they are to complete the form.
Align with Your Brand
Ensure consistency in visuals and tone to reinforce your brand identity. A cohesive design builds recognition and trust.
Test and Iterate
Experiment with form placement, messaging, and styles to see what works best. Regularly review performance metrics and adjust accordingly.
Final Thoughts
By utilizing Maildroppa's Signup Form Builder and applying these best practices, you can create engaging forms that effectively convert website visitors into subscribers. Understanding your audience and continuously refining your forms based on performance will lead to better engagement and higher conversion rates.

