Contents
the email tool that makes email marketing simple


Build Email Marketing Automations
Published: · Last updated: · By Marcus Biel
In brief
Learn how to build Maildroppa automations with signup, field, tag, event and webhook triggers, inline emails, lead magnets, delays and conditions.
Before you start
- A Maildroppa account
- A defined audience or signup source
- The emails or lead magnet used by the flow
Expected result
A saved automation with a clear trigger and a valid path through each email, delay, condition, or action.
Troubleshooting
- If the automation cannot start, verify that the trigger has all required settings.
- If a subscriber does not advance, review the active version and the condition on the current step.
Automations let you create complete email journeys that react to subscriber activity, dates, data changes, and events from external applications.
You build each automation as a visual flow. A trigger decides when a contact enters. Steps then send emails, wait, update subscriber data, call another system, or choose a different path according to a condition. No programming is required for ordinary welcome sequences, follow-ups, anniversary emails, or subscriber segmentation. When you do want to connect another application, the same builder also provides Custom Event and Inbound Webhook triggers.
This guide explains the complete Automations page and builder, including all current triggers and steps, the email editor inside an automation, event data, lead magnet delivery, publishing, versioning, and safe webhook setup.
What You Can Build with Automations
Here are a few common examples:
- Welcome series — Start after a contact confirms a signup, send an immediate welcome email, wait two days, and continue with useful content.
- Lead magnet delivery — Start after a confirmed signup through a specific Signup Flow, send the protected download link, and follow up later.
- Birthday and anniversary emails — Start every year on the date stored in a subscriber field.
- Interest-based follow-ups — Start when a tag is added, then send content that matches that interest.
- Profile completion journeys — React when a field is added, updated, or removed.
- Product and purchase journeys — Let your backend send an event such as
trial.startedororder_paid, then use the event properties in emails and conditions. - No-code inbound integrations — Give an external tool a unique webhook URL that starts one particular automation when it receives JSON.
- Subscriber maintenance — Add or remove tags, update fields, start or stop another automation, or unsubscribe a contact.
- System integrations — Send a signed JSON webhook to another application when a contact reaches a particular step.
Opening the Automations Page
Open “Automations” in the main navigation.
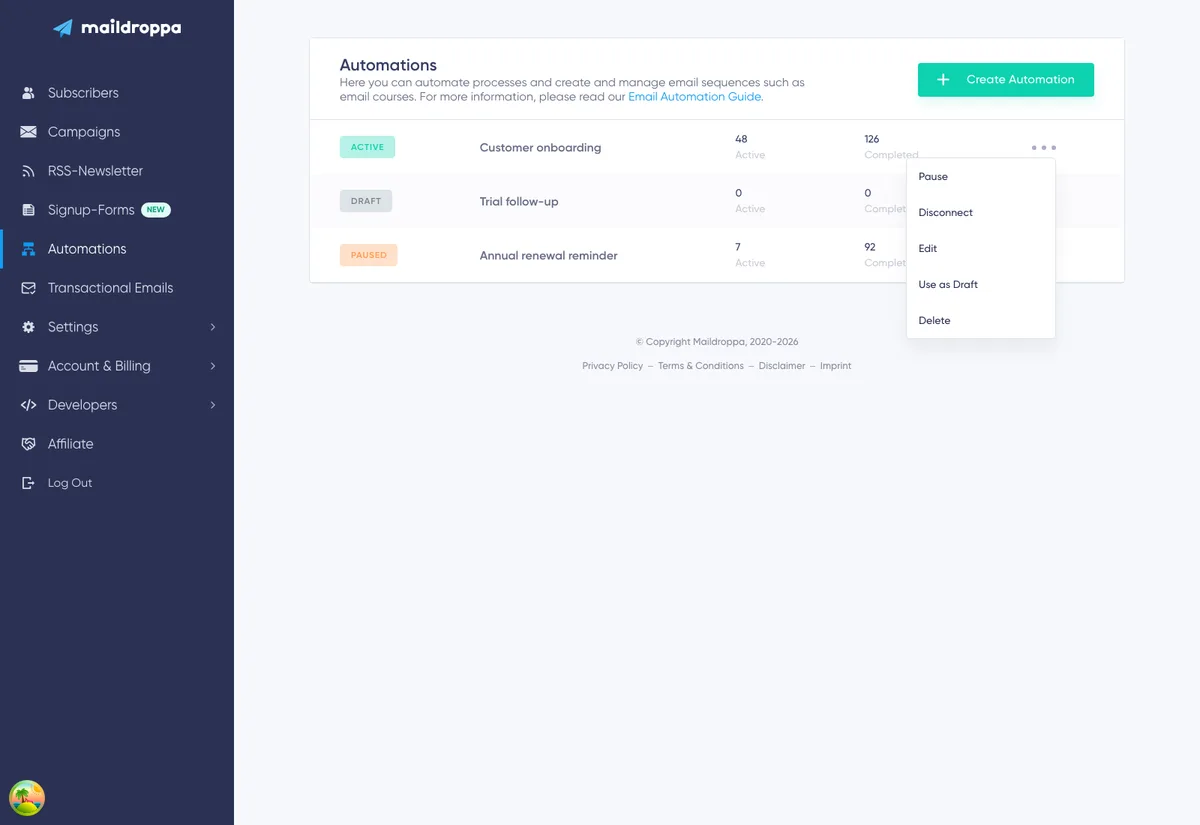
The overview lists every automation in your account. Each row shows its Status, Automation Name, number of Active Subscribers, number of Completed Subscribers, and an actions menu on the right.
Automation Statuses
The status tells you what the automation currently does.
Draft — The automation is still being prepared. It does not accept contacts or execute steps. You can continue editing it and activate it when it is ready.
Active — The automation is live. Matching triggers can start new runs, and contacts already inside continue through their steps.
Paused — No new contacts enter and contacts already inside do not move forward until you activate the automation again. An Inbound Webhook URL can still accept and log requests while paused, but those requests do not start runs.
Disconnecting — Starting triggers no longer accept new contacts, but contacts already inside continue their journeys. When the last active contact leaves, Maildroppa archives the automation automatically. A disconnecting automation is read-only.
Archived — The automation is finished and read-only. It no longer accepts contacts or executes steps. You can still view it or use it as the basis for a new draft.
Counts in the Overview
Active Subscribers is the number of contacts currently waiting at or moving through a step in that automation.
Completed Subscribers is the number of completed automation runs. If reentry is enabled, one contact can complete the same automation more than once, so this is a completion count rather than necessarily a unique-contact count.
Row Actions
Open the three-dot menu at the end of a row. Available actions depend on the current status:
- Active automations can be paused, disconnected, edited, copied as a draft, or deleted.
- Paused automations can be activated, disconnected, edited, copied as a draft, or deleted.
- Disconnecting and archived automations can be viewed, copied as a draft, or deleted.
- Drafts can be edited or deleted.
“Use as Draft” creates a separate editable copy. It does not reactivate or alter the original automation. If the source uses an Inbound Webhook URL, the secret URL is not copied into the new draft; the copy must receive its own URL.
Creating an Automation
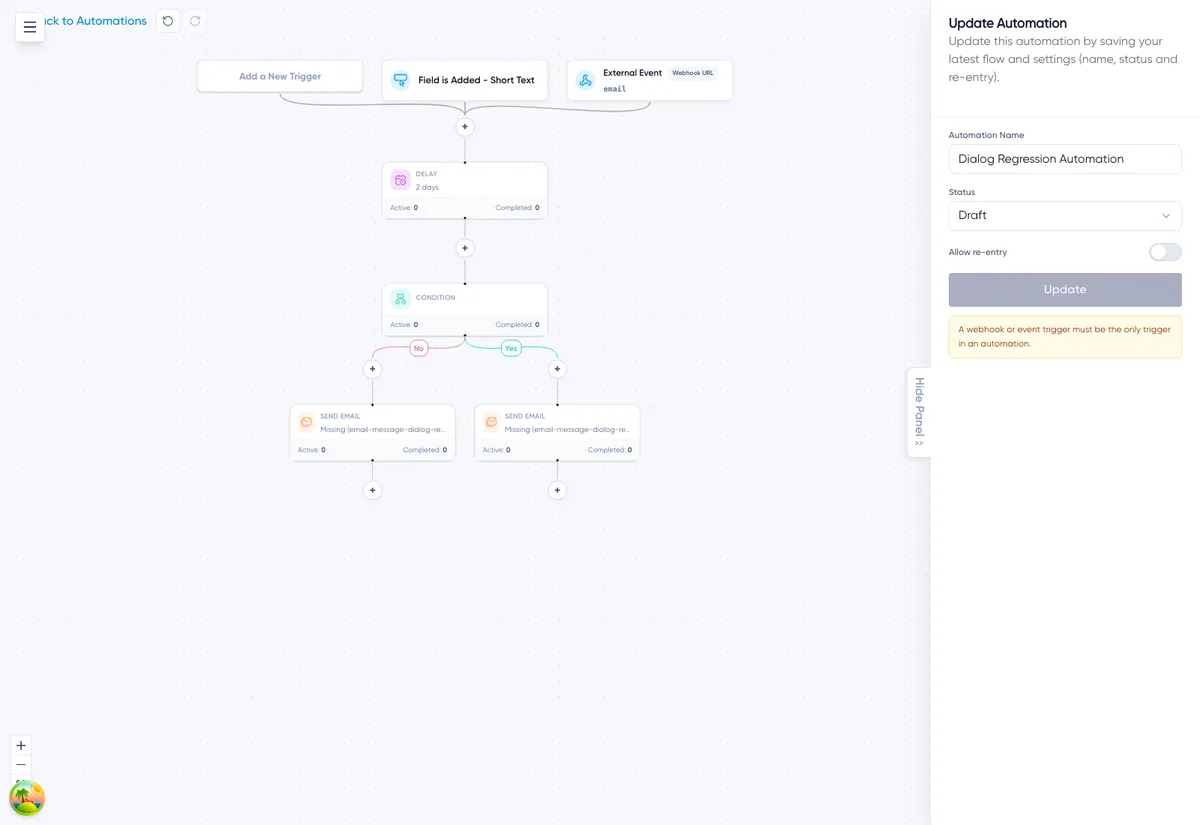
Click “Create Automation” to open the visual builder.
Every usable automation needs:
- A name.
- At least one trigger.
- At least one connected step.
- A complete route from the first step to the end of every branch.
The canvas contains plus buttons wherever a new step can be inserted. Click a plus button, choose a step type, and configure it. Hover over an existing trigger or step to edit or remove it.
Build and save the automation as a Draft while you are testing it. Activate it only after its triggers, content, conditions, links, delays, and integrations have been checked.
Triggers: How Contacts Enter an Automation
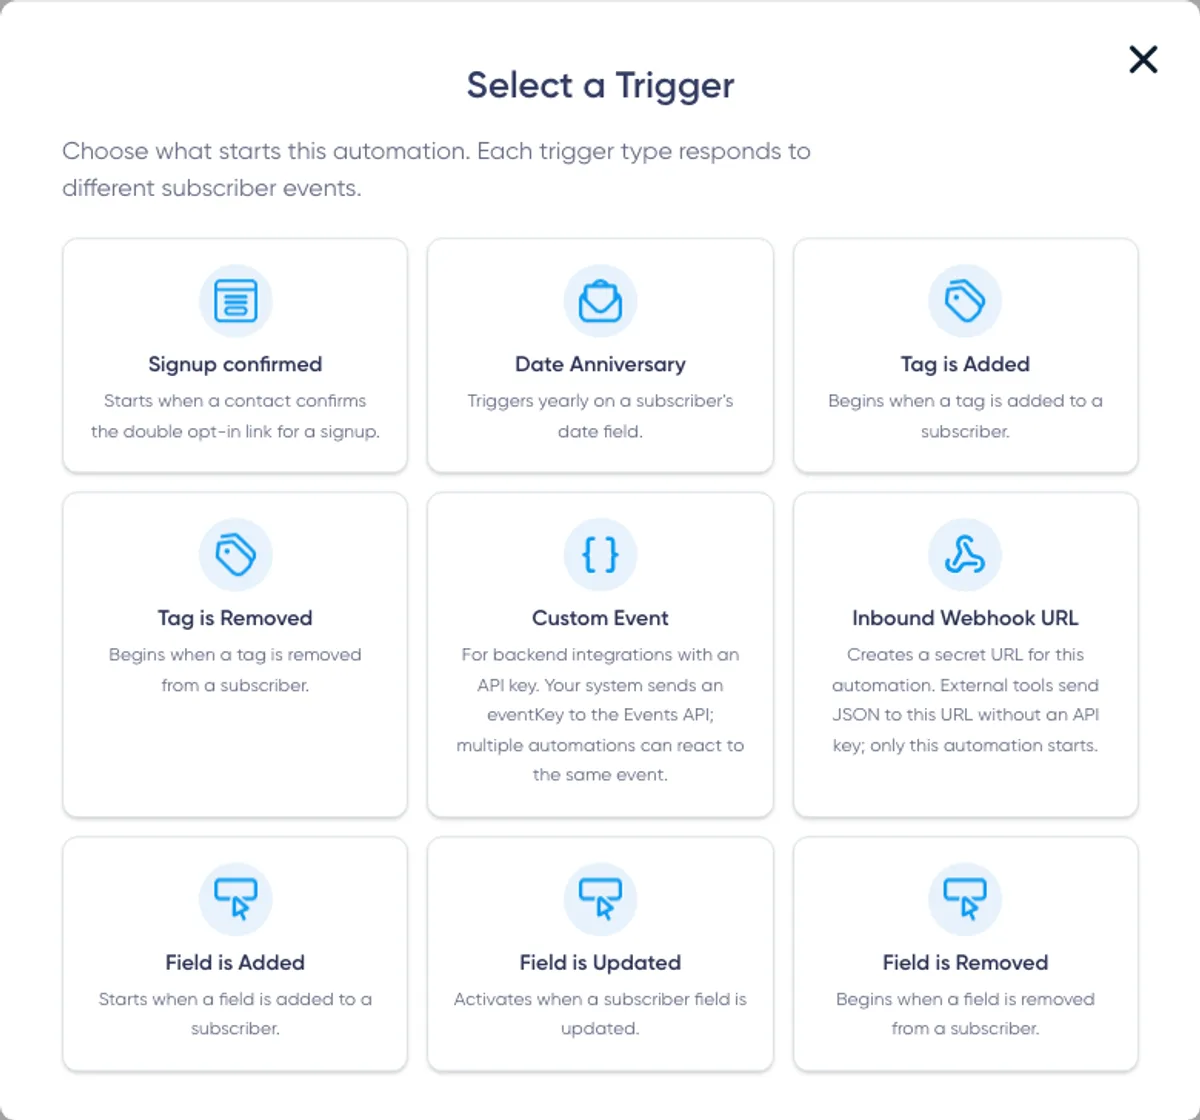
A trigger is the starting point of an automation. Maildroppa currently provides nine trigger types:
- Signup confirmed
- Date Anniversary
- Tag is Added
- Tag is Removed
- Custom Event
- Inbound Webhook URL
- Field is Added
- Field is Updated
- Field is Removed
General and Specific Triggers
Signup, tag, and field triggers can cover a broad source or one specific source.
For example, “Any Tag” reacts to every customer-created tag, while a trigger for “Webinar” reacts only when that tag is assigned. “Any Field” and a trigger for one selected field work in the same way.
An automation cannot contain a general trigger and a specific trigger of the same type at the same time. “Any Tag” already includes the “Webinar” tag, so adding both would create an overlap. Duplicate specific triggers are also not useful and are prevented.
You can add up to 30 standard triggers to one automation. A contact enters when any one of them matches. However, Custom Event and Inbound Webhook URL are special event-data triggers and follow stricter rules described below.
Signup Confirmed
This trigger starts only after a contact clicks the Double Opt-in confirmation link for a signup. A form submission by itself is not enough.
Choose the source scope that matches the journey:
- Form — Select one particular signup form.
- Signup flow — Select one particular Signup Flow.
- All sources — React to confirmed signups from every source.
Use a specific Form when the automation belongs to one placement, such as a webinar landing page. Use a specific Signup Flow when several forms intentionally share the same confirmation journey and follow-up. Use All sources only when every confirmed signup should receive the same automation.
For details about Double Opt-in messages, redirects, confirmation pages, and form assignments, see the Signup Flows guide.
Date Anniversary
Date Anniversary starts the automation every year on the month and day stored in a selected custom Date field.
For example, if the “Birthday” field contains 1988-04-12, the trigger can start on April 12 each year. The original year identifies the date but does not limit the trigger to that one year.
Only active Date fields can be selected. If no Date field exists yet, create one under Subscriber Fields and Tags before configuring this trigger.
Annual journeys normally need reentry enabled. Without reentry, a contact who already completed last year's birthday automation cannot enter it again this year.
Tag is Added and Tag is Removed
These triggers start when a customer-created tag is actually assigned to or removed from a contact. Choose “Any Tag” or one specific tag.
They are useful for interests, lifecycle stages, customer groups, webinar attendance, or manual follow-up queues. Current profile changes made in Maildroppa, supported individual API updates, and customer bulk tag actions can start these triggers.
Maildroppa reacts only to a real change. Assigning a tag a contact already has, or removing a tag the contact does not have, does not create a new tag-change event.
Tag changes performed by an automation step do not recursively start another tag-triggered automation. Use the explicit “Start Other Automation” action when one automation should intentionally hand a contact to another.
Field is Added, Field is Updated, and Field is Removed
These triggers react to changes in subscriber profile values. Each can watch “Any Field” or one selected field.
- Field is Added — A previously empty field receives a value.
- Field is Updated — An existing value changes to a different value.
- Field is Removed — A field value is cleared.
The distinction is useful. For example, adding a birth date for the first time can start one educational message, while changing it later can start a data-review process.
Profile edits made in the Maildroppa app and supported individual API updates can produce these events. Signup processing, imports, and changes made by another automation step do not start this trigger family. For a signup journey, use Signup confirmed instead.
Archived fields cannot be selected in new triggers. Existing references remain visible so an older automation can be understood and repaired, but restore or replace the field before activating an edited configuration.
For field types and archive behavior, see the Subscriber Fields and Tags guide.
Custom Event and Inbound Webhook URL
Both event-data triggers let an external system start an automation and supply temporary data for that individual run. They serve different integration styles.
| Custom Event | Inbound Webhook URL | |
|---|---|---|
| Best for | A backend integration that sends named business events | A tool that can send JSON to a unique URL |
| Address | Central Events API endpoint | Secret URL created for one automation |
| Authentication | X-API-Key header | Secret access token inside the URL path |
| Routing | eventKey decides which automations react | The URL identifies exactly one automation |
| Reuse | Several automations can react to the same event key | The URL belongs only to its automation |
| Test mode | Send triggerAutomations: false | Requests are test data until activation |
An event-data trigger must be the only trigger in its automation. You cannot combine Custom Event or Inbound Webhook URL with Signup confirmed, a tag trigger, a field trigger, Date Anniversary, or a second event-data trigger. This rule ensures event properties are available reliably in every email and condition in the flow.
Event data belongs to one automation run. It does not automatically become permanent subscriber profile data. Add an Update Field step if selected information should also be stored on the contact.
Setting Up a Custom Event Trigger
Choose “Custom Event” when your server can call the Maildroppa Events API with an API key.
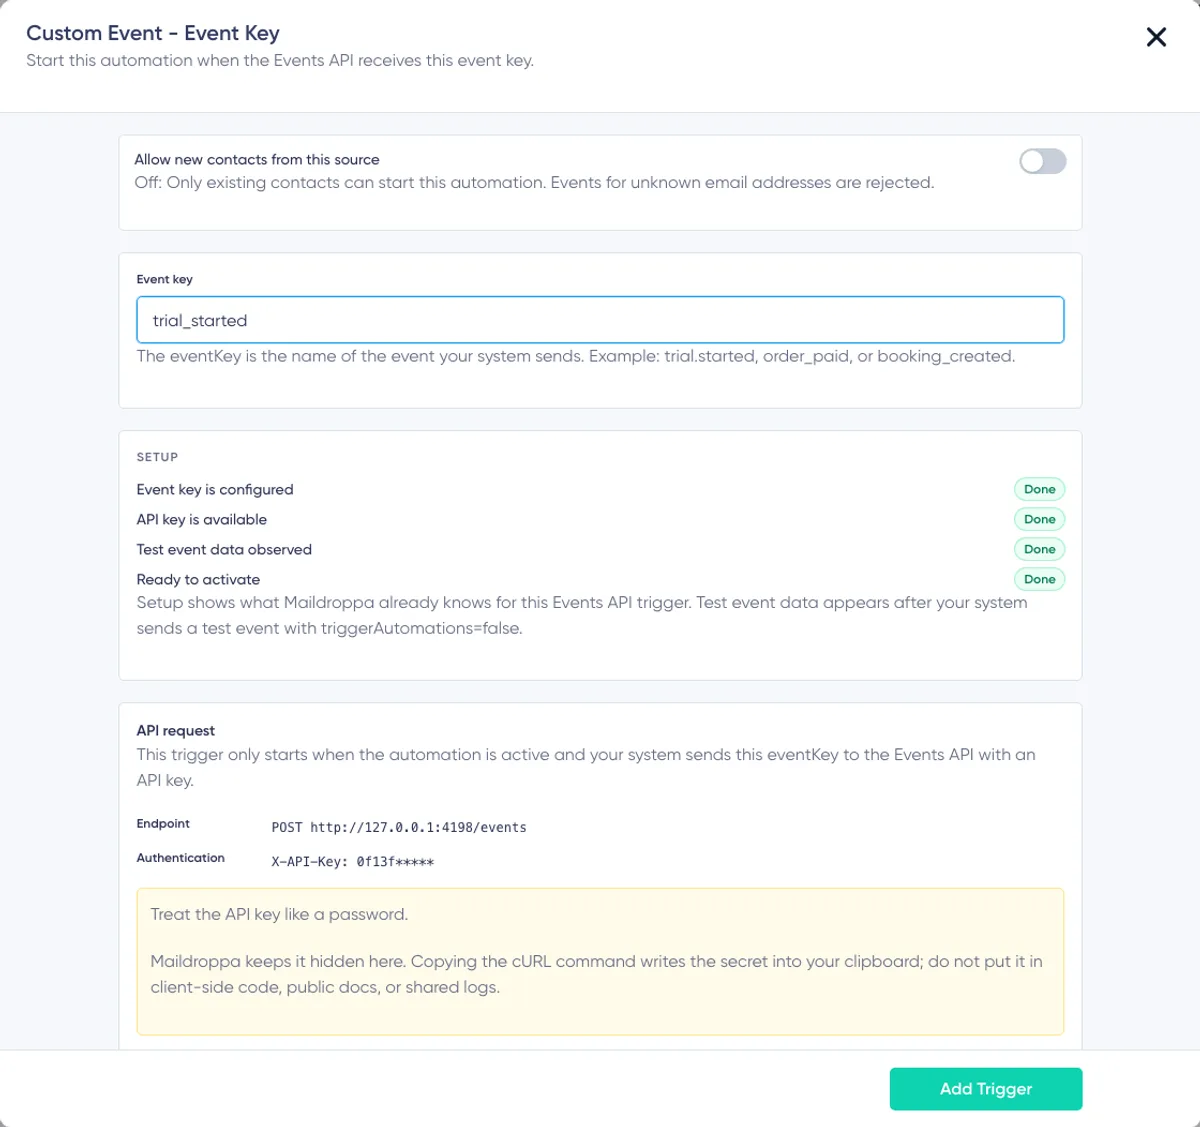
Step 1: Choose the Event Key
Enter a stable business event name, such as:
trial.startedorder_paidbooking_created
The event key may contain letters, numbers, dots, underscores, and hyphens. Matching is exact, so order_paid and order.paid are different events. Keep the name stable after your integration has been deployed.
Step 2: Decide Whether New Contacts Are Allowed
Use “Allow new contacts from this source” to control unknown email addresses.
- When it is off, only an email address that already belongs to a Maildroppa contact can start the automation. Unknown addresses are rejected.
- When it is on, Maildroppa creates a contact for an unknown email address and then starts the automation.
Leave it off when the sending system should only enrich or react to contacts already managed in Maildroppa. Turn it on only when the external event is an approved contact-creation source and your process has the necessary permission.
Step 3: Create or Use the API Key
The setup checklist shows whether an API key is available. If necessary, create it from the trigger setup.
Treat the API key like a password. Use it only in server-side code. Do not put it into browser JavaScript, a public repository, screenshots, support tickets, public documentation, or shared logs. Copying the example cURL command also copies the secret into your clipboard.
The request is sent to:
POST https://api.maildroppa.com/events
with the header:
X-API-Key: YOUR_API_KEY
For general key security and rotation, see the API Key guide.
Step 4: Send a Test Event
Send the event with triggerAutomations set to false. This lets Maildroppa observe the event properties without starting a live automation.
{
  "eventKey": "trial.started",
  "email": "contact@example.com",
  "properties": {
    "planName": "Professional",
    "trialDays": 14,
    "salesAssisted": false
  },
  "occurredAt": "2026-07-16T08:00:00Z",
  "triggerAutomations": false
}
Properties must be a flat object. Values can be strings, numbers, booleans, or null. Property names can contain letters, numbers, underscores, dots, and hyphens. The serialized properties object can be up to 64 KiB.
Maildroppa displays observed properties in the trigger setup. They then become selectable in email personalization and under Event data in conditions. For example, planName can be inserted into an email as {{event.planName}}.
Step 5: Complete the Checklist and Activate
The Custom Event checklist confirms:
- Event key is configured.
- API key is available.
- Test event data was observed.
- The trigger is ready to activate.
After the automation is active, send production events with triggerAutomations set to true. The event key must match exactly. Event properties are stored with that automation run and remain available throughout its steps.
Setting Up an Inbound Webhook URL Trigger
Choose “Inbound Webhook URL” when an external application can send a JSON POST request but should not use your account-wide API key.
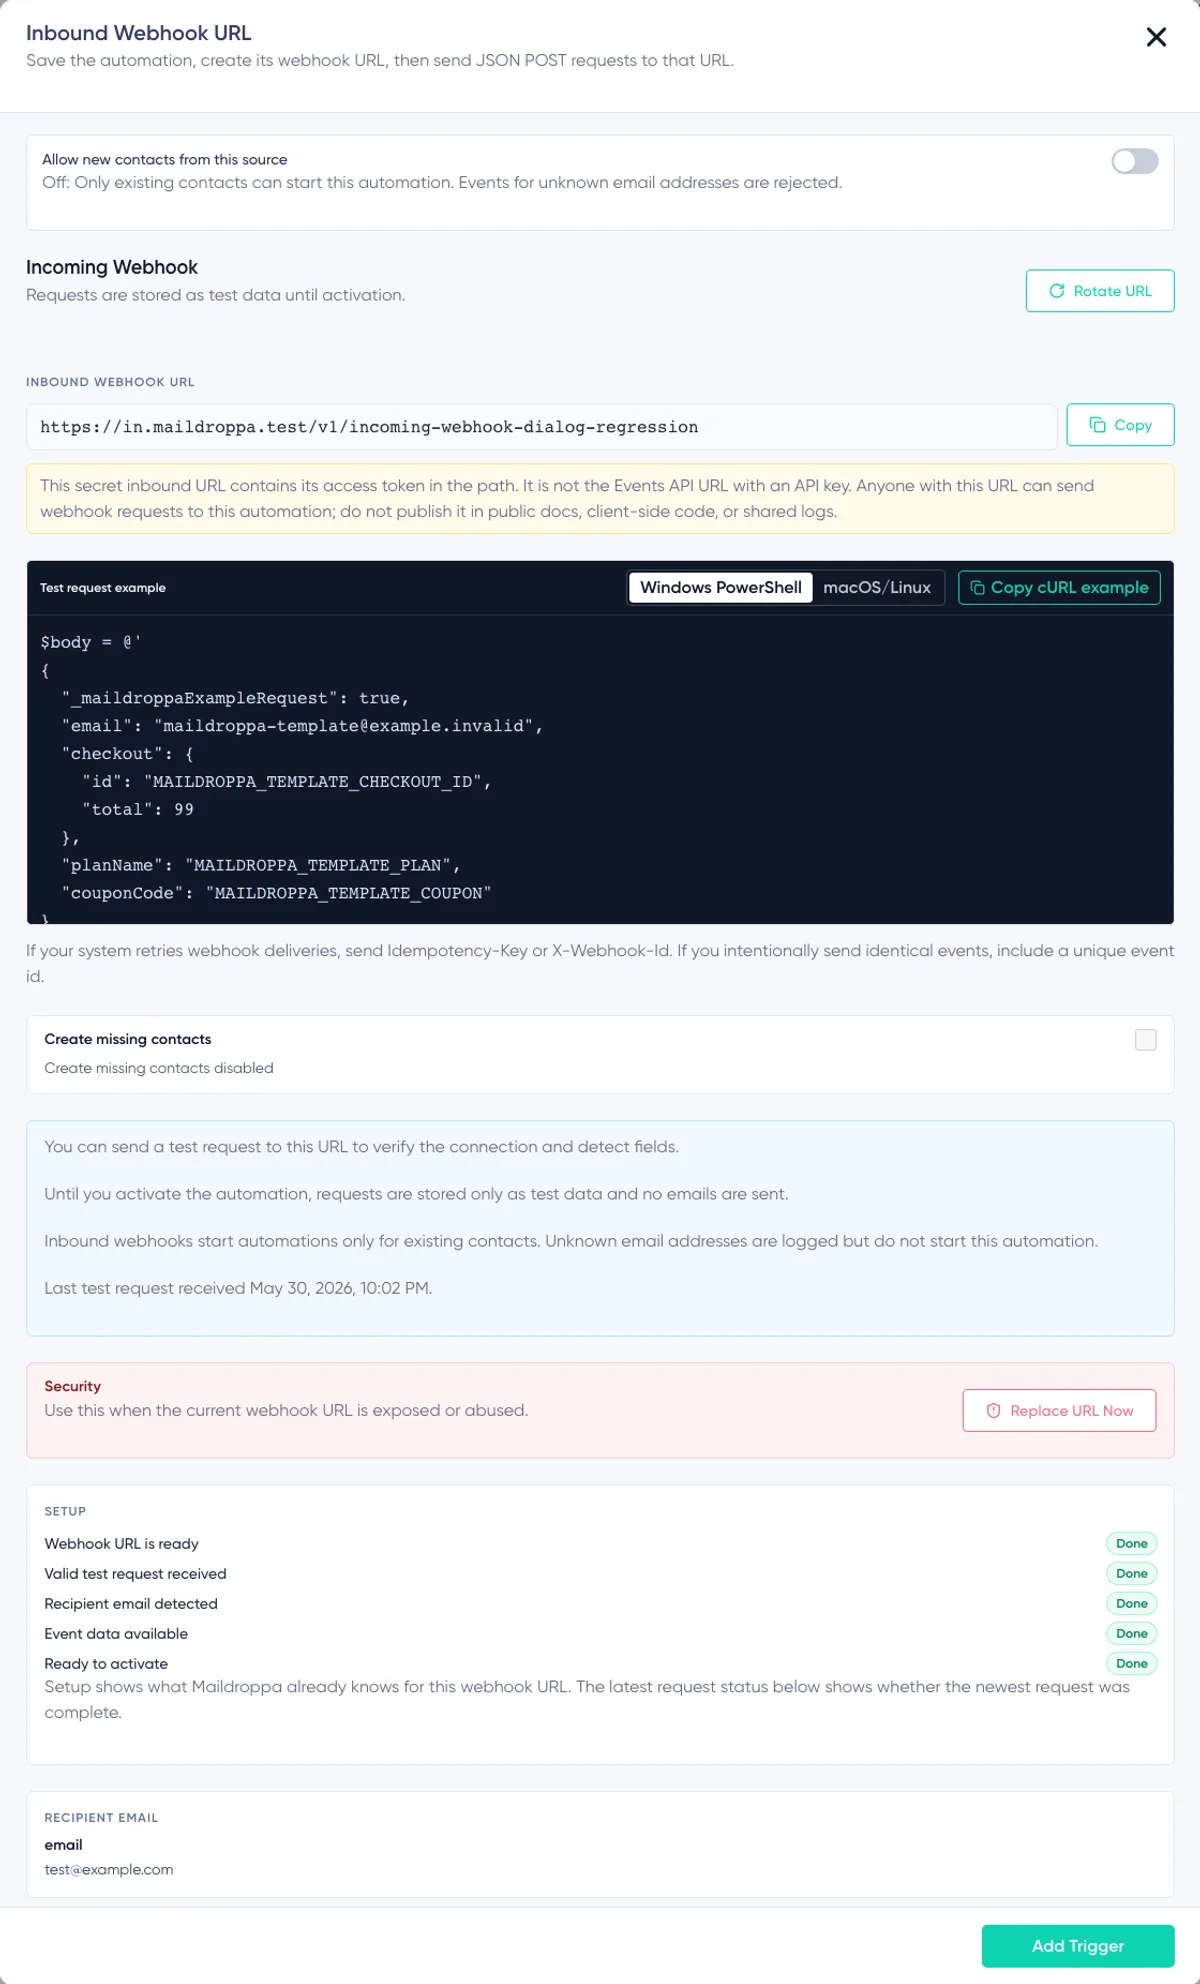
Maildroppa creates a unique secret URL for this automation, for example:
https://in.maildroppa.com/webhooks/inbound/SECRET_TOKEN
The token in the path grants access. No API key is required, and only the automation attached to this URL can start.
Step 1: Create the URL
Add the Inbound Webhook URL trigger and save the automation when requested. Maildroppa then creates and displays its URL.
Copy the URL into the external system's webhook settings. Treat the complete URL like a password. Do not publish it, place it in client-side code, or include it in ordinary shared logs.
Step 2: Send a JSON Test Request
The setup provides ready-to-copy examples for macOS/Linux and Windows PowerShell. Send one webhook request for one contact. The payload must contain a valid recipient email somewhere Maildroppa can identify.
For example:
{
  "email": "contact@example.com",
  "checkout": {
    "id": "checkout_123",
    "total": 99
  },
  "planName": "Professional"
}
Before activation, accepted requests are stored only as short-lived test data. They do not start the automation and do not send emails.
If the external system automatically retries requests, send an Idempotency-Key or X-Webhook-Id header. This helps Maildroppa recognize the same delivery instead of starting the same event twice. If two otherwise identical events are intentional, give each one its own event ID.
Step 3: Select the Recipient Email
Maildroppa examines the latest valid test request and looks for possible email fields.
- If one clear field is found, it can be selected automatically.
- If several possible fields are found, choose the one that identifies the contact.
- If none is found, adjust the payload and send another test request.
The selected path belongs to the webhook contract. Send one request per recipient rather than an array of recipients.
Step 4: Decide Whether Missing Contacts Are Created
When “Create missing contacts” is disabled, only existing contacts start the automation. Unknown email addresses are logged but do not start a run.
When it is enabled, Maildroppa creates a new contact for a valid unknown email address and then starts the automation. Enable this only when the inbound source is allowed to create contacts.
Step 5: Review Event Data
Maildroppa lists usable values observed in the test payload. These suggestions are not a permanent, complete schema. If a required field is missing, include it in a new test request and refresh the test data.
The recipient email receives special handling and is not duplicated as an event-data property. Lists, sensitive-looking values, deeply nested values, empty objects, unsafe property names, or fields beyond the supported detection limits may also be excluded.
Observed fields become available in emails as merge tags and in conditions under Event data. Their values are captured separately for each live automation run.
Step 6: Complete the Checklist and Activate
The setup checklist shows whether:
- The webhook URL is ready.
- A valid test request was received.
- A recipient email was detected or selected.
- Event data is available when the flow uses it.
- The webhook is ready to activate.
When you activate the automation, Maildroppa removes the setup samples. New requests can then start real runs.
URL Status and Security
An inbound URL can have these states:
- Pending — Requests are stored as setup data and do not start runs.
- Live — Valid requests can start the active automation.
- Paused — Requests are accepted and logged but do not start runs.
- Revoked — The URL was permanently disabled and no longer starts runs.
- Expired — Setup was not activated in time. Create a new URL and test it again.
Use “Rotate URL” for a planned change. Maildroppa creates a new URL while the previous one remains valid for 24 hours, giving you time to update the external application.
Use “Replace URL Now” only if the current URL was exposed or abused. It disables the old URL immediately and cannot be undone. Update the sender with the newly generated URL before expecting more events.
Adding and Editing Steps
Click a plus button below a trigger or between existing steps. The first dialog offers four main choices:
- Action
- Delay
- Condition
Action and Delay open a second selection with their individual step types.
To edit a step, hover over it and select the edit icon. To remove it, select the delete icon and confirm the warning. Removing a step from an automation that already has active contacts can remove contacts waiting on that step, so review active flows carefully.
Action Steps
The Action category contains seven actions.
Update Field
Select a subscriber field and enter the new value. The input adapts to the field type, including choice and multi-select fields.
Use this to store a lifecycle stage, record a preference, or preserve selected information after a contact reaches a milestone. Archived fields cannot be selected for a new action.
Add Tag
Select a customer-created tag to assign to the contact. System tags are not available for this action.
Use tags for internal organization, segmentation, and later campaign selection. Adding an already assigned tag leaves the profile unchanged.
Remove Tag
Select a customer-created tag to remove. If the contact does not have it, the step can continue without creating a change.
Start Other Automation
Select another suitable automation and start it for the same contact.
This is the explicit way to connect smaller reusable journeys. Maildroppa excludes invalid targets and checks automation dependencies to prevent cycles such as Automation A starting Automation B while Automation B starts Automation A.
The target automation's reentry rules still apply. A contact who is already active there cannot start a second simultaneous run.
Stop Other Automation
Select another automation in which this contact should stop progressing. This is useful when a later event makes an older nurture sequence irrelevant.
Send Webhook
Send Webhook makes a signed JSON POST request when the contact reaches this step. It is an outgoing action and is different from the incoming Inbound Webhook URL trigger.
Configure:
- A public HTTPS target URL.
- Optional custom headers for server-side authentication.
- All supported subscriber fields or a selected set of fields.
- The account webhook Signing secret.
The dialog displays a payload preview before you save. Send a test webhook to verify the endpoint, then inspect the delivery result and later production delivery history from the step.
Subscriber data is sent in the JSON body. Keep the target URL static; do not place personal data or secrets in query parameters. Production deliveries run in the background and retry temporary failures. A test request is sent once and is not retried.
If the receiver returns 410 Gone, Maildroppa disables delivery for that step because the endpoint has explicitly said it no longer exists. Correct the receiver or URL, then use “Re-enable” in the step.
Automation webhooks and account-wide developer webhooks use the same Signing secret. For signature verification, retry behavior, target requirements, and secret rotation, see the Webhooks guide.
Unsubscribe
Unsubscribe changes the contact to unsubscribed from all emails. It is a terminal step, so no later step can follow it on that path.
Use it only when the automation represents a clear unsubscribe decision or a policy you have deliberately designed. Do not use it merely to stop one automation; use Stop Other Automation for that.
Delay Steps
Delays control when a contact reaches the next step.
Fixed Delay
Enter an amount and choose Minutes, Hours, Days, Weeks, or Months.
The minimum delay is five minutes. All other units require an amount of at least one. A fixed delay starts when the contact reaches the step, so two contacts can wait at different calendar times even though they use the same duration.
Date Field Delay
Select an active custom Date field. The contact waits until the date stored in that field is reached.
You must also decide what happens if the contact has no value in that field:
- Proceed Immediately — Skip the wait and continue to the next step.
- Wait Indefinitely — Keep the contact at this step until a value becomes available.
- Remove Subscriber — End this contact's current automation run.
Choose deliberately. “Wait Indefinitely” can leave contacts active for a long time, while “Remove Subscriber” ends their journey without executing later steps.
Creating an Email Directly in the Automation
The Email step now opens a complete email editor inside the automation workflow. You no longer need to create a separate Transactional Email and then select it from a dropdown.
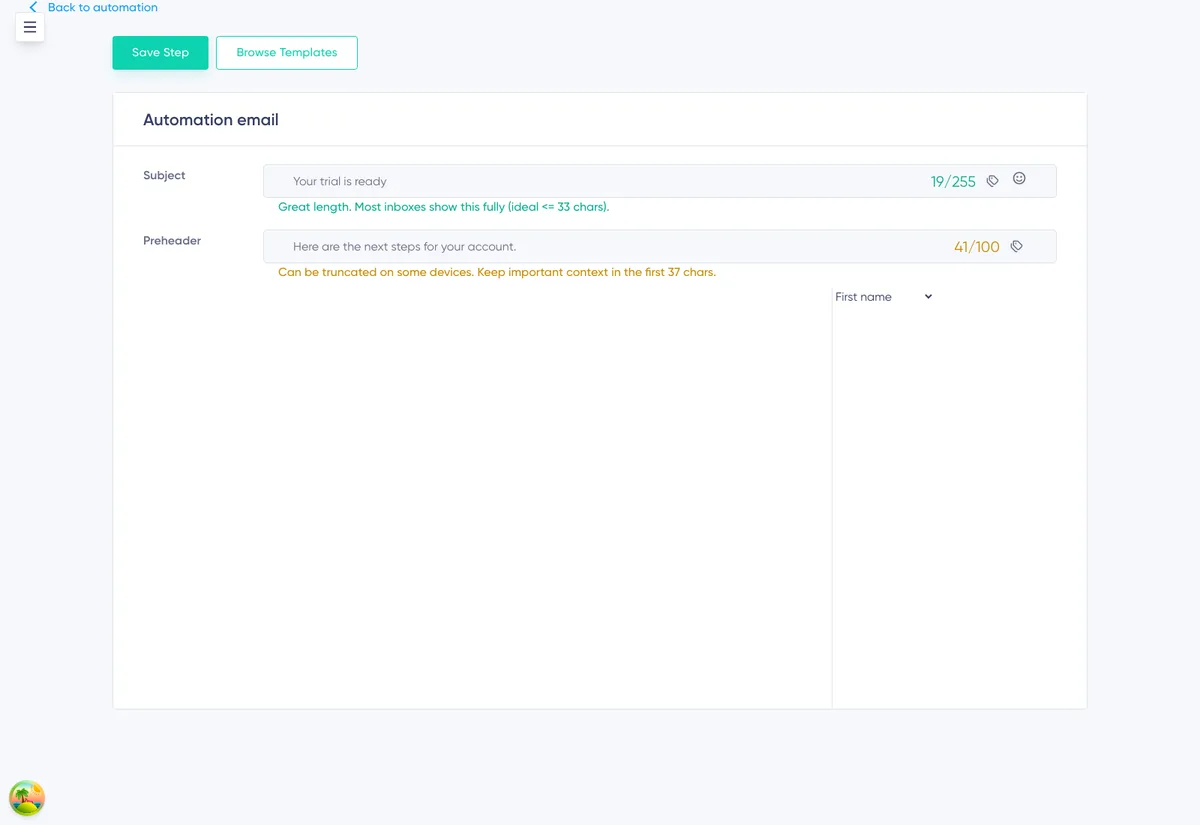
Enter a Subject and optional Preheader, then build the email body in the visual editor. You can drag content blocks into the message, configure its appearance, or click “Browse Templates” to start from an existing design. Click “Save Step” to return the finished message to the automation canvas.
The account's standard Maildroppa footer is included in the email. Configure its global appearance on the Footer Style page.
Subject and Preheader
The Subject is required and can contain up to 255 characters. The Preheader is optional and can contain up to 100 characters.
Keep the important part near the beginning because inboxes often truncate both. The editor displays length guidance while you type.
Templates and Content Blocks
“Browse Templates” opens templates suitable for email messages. Selecting one replaces the current body design, so choose a template before doing extensive manual work.
In the visual editor, use structures and content blocks for text, images, buttons, spacing, social links, and other supported content. Preview links, mobile layout, sender identity, footer contrast, and the final copy before activation.
Personalization
Use subscriber personalization fields for information stored on the contact.
When the automation starts from Custom Event or Inbound Webhook URL, observed event properties are also available as personalization tags. For example:
Your {{event.planName}} trial has started
Event values come from the individual run that reached the email. If a property is required, make sure your test payload includes it and every production sender follows the same contract.
Adding a Lead Magnet to an Automation Email
Automation emails can deliver a lead magnet immediately after a confirmed signup. A lead magnet can be a protected uploaded file or a URL offer managed in Maildroppa.
Lead magnet delivery is available only when every trigger in the automation is “Signup confirmed” for a specifically selected Signup Flow. It is not available with All sources, a direct Form scope, Date Anniversary, tag or field triggers, Custom Event, or Inbound Webhook URL. This strict relationship ensures the download belongs to a completed Double Opt-in journey with a known Signup Flow.
To add a lead magnet:
- Add or edit an Email step in a qualifying automation.
- Open “Lead magnet delivery”.
- Select the file or URL offer.
- In the email body, create a button or text link.
- Use the “Lead magnet URL” personalization tag as that link's destination.
- Save the Email step and then save the automation.
Maildroppa uses the merge tag {{ lead_magnet_url }} internally and replaces it at send time with a protected Maildroppa download link.
The tag must be used as a link target in the email body. Do not place it in the Subject, Preheader, visible text, or another non-link location. The editor prevents saving a selected lead magnet without a valid download link, and it also prevents a lead magnet URL tag without a selected offer.
The protected link remains stable. If you later replace the file or change the offer's target, links in already sent emails continue to work and resolve to the current target.
Condition Steps
A Condition evaluates data when a contact reaches the step and divides the journey into two paths:
- YES — The complete expression matches.
- NO — The expression does not match.
Conditions can use subscriber fields, tags, and segments. In a Custom Event or Inbound Webhook automation, they can also use observed Event data.
Combining Filters
Conditions use filter groups:
- Filters inside the same group are joined with AND. Every filter in that group must match.
- Separate groups are joined with OR. Matching one complete group is enough.
For example:
Group 1
- Country equals Germany
- AND tag contains Customer
OR Group 2
- Event data
planNameequals Professional - AND Event data
trialDaysis greater than 7
If either complete group matches, the contact follows YES. Otherwise, the contact follows NO.
Event-Data Conditions
The Event data option appears only when the automation has a Custom Event or Inbound Webhook URL trigger and Maildroppa has observed usable properties.
If a property is missing, send another Custom Event test with triggerAutomations: false, or send another inbound webhook test request before activation. Inbound Webhook conditions can be previewed against the accepted test sample during setup.
Event data is evaluated from the run snapshot, not from the contact profile. Updating a similarly named subscriber field does not change the event value captured when the run started.
Building More Than Two Paths
Each individual Condition has only YES and NO branches. To create a country switch, pricing-plan switch, or other multi-path flow, connect another Condition to the NO branch and continue until the final fallback path.
Saving, Activating, and Reentry
When the flow is complete, save it as a Draft or activate it.
Give the automation a clear unique name such as “Confirmed Signup - Main Welcome”, “Annual Birthday Offer”, or “Trial Started - Professional”. A specific name makes versions and cross-automation actions much easier to recognize.
Allow Reentry
Reentry controls whether a contact who completed the automation in the past can enter again.
- With reentry off, a completed contact cannot start the same automation again.
- With reentry on, the contact can enter again after a later matching trigger.
A contact cannot have two simultaneous active runs in the same automation. Even with reentry enabled, Maildroppa allows a maximum of 10 completions per contact, per automation, per day.
Enable reentry for genuinely repeatable journeys such as annual anniversaries or repeat purchases. Leave it off for one-time onboarding or a lead magnet that should be delivered only once.
Activation Checks
Before an automation becomes active, Maildroppa checks the complete configuration. Depending on the flow, this includes:
- Trigger and step completeness.
- Connected branches and a valid start step.
- Invalid cycles or automation dependencies.
- Email content and personalization syntax.
- Lead magnet assignment and download-link placement.
- Custom Event API key and observed test data.
- Inbound webhook URL, test request, recipient email, and referenced event fields.
- Outgoing webhook Signing secret.
Resolve every open setup item rather than activating with an untested assumption.
Editing an Active Automation
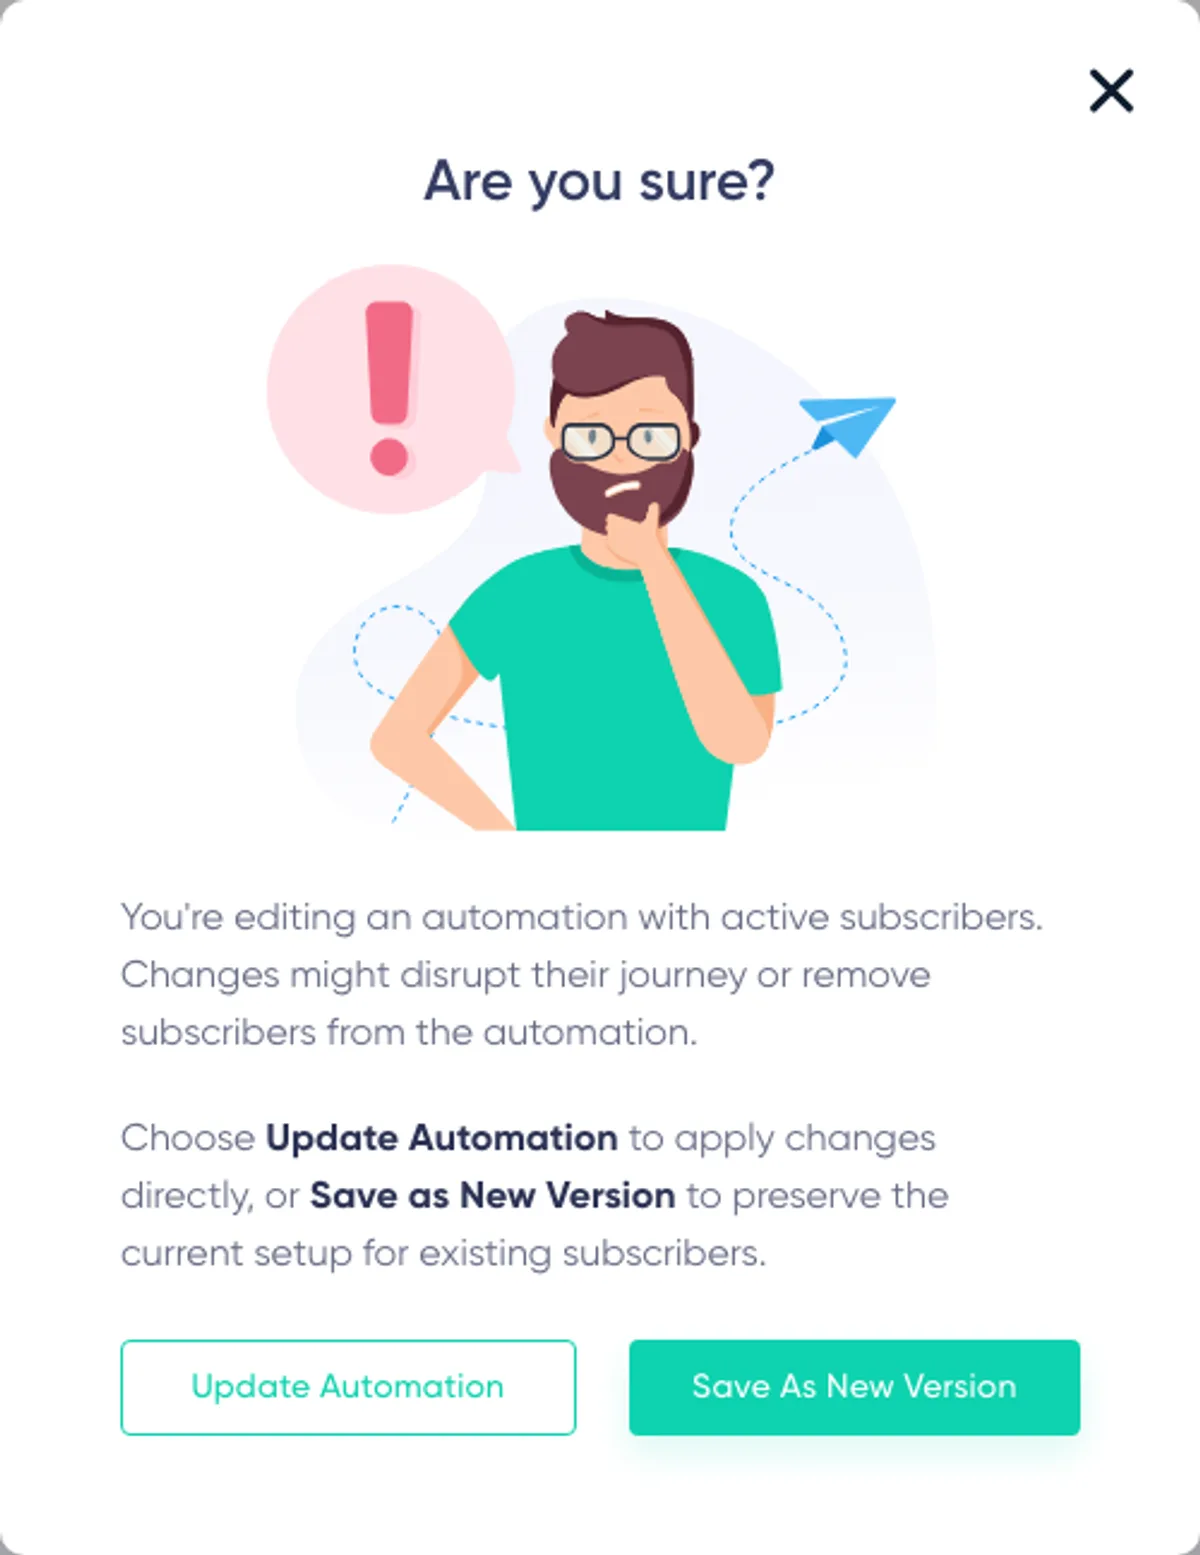
You can open an Active or Paused automation in the editor. If active contacts may be affected, saving offers two choices.
Update Automation
This applies the changes directly to the current automation.
Use it for small, safe corrections when you understand where active contacts are waiting. Removing or replacing a step can disrupt their journey or remove contacts from the automation.
Save as New Version
This preserves the current setup for contacts already inside it and creates a new active version for future entries.
The previous version moves to Disconnecting. Its triggers stop accepting new contacts, but its active contacts continue through the unchanged flow. It becomes Archived after the last contact finishes. The new version receives new entries.
Use this option for structural changes, new sequences, changed delays, major condition changes, or a replacement of an email that contacts are already approaching.
Pausing, Disconnecting, Copying, and Deleting
Pause When You Intend to Resume
Pause an automation to stop new entries and temporarily freeze active contacts. Activate it again when the issue or planned interruption is over.
Pause is useful while correcting a destination, checking an email, or temporarily stopping a time-sensitive journey. Remember that inbound webhook requests received while paused do not become delayed runs; they are accepted and logged without starting the automation.
Disconnect When Existing Contacts Should Finish
Disconnect an automation when no new contacts should enter but contacts already inside should finish normally. This is usually safer than deleting a live journey.
Use as Draft for a New Journey
Use as Draft when the structure is useful but the new automation should be independent. Rename the copy, review every trigger, recipient-facing message, action target, webhook, delay, and condition before activating it.
Delete Carefully
Deleting is permanent. An automation that is still referenced by another automation may need those references removed first. For a live journey, consider Pause, Disconnect, or Save as New Version before deletion.
Practical Setup Checklist
Before activating, review the automation from a contact's perspective:
- Does each trigger represent the exact event that should begin the journey?
- If several standard triggers exist, are their scopes non-overlapping and intentional?
- Is reentry appropriate for this use case?
- Does every branch lead somewhere sensible?
- Are the delay durations correct, and does every Date Field Delay handle a missing value appropriately?
- Have all email subjects, preheaders, links, personalization tags, and mobile layouts been checked?
- If a lead magnet is selected, is its protected tag used as a body link target?
- If event data is used, did the test request contain every required property?
- Are webhook URLs and secrets stored only in appropriate server-side systems?
- Have outbound webhook previews and tests succeeded?
- Would Update Automation disrupt active contacts, making Save as New Version safer?
- Is there a clear way to pause or disconnect the journey if an external dependency fails?
Start with a small, understandable flow and add complexity only when it serves a clear subscriber journey. Clear triggers, short branches, deliberate delays, and focused emails are easier to test and usually create a better experience than one enormous automation.
Ready to Send Better Emails?
Stop juggling bloated tools or overpriced plans. Maildroppa offers personal support, privacy-conscious controls, and powerful email marketing - starting free forever.
No credit card required. No time limit.