Contents
the email tool that makes email marketing simple


Manage Subscriber Fields and Tags
Published: · Last updated: · By Marcus Biel
In brief
Learn how to create choice and multi-select subscriber fields, manage tags, archive or restore data, and add or remove tags in bulk.
Subscriber Fields and Tags help you store useful information about subscribers and organize your audience.
A Subscriber Field stores a value, such as a first name, birthday, country, customer number, or a set of interests. A Tag is a label, such as “Customer”, “Webinar 2026”, or “VIP”. Fields are best for structured data that describes a subscriber. Tags are best for grouping subscribers by source, activity, or business meaning.
Maildroppa uses fields and tags throughout the application. You can add fields to Signup Forms, import field values, personalize email content, create Segments and send filters, and use fields or tags in Automations. You can also add or remove several tags for many subscribers in one action.
The page now separates active and archived data. Archiving hides a field or tag from new use without immediately deleting stored subscriber data. If you no longer need the archived item, you can review its usage and permanently delete it in a separate step.
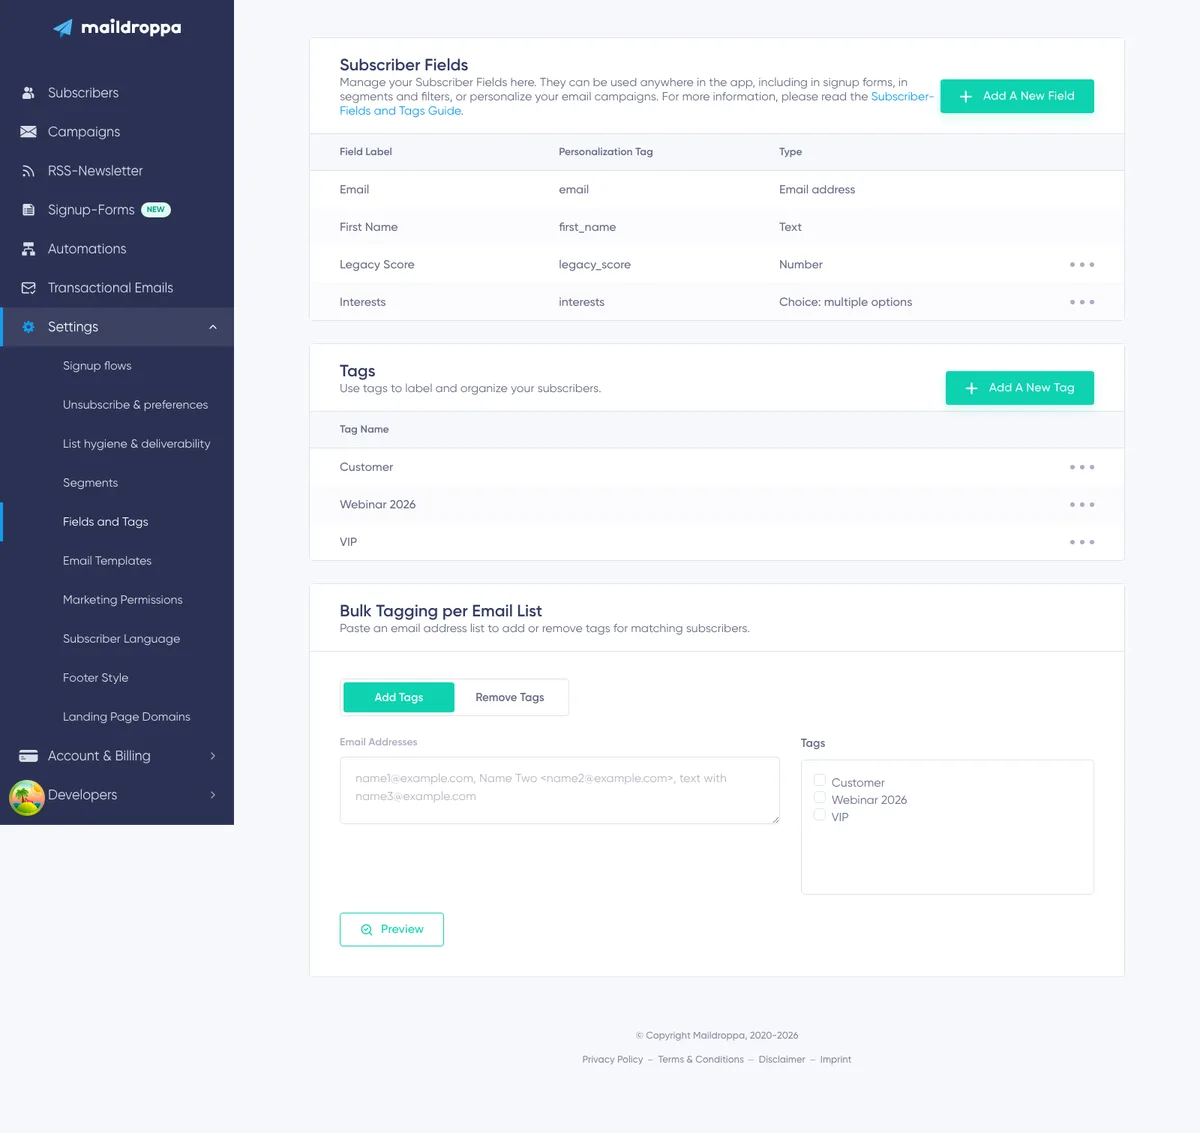
Opening the Subscriber Fields Page
Open “Settings” and select “Subscriber Fields”.
You can also open the page directly at:
https://app.maildroppa.com/settings/subscriber-fields
Depending on the data in your account, the page can contain the following sections:
- Subscriber Fields
- Archived Fields
- Tags
- Archived Tags
- Bulk Tagging per Email List
- System Tags
The Archived Fields and Archived Tags sections only appear when at least one corresponding item is archived. The System Tags section only appears when system-generated tags exist in the account.
Subscriber Fields and Tags Are Different
It is helpful to decide whether information should be stored in a field or represented by a tag before you create it.
Use a Subscriber Field for a Value
Use a field when each subscriber has a value that follows a defined format.
Examples include:
- First name
- Date of birth
- Customer number
- Preferred language
- Country
- Favorite product category
- Several selected interests
Fields can validate the type of data that is stored. A Date field accepts a date, a Number field accepts a number, and a choice field only accepts one or more of its predefined options.
Fields also have a stable Personalization Tag. You can insert that tag into supported email content and Maildroppa replaces it with the stored value for the recipient.
Use a Tag for Membership in a Group
Use a tag when the important question is whether a subscriber belongs to a group.
Examples include:
- Lead
- Customer
- VIP
- Registered for Webinar
- Downloaded Guide
- Interested in Product A
A subscriber either has the tag or does not have it. A tag does not store free text, a date, or a number.
Tags are particularly useful for Segments, Automation triggers and actions, Signup Form assignments, link-click actions, imports, and manual subscriber organization.
A Simple Decision Example
If you need to store one country for every subscriber, create a “Country” choice field. If you only need to identify the subscribers who attended a particular event, create an “Attended Berlin Event” tag.
Planning the structure before collecting data helps keep your account understandable and prevents several tags from being used as an improvised field.
Collect Only the Data You Need
Every additional field increases the amount of personal data you store. It can also make a Signup Form longer and reduce the number of people who complete it.
Before creating a field, ask:
- Do we need this information for a defined purpose?
- Have we told subscribers why we collect it?
- How long should we keep it?
- Who needs access to it?
- Could the same goal be achieved with less data?
If your organization is subject to data-protection laws such as the GDPR, make sure your collection, storage, access, and deletion processes meet your legal obligations. Maildroppa provides the tools described in this guide, but the correct legal basis and retention period depend on your organization and use case.
Understanding Subscriber Fields
The active Subscriber Fields table shows these characteristics for every field:
- Field Label
- Personalization Tag
- Type
Built-in fields are listed together with your custom fields, but they cannot be edited or archived.
Field Label
The Field Label is the readable name shown inside Maildroppa. It also becomes the initial label when you add the field to a Signup Form or subscriber profile.
Examples include “First name”, “Birthday”, or “Favorite topics”. A field label can contain up to 255 characters, but a short and unambiguous label is easier to understand in forms, Segments, imports, and Automations.
You can change the label of a custom field later. Changing the label does not change its Personalization Tag or field type.
Personalization Tag
The Personalization Tag is the stable identifier used for imports, integrations, field references, and personalized email content.
For example, a field labeled “Favorite topics” can receive the Personalization Tag favorite_topics. In supported email content, you can use it as {{favorite_topics}}.
Maildroppa creates an available Personalization Tag automatically from the field label. It uses lowercase ASCII letters, numbers, and underscores. If the generated name already exists, Maildroppa creates a unique variation.
The Personalization Tag is not editable after the field has been created. This prevents existing forms, imports, integrations, content, and Automations from silently pointing to a different field.
Field Type
The field type defines which values Maildroppa accepts and how the value can be used. Choose it carefully because the type cannot be changed after the field has been created.
Maildroppa supports these field types:
| Field type | What it stores |
|---|---|
| Text | A single line of text with up to 255 characters. |
| Textarea | Longer, multi-line text with up to 16,000 characters. |
| Email address | An additional validated email address. It does not replace the subscriber's primary email address. |
| Number | A numeric value, including decimal values. |
| Date | A calendar date without a time of day. |
| Yes/No | A boolean value: yes or no. |
| Choice: one option | Exactly one value from a list of predefined options. |
| Choice: multiple options | Several values from a list of predefined options. |
Older Maildroppa guides described Radio Button, Checkbox, and Dropdown as field types. In the current model, the data type and its visual presentation are separate.
For example:
- A “Choice: one option” field can be displayed as a dropdown or a group of radio buttons in a Signup Form.
- A “Choice: multiple options” field can be displayed as checkboxes or as a multi-select dropdown in a Signup Form.
This lets the same subscriber data remain consistent even when different forms present it in different ways. For more information about adding and presenting fields in forms, see Signup Forms.
Built-in Fields
Every account has two built-in fields:
- First name
Email is required because every subscriber needs a primary email address. First name is optional.
Built-in fields cannot be renamed, archived, or permanently deleted. They do not count toward the custom-field limit.
Custom Field Limits
An account can have up to 30 active custom fields in addition to the two built-in fields.
Up to five active custom fields can use “Choice: multiple options”. This separate limit keeps multi-value subscriber data predictable across profiles, imports, Segments, forms, and Automations.
Archived fields do not count toward the active limits. However, restoring an archived field counts as activating it again. If the relevant limit has already been reached, archive another field before restoring it.
Creating a Custom Subscriber Field
To create a field:
- Open “Settings” → “Subscriber Fields”.
- In the Subscriber Fields section, click “Add a New Field”.
- Enter a Field Label.
- Select the field Type.
- If you selected a choice type, enter its Options.
- Click “Add”.
Maildroppa generates the Personalization Tag and adds the field to the active Subscriber Fields table.
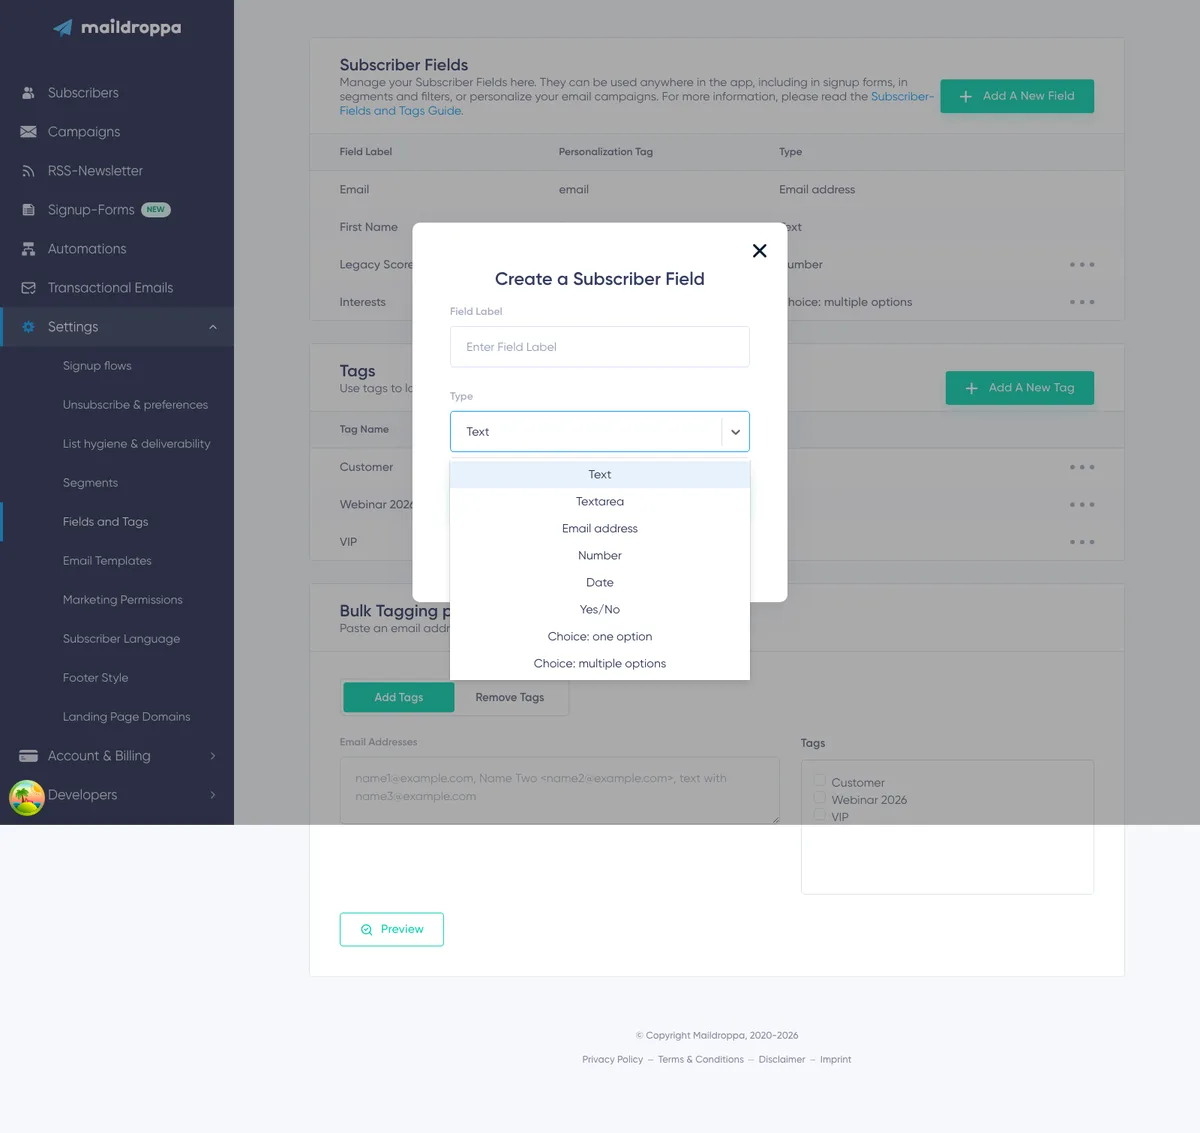
Creating Choice Fields
Choice fields are useful when you want consistent data rather than many spelling variations.
For example, a free-text “Preferred newsletter” field could contain “Product”, “product news”, “Products”, or spelling mistakes. A choice field restricts input to the options you define.
Choice: One Option
Use “Choice: one option” when a subscriber should select only one value.
Examples include:
- Preferred language
- Country
- Customer type
- Company size
- Primary interest
In the Signup Form Builder, you can present this field as a dropdown or as radio buttons.
Choice: Multiple Options
Use “Choice: multiple options” when several values may be true at the same time.
Examples include:
- Topics the subscriber wants to receive
- Products the subscriber uses
- Event formats the subscriber prefers
- Regions the subscriber serves
A subscriber can select up to 20 options in one multi-choice field. In the Signup Form Builder, you can present the field as a checkbox group or a multi-select dropdown.
Adding Options
After selecting either choice type, an Options area appears.
Enter the first option, then click “Add Value” to create another input. Repeat this until all options are present.
A choice field:
- Must have at least one option.
- Can have up to 50 options.
- Must have unique option labels. Capitalization alone does not make two labels different.
- Allows up to 255 characters per option label.
- Does not allow the pipe character (
|) in an option label.
Use short option labels that will still make sense in subscriber profiles, form controls, Segments, exports, and personalized content.
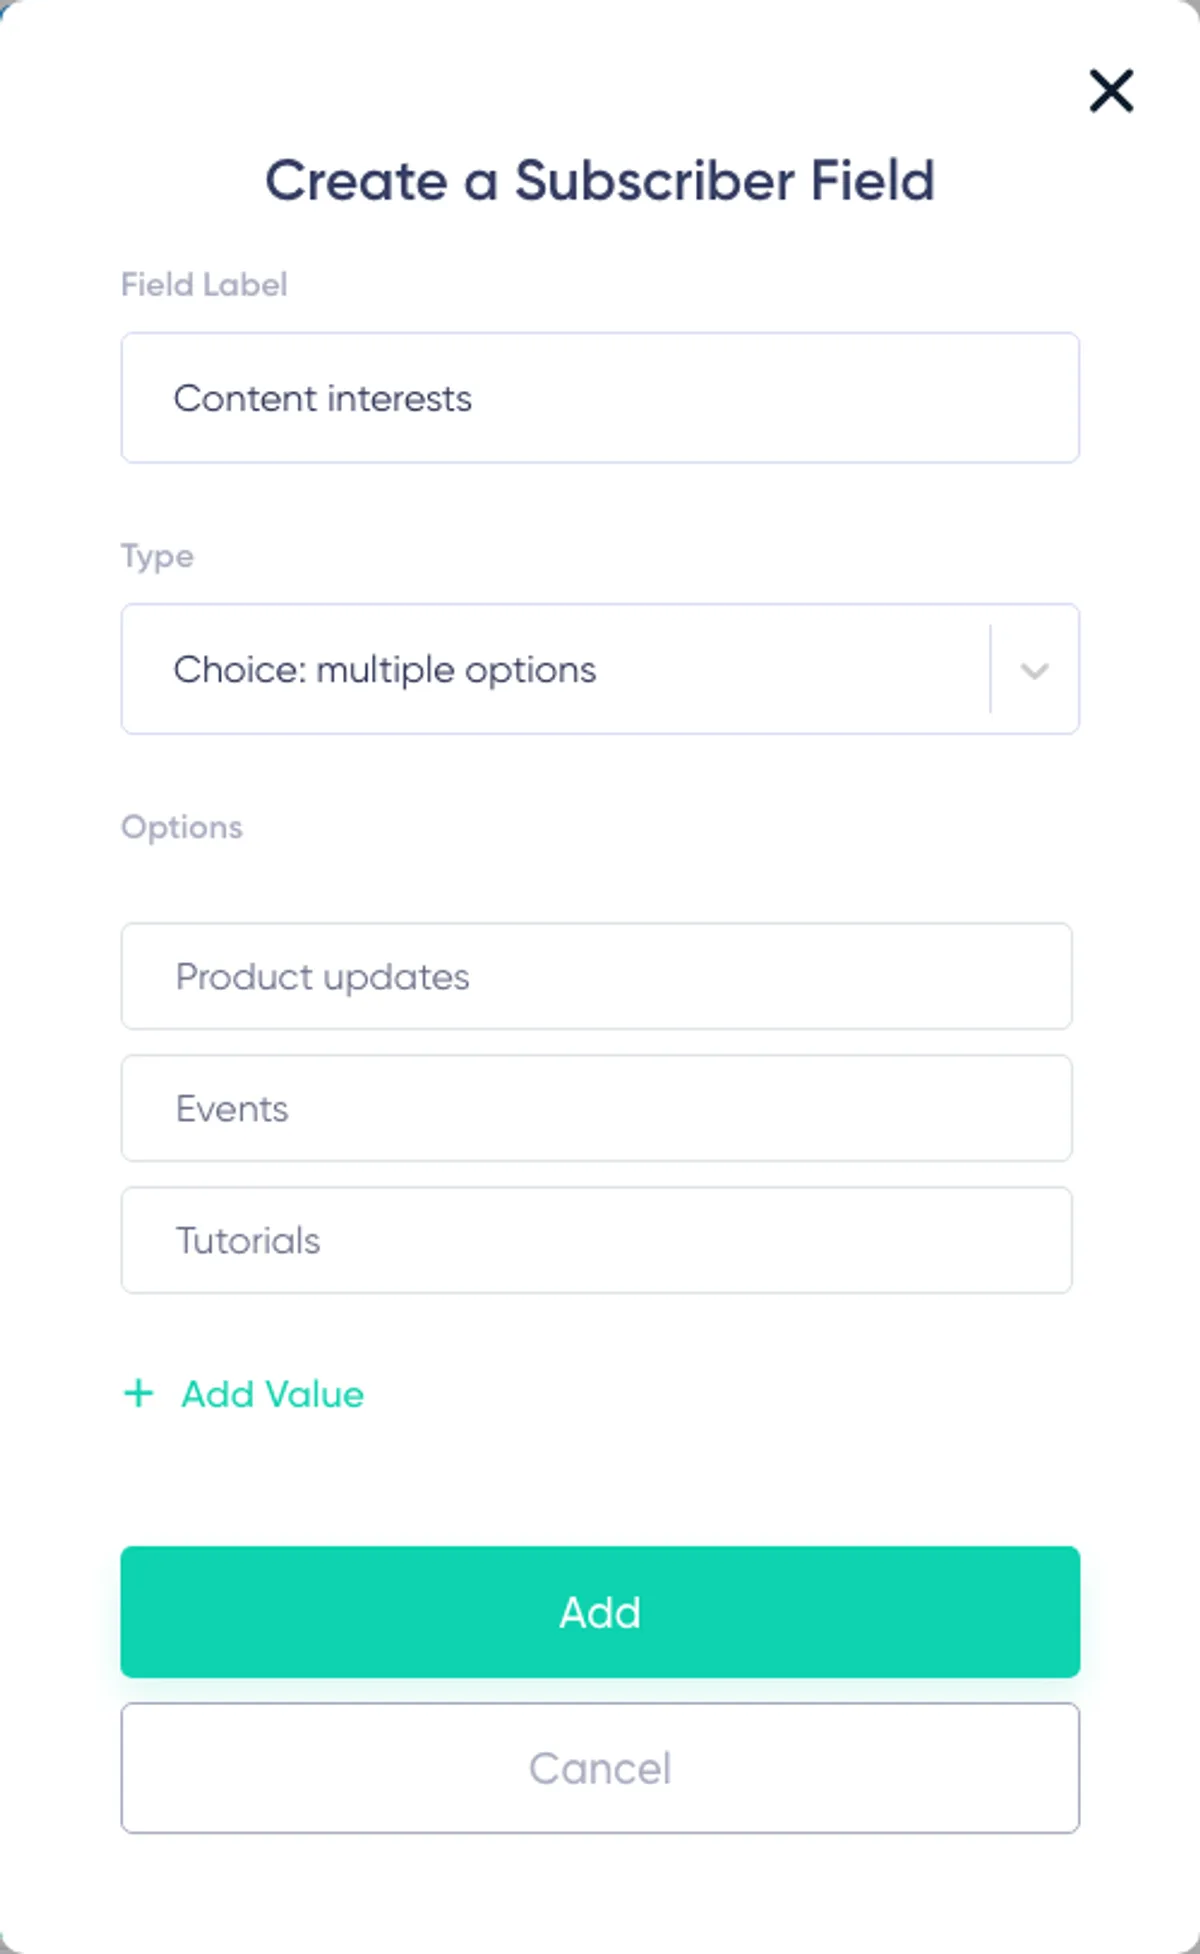
Editing a Custom Subscriber Field
To edit an active custom field:
- Find the field in the Subscriber Fields table.
- Open the three-dot menu at the end of its row.
- Select “Edit”.
- Change the Field Label or, for a choice field, its Options.
- Click “Change”.
The Field Type and Personalization Tag are intentionally not editable.
Editing Choice Options
You can rename an existing choice option, add a new option, or remove an unused option.
When you rename an option, its identity stays connected to existing subscriber selections. Remember that the new label can also appear in profiles, Segments, exports, and personalized content.
To remove an option, clear its input and save the field. Maildroppa only removes an existing option when no subscriber value still uses it. If the option is in use, the change is rejected and the current field definition is reloaded.
This protects stored selections from becoming invalid. If an option is still used, first update or clear the affected subscriber values, then try again.
Where Subscriber Fields Are Used
Subscriber fields can be used in several areas of Maildroppa:
- Signup Forms can collect field values.
- Subscriber profiles can display and update field values.
- Imports can map columns to fields.
- Email content can use Personalization Tags.
- Segments and send filters can select subscribers by field values.
- Automations can read or update fields.
- API clients and integrations can read or write supported field values.
Before changing, archiving, or permanently deleting a field, consider every workflow that can depend on it. Maildroppa checks known internal usage and shows links to affected items where possible.
Archiving a Subscriber Field
Archiving is the safe first step when you no longer want a field to be used for new data.
When you archive a custom field:
- Existing subscriber values stay stored.
- The field disappears from new field selections.
- New writes to the field are rejected.
- Existing read or render references are not automatically removed.
- The field moves to the Archived Fields section.
- The field cannot be edited until it is restored.
To archive a field:
- Open the three-dot menu for the active custom field.
- Select “Archive”.
- Wait while Maildroppa checks how the field is used.
- Review Archive blockers, Existing read or render usage, and Content merge tag usage.
- Resolve every blocker.
- Type
ARCHIVEin the confirmation field. - Click “Archive”.

What Blocks Field Archiving?
Maildroppa blocks archiving while a known workflow is still expected to write to the field. Examples include:
- A Signup Form that collects the field.
- An Automation that writes to the field.
- An active import mapping that writes to the field.
- A subscriber import or bulk subscriber write that is currently running.
Open the listed item, remove or replace the field reference, and return to the archive dialog.
Warnings That Do Not Block Archiving
Some existing references only read or render the field. These can include Segments, Automation conditions, and Personalization Tags in email content.
They are shown as warnings because archiving does not automatically rewrite those workflows. Review every warning before continuing. Decide whether the existing reference should remain, be replaced, or be removed.
Maildroppa cannot fully inventory every external API client or independently stored embedded-form request. After archiving, future external write attempts for the field fail. Update your integrations before archiving.
Restoring an Archived Field
Restore an archived field when you want to use it again.
- Find it in the Archived Fields section.
- Open the three-dot menu.
- Select “Restore”.
The field returns to the active Subscriber Fields section with the same Personalization Tag, type, options, and stored subscriber values.
Restoring can fail when the account already has 30 active custom fields or five active multi-choice fields. Field changes are also temporarily unavailable while a subscriber import is running.
The Archived Fields table shows two additional values:
- Subscriber values: how many stored subscriber values currently use the field.
- Blocking usages: how many known references currently prevent permanent deletion.
These numbers make it easier to decide whether to restore the field, clean up its references, or continue to permanent deletion.
Permanently Deleting an Archived Field
Permanent deletion is different from archiving. It removes the field and all of its stored subscriber values and cannot be undone.
A field must be archived before it can be permanently deleted.
To permanently delete it:
- Find the field in Archived Fields.
- Open the three-dot menu.
- Select “Permanently delete”.
- Review the subscriber-value count and every listed blocker.
- Remove or replace all blocking references.
- Type the exact Field Label shown in the dialog.
- Click “Permanently delete”.
Permanent deletion can be blocked by forms, Automations, Segments, import mappings, send filters, Personalization Tags in content, or a send that is currently running. Unlike archiving, read and render references also block permanent deletion because the field definition will no longer be available.
After permanent deletion:
- Subscriber values for the field are removed.
- The field disappears from Archived Fields.
- The field cannot be restored.
- Its Personalization Tag stays reserved and cannot be reused by a future field.
Keeping the Personalization Tag reserved prevents old integrations or delayed requests from accidentally writing data into an unrelated new field.
Understanding Tags
The Tags section contains active, customer-created tags. Each row shows the Tag Name and a menu for renaming or archiving the tag.
An account can have up to 50 active customer-created tags. Archived tags do not count toward this active limit, but restoring a tag activates it again.
A subscriber can have up to 20 customer-managed tags. Keep this in mind when a bulk action adds several tags to subscribers who already have many assignments.
Creating a Tag
To create a tag:
- In the Tags section, click “Add a New Tag”.
- Enter the Tag Name.
- Click “Add”.
Choose a name that explains why the tag exists. “Webinar 2026 - Registered” is clearer than “List 4”.
Renaming a Tag
To rename an active customer tag:
- Open the three-dot menu at the end of its row.
- Select “Rename”.
- Enter the new name.
- Click “Change”.
Renaming a tag keeps its existing subscriber assignments and internal identity. Review any team documentation or external process that refers to the old visible name.
System Tags
System Tags are created automatically by Maildroppa for internal product workflows. They are listed separately from customer-created tags.
System Tags cannot be renamed, manually assigned, removed in bulk, archived, or permanently deleted. This protects the workflows that depend on them.
Archiving a Tag
When you archive a customer-created tag:
- It is no longer available for new subscriber assignments.
- Existing subscriber assignments remain stored.
- It moves to the Archived Tags section.
- It cannot be renamed until it is restored.
To archive a tag:
- Open the three-dot menu for the active tag.
- Select “Archive”.
- Wait while Maildroppa checks the tag's usage.
- Review blockers, warnings, and the number of subscriber assignments.
- Resolve every blocking use.
- Type
ARCHIVEin the confirmation field. - Click “Archive”.
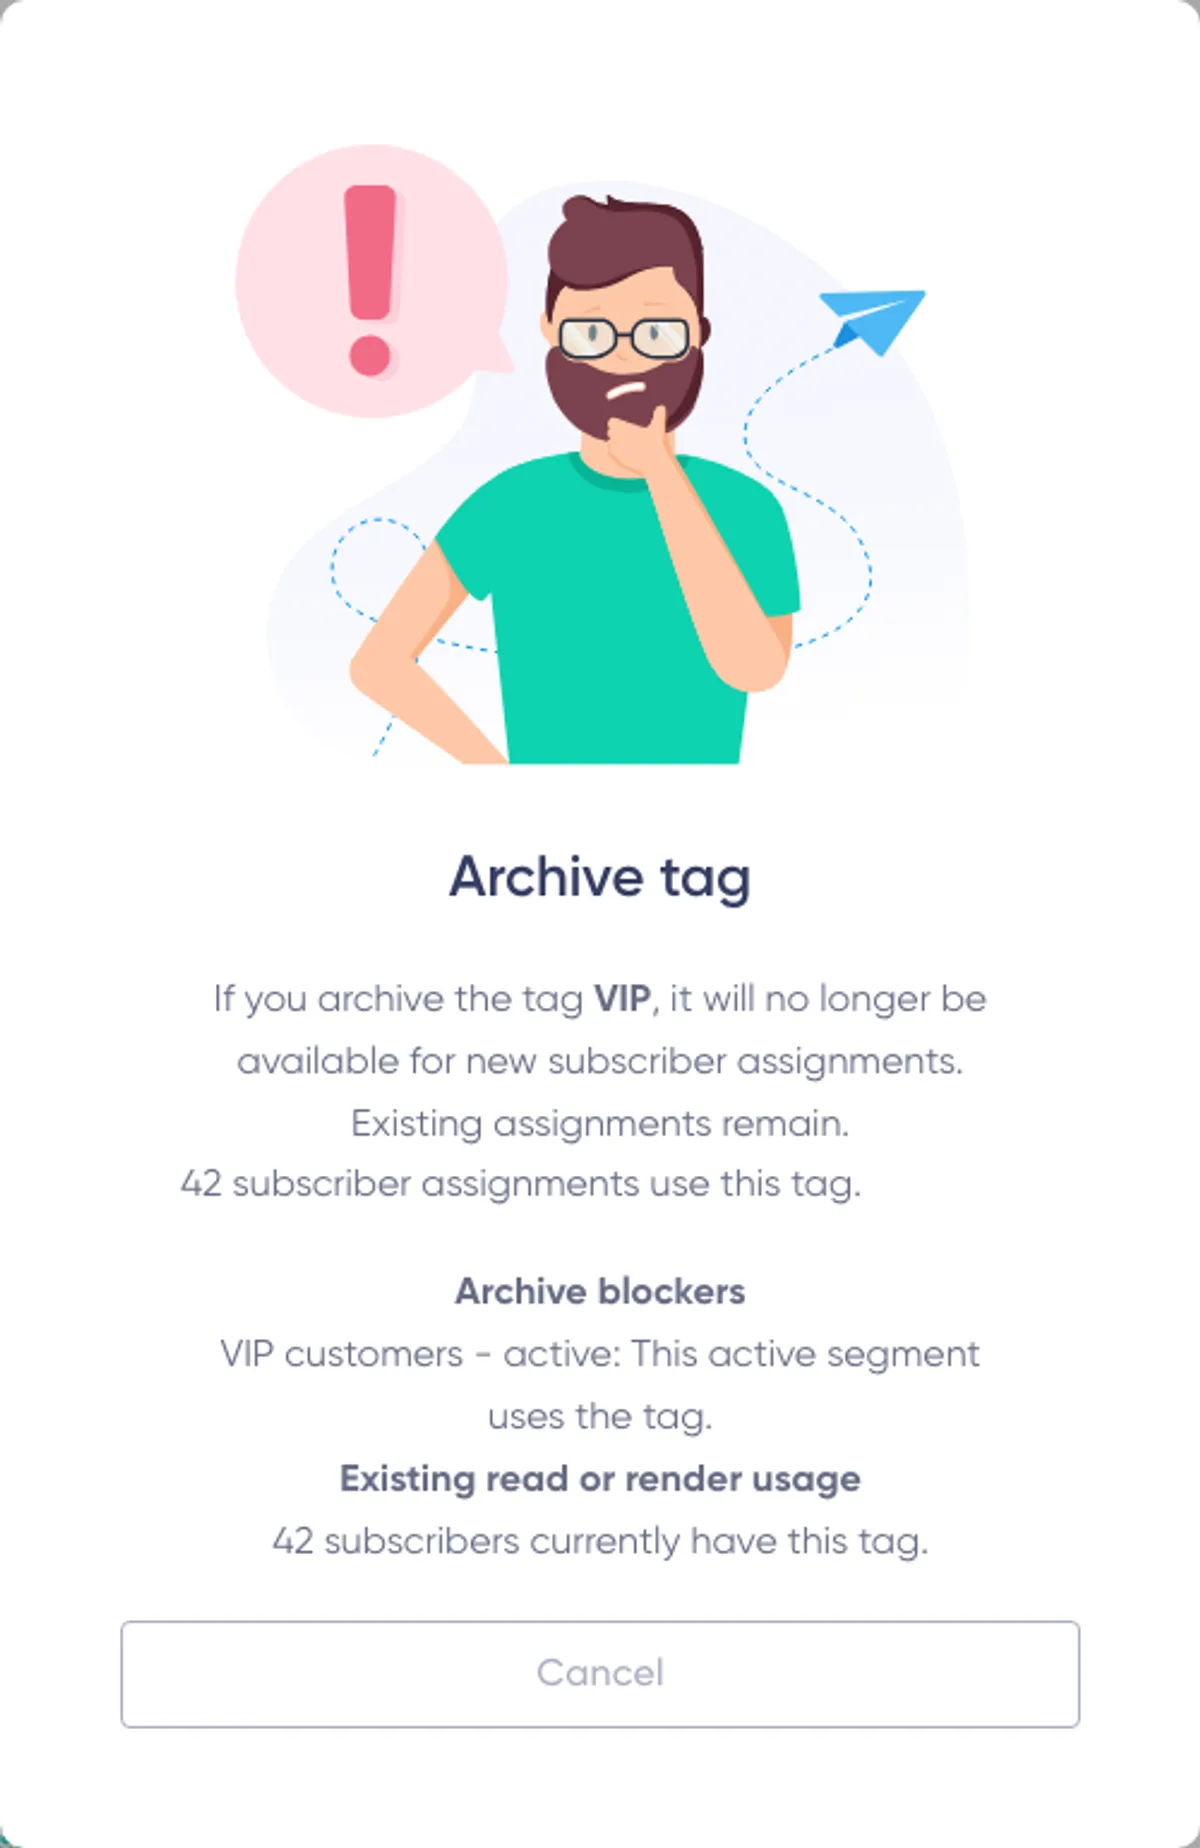
Tag assignments on subscribers are warnings, not archive blockers, because existing assignments remain after archiving.
Examples of usage that can block archiving include:
- A Signup Form that assigns the tag after submission.
- An Automation that adds the tag or depends on it as an active trigger.
- An active import that assigns the tag.
- A configured link action that assigns the tag.
Segments and other read-only references can appear as warnings. Review them because Maildroppa does not rewrite their logic when the tag is archived.
External API clients and imported files may also try to assign the tag later. Update those external processes before archiving.
Restoring or Permanently Deleting an Archived Tag
Restore a Tag
To use an archived tag again:
- Find it in Archived Tags.
- Open its three-dot menu.
- Select “Restore”.
The tag returns to the active Tags section with its existing subscriber assignments. Restoring fails if the account already has 50 active customer-created tags.
Permanently Delete a Tag
Permanently deleting an archived tag removes it from stored subscriber assignments and it cannot be restored.
To permanently delete it:
- Find it in Archived Tags.
- Open its three-dot menu.
- Select “Permanently delete”.
- Review the assignment count and all blockers.
- Remove or replace blocking references in forms, links, Automations, imports, and Segments.
- Type the exact Tag Name shown in the dialog.
- Click “Permanently delete”.
Subscriber assignments themselves do not block permanent deletion. Maildroppa removes them as part of the deletion. Other artifacts that still reference the tag do block deletion because their configuration would otherwise become invalid.
Bulk Tagging Selected Subscribers
Use the Subscribers table when the people you want to update are already visible in a filtered or searched list.
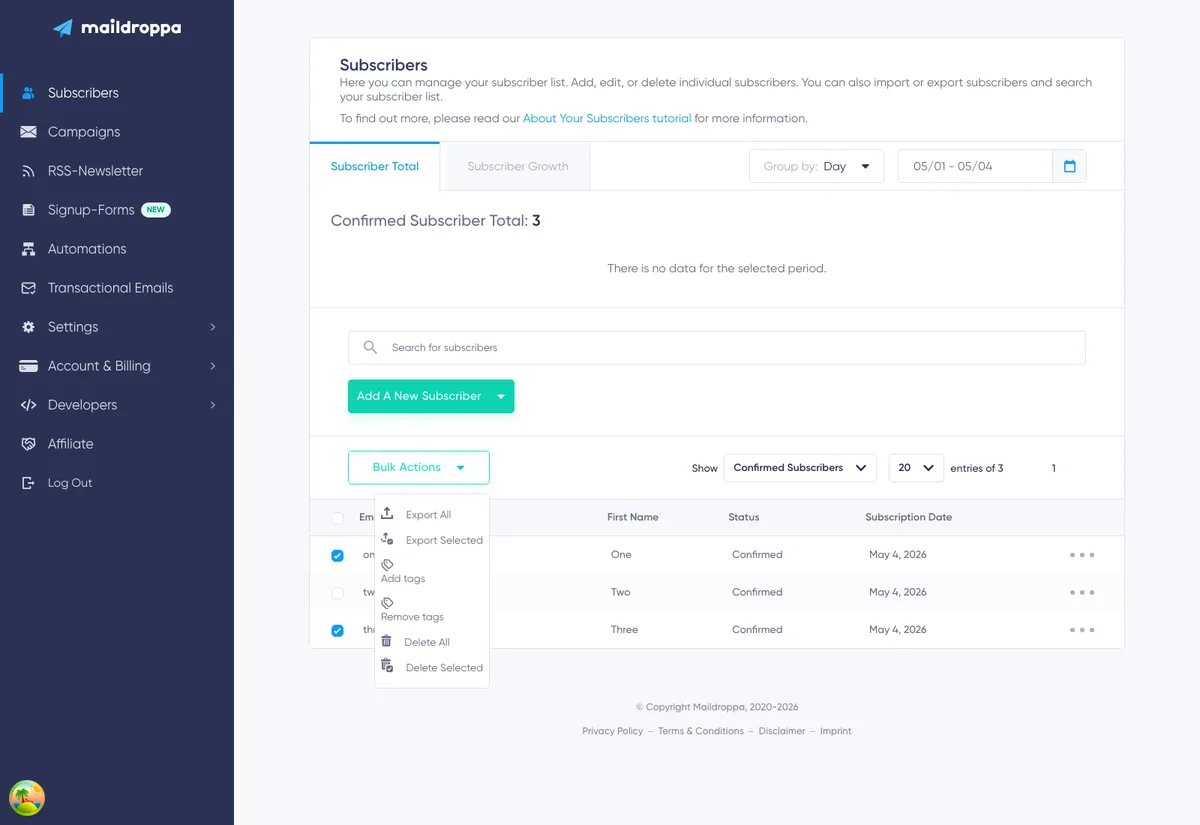
To add or remove tags from selected subscribers:
- Open the Subscribers page.
- Select the checkbox for every subscriber you want to update.
- Open “Bulk Actions”.
- Select “Add tags” or “Remove tags”.
- Select one or more customer-created tags.
- Confirm the action.
After the update, Maildroppa refreshes the table and clears the row selection. The result message tells you how many subscribers were changed, how many already had or did not have the selected tags, and how many were skipped.
When adding tags, only confirmed subscribers can receive new tag assignments. Pending, unsubscribed, bounced, and blocked subscribers are skipped. Removing tags can clean up existing assignments regardless of subscriber status.
System Tags are not shown in the selection dialog.
Use this method for a manageable set of rows. For a large list that comes from another tool, spreadsheet, CRM, or event system, use Bulk Tagging per Email List.
Bulk Tagging per Email List
The “Bulk Tagging per Email List” section lets you paste email addresses and add or remove several tags for every matching subscriber.
This is useful when you have a list of addresses but do not want to find and select each subscriber manually.
Supported Input
The Email Addresses box accepts simple address lists and text that contains addresses.
Examples include:
name1@example.comname1@example.com, name2@example.comName Two <name2@example.com>- Text copied from another application that contains email addresses
Maildroppa extracts valid email addresses, normalizes capitalization, and removes duplicate addresses before matching them to subscribers. Invalid email-like input is reported separately instead of stopping the entire list.
Only active customer-created tags are available in this section. System Tags and archived tags cannot be newly assigned here.
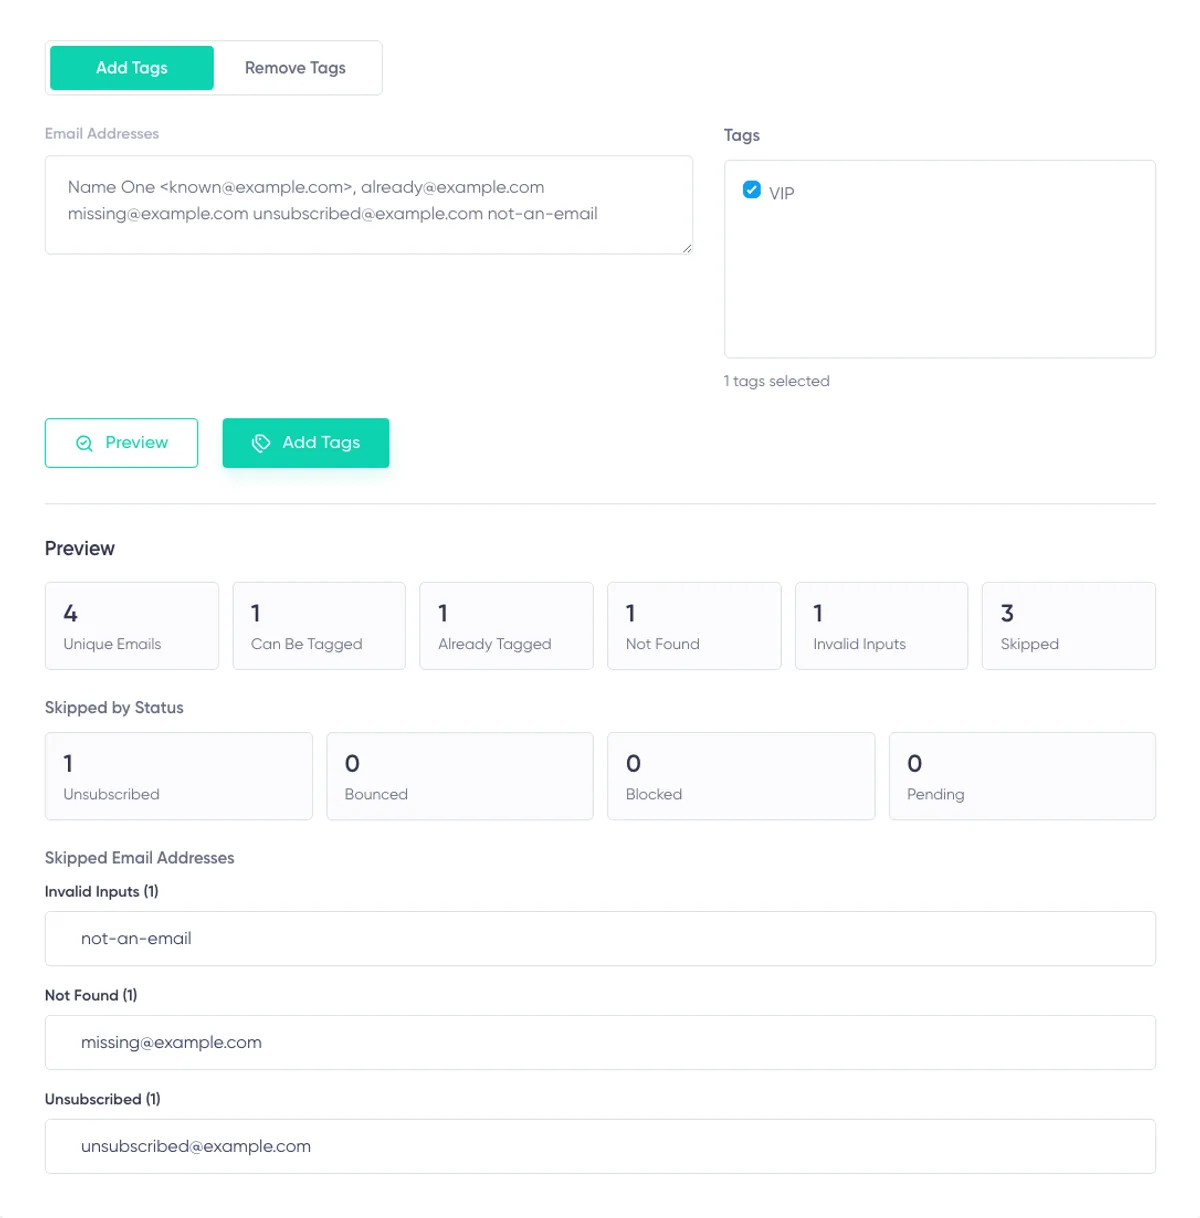
Add Tags by Email List
To add tags:
- Select the “Add Tags” tab.
- Paste the source text into “Email Addresses”.
- Select one or more Tags.
- Click “Preview”.
- Review every preview category.
- If at least one subscriber can be updated, click “Add Tags”.
The add preview shows:
- Unique Emails: valid, unique addresses extracted from the input.
- Can Be Tagged: confirmed subscribers who are missing at least one selected tag.
- Already Tagged: confirmed subscribers who already have every selected tag.
- Not Found: valid addresses that do not belong to a subscriber in the account.
- Invalid Inputs: email-like values that are not valid addresses.
- Skipped: all invalid, missing, or status-ineligible entries.
- Skipped by Status: separate counts for Unsubscribed, Bounced, Blocked, and Pending subscribers.
For each subscriber under “Can Be Tagged”, Maildroppa adds only the selected tags that are currently missing. Existing assignments are not duplicated.
Remove Tags by Email List
To remove tags:
- Select the “Remove Tags” tab.
- Paste the source text into “Email Addresses”.
- Select one or more Tags.
- Click “Preview”.
- Review every preview category.
- If at least one subscriber can be updated, click “Remove Tags”.
The removal preview shows:
- Unique Emails: valid, unique addresses extracted from the input.
- Existing Subscribers: addresses that match subscriber records.
- Can Be Updated: subscribers who have at least one of the selected tags.
- Without Selected Tags: matching subscribers who do not have any selected tag.
- Not Found: valid addresses without a matching subscriber.
- Invalid Inputs: email-like values that are not valid addresses.
- Skipped: invalid and not-found entries.
For each subscriber under “Can Be Updated”, Maildroppa removes the selected tags that are actually assigned. Other tags stay unchanged.
Tag removal is also useful for cleaning up assignments on pending, unsubscribed, bounced, or blocked subscribers. Unlike adding tags, removal does not require the subscriber to be confirmed.
Why Preview Is Required
Preview prevents a pasted list from changing subscriber data immediately. It lets you inspect the result before the final action becomes available.
If you change the mode, email text, or selected tags, Maildroppa clears the previous preview. Click “Preview” again so the result always matches the current input.
The final Tagging Summary or Removal Summary is the authoritative result. It reports the subscribers actually changed and the entries skipped when the action ran.
Recommended Field and Tag Workflow
Use this process to keep subscriber data reliable:
- Define the business purpose of the data.
- Decide whether it should be a field value or a tag assignment.
- Choose the strictest useful field type.
- Use predefined options when a controlled list will improve data quality.
- Create the field or tag before configuring forms, imports, Segments, or Automations.
- Test data collection with a test subscriber.
- Check how the value appears in the subscriber profile and in personalized content.
- Document the meaning of important fields and tags for your team.
- When an item is no longer needed, archive it first.
- Review remaining usage and stored data before permanent deletion.
Avoid creating several fields or tags with nearly identical meanings. A small, deliberate data model is easier to maintain than a long list of ambiguous items.
Troubleshooting
I Cannot Change the Field Type
The field type is permanent after creation. Create a new field with the correct type, migrate or recollect the values you still need, update every dependent workflow, and then archive the old field.
Do not permanently delete the old field until all required values and references have been handled.
I Cannot Remove a Choice Option
The option is still selected in at least one subscriber value. Update or clear those subscriber values first, then edit the field again.
I Cannot Archive a Field
The archive dialog lists known write usages that must be removed first. Check Signup Forms, Automation write actions, import mappings, and running subscriber imports or bulk writes.
After removing a reference, close and reopen the archive dialog so Maildroppa checks the current usage again.
I Archived a Field but Its Values Still Exist
This is expected. Archiving stops new use and writes but retains existing subscriber values. Use permanent deletion only when you deliberately want to remove the field and all stored values.
I Cannot Permanently Delete a Field
Permanent deletion requires a stricter usage check than archiving. Remove both write references and read or render references, including Segments, send filters, Personalization Tags in content, and Automations. A running send can also block deletion temporarily.
I Cannot Archive or Permanently Delete a Tag
Review the usage list in the dialog. Forms, link actions, Automations, imports, and Segments can refer to the tag. Subscriber assignments do not block archiving or permanent deletion, but they are retained by archiving and removed by permanent deletion.
An Archived Field or Tag Is Missing From New Selections
This is expected. Archived items are intentionally hidden from new use. Restore the item if it should become assignable or writable again.
I Cannot Restore a Field or Tag
The active-item limit may already be reached. Maildroppa allows up to 30 active custom fields, five active multi-choice fields, and 50 active customer-created tags.
Archive an unused active item, then try the restore action again. Also wait until any running subscriber import has finished before changing fields or tags.
The Bulk Add Preview Skips Subscribers
Only confirmed subscribers can receive new tags through bulk tagging. Pending, unsubscribed, bounced, and blocked subscribers appear under “Skipped by Status”. Invalid and not-found addresses are shown separately.
The Add Tags or Remove Tags Button Is Missing
Complete a Preview first. The final action appears only when the preview contains at least one subscriber who can be changed.
Changing the email list, selected tags, or mode invalidates the previous preview.
No Tags Are Available for a Bulk Action
Create or restore at least one customer-created tag. System Tags cannot be manually assigned, and archived tags are hidden from new assignments.
Some Subscribers Were Already Tagged
This is expected. Maildroppa does not create duplicate assignments. In Add Tags mode, subscribers who already have all selected tags are counted under “Already Tagged”. Subscribers who are missing only some selected tags receive only the missing tags.
Subscriber Fields and Tags form the structure behind audience data in Maildroppa. Choose the right data type, use multi-choice fields for controlled multiple selections, use tags for group membership, and archive before deleting so you can review every dependency safely.
Ready to Send Better Emails?
Stop juggling bloated tools or overpriced plans. Maildroppa offers personal support, privacy-conscious controls, and powerful email marketing - starting free forever.
No credit card required. No time limit.