Contents
the email tool that makes email marketing simple


Connect and Verify a Custom Landing Page Domain
Published: · Last updated: · By Marcus Biel
In brief
Connect and verify a custom Maildroppa landing page domain, configure TXT and CNAME records, and troubleshoot DNS verification problems.
Landing Page Domains let you publish Maildroppa Landing Pages under an address that belongs to your business.
Instead of sharing only the standard Maildroppa address, you can use a subdomain such as newsletter.your-real-domain.com, add an optional path, and publish pages at addresses such as:
https://newsletter.your-real-domain.com/weekly-tips
Maildroppa checks that you control the subdomain, confirms that visitors are routed to the correct service, and prepares a secure HTTPS connection. The Landing Page Domains page brings the setup status, required DNS records, manual connection check, and domain removal together in one place.
Is your domain still waiting for verification?
Confirm that both DNS records exactly match the values shown in Maildroppa. Check that your DNS provider has not appended your main domain twice, and set any Cloudflare or other DNS proxy to DNS only. Then click “Check DNS”. DNS changes can take up to 48 hours to propagate. Do not delete and re-add the domain while waiting, because doing so creates a new TXT verification token.
If the domain is still not ready after the records have remained unchanged for 48 hours, send support the exact subdomain, your DNS provider, the displayed failure message, the TXT values found, and the CNAME chain found.
What a Landing Page Domain Is
A Landing Page domain is the hostname used for public Landing Pages created with Maildroppa's Signup Form Builder.
Maildroppa connects a subdomain rather than the root domain. For example:
newsletter.your-real-domain.comis a subdomain and can be connected.www.your-real-domain.comis also a subdomain and can be connected.your-real-domain.comis the root domain and cannot be connected through this CNAME-based setup.
Using a separate subdomain keeps the Landing Page connection independent from your main website. Your website can remain on your-real-domain.com while Maildroppa serves Landing Pages on newsletter.your-real-domain.com.
You can connect up to ten Landing Page domains to one Maildroppa account. This is useful when you manage several brands, campaigns, countries, or public page groups. A connected domain can also host more than one Landing Page when each page uses a different path.
Landing Page Domains and Sender Domains Are Different
The Landing Page Domains page controls web addresses for published Landing Pages. It does not authenticate the email address used to send campaigns or Double Opt-in emails.
These are separate settings:
- Use “Settings” → “Landing Page Domains” to connect a public Landing Page subdomain with TXT and CNAME records.
- Use “Settings” → “Email sender” to configure the sender name, sender email address, and sender-domain authentication such as DKIM.
Connecting a Landing Page domain does not automatically make that domain an authenticated sending domain. Likewise, authenticating a sender domain does not automatically connect it as a Landing Page domain. Complete both setups separately when you want to use the same organizational domain for web pages and email sending.
What You Need Before Starting
Before connecting a domain, make sure that:
- You own or control a real public domain.
- You can edit its DNS records through your domain registrar, hosting provider, or DNS provider.
- You have chosen a subdomain that is not already used for a website or another service.
- You can create both a TXT record and a CNAME record.
- You know whether your provider expects a complete hostname or only the part before your main domain.
Do not disconnect an existing website, shop, or application to reuse its hostname. Choose a new subdomain when the desired name already has an A, AAAA, or CNAME record.
The examples in this guide show the required format. Replace them with a subdomain of a real domain that you control. Maildroppa rejects placeholder domains such as example.com and Maildroppa-owned domains.
Opening Landing Page Domains
Open “Settings” and select “Landing Page Domains”.
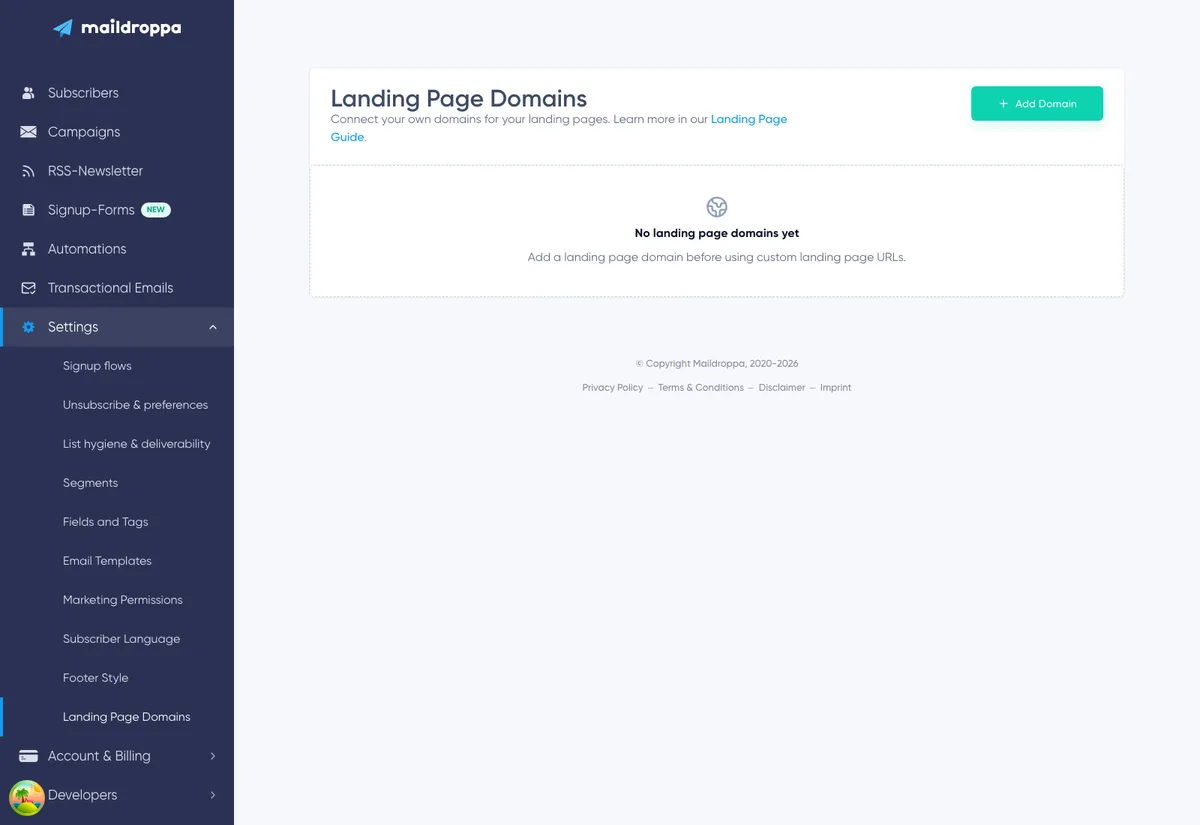
If you have not connected a domain yet, the page shows “No landing page domains yet”. Click “Add domain” to begin.
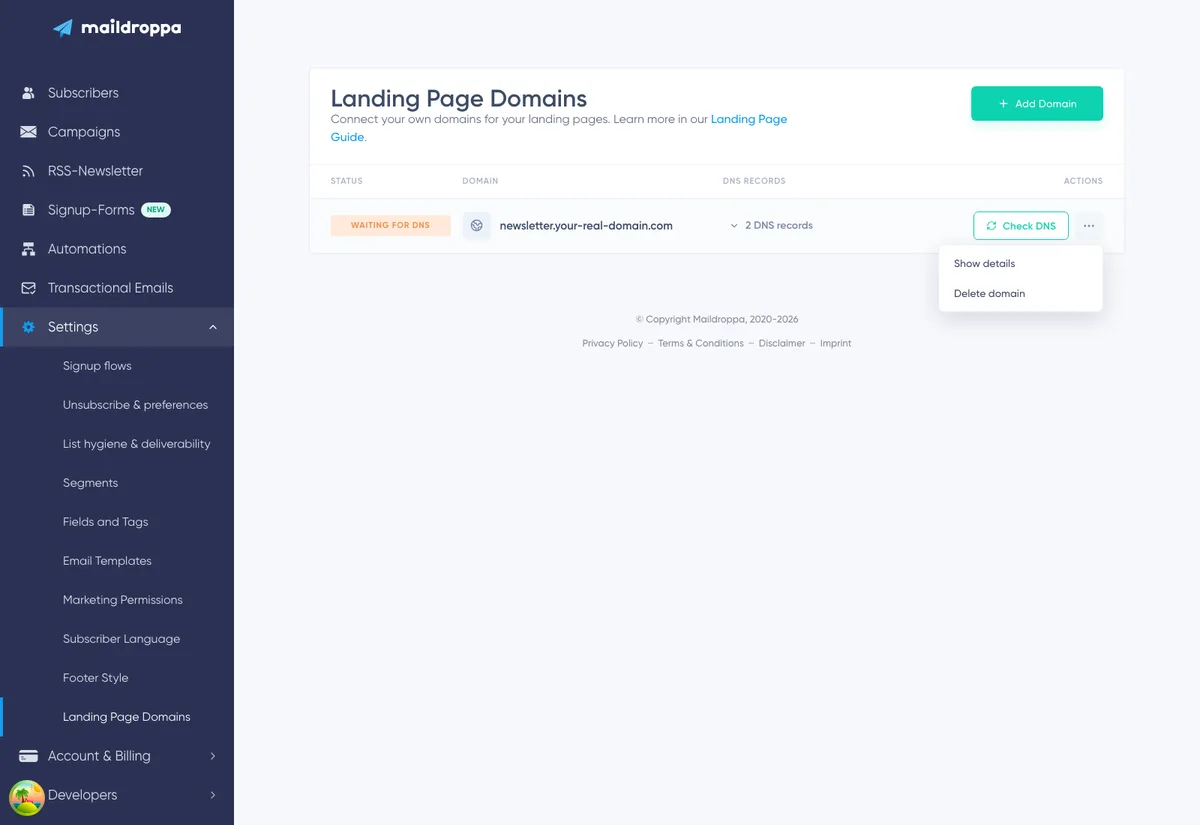
When domains already exist, the page shows:
- The current connection status
- The domain name
- The number of required DNS records
- A control for showing the DNS details
- “Check DNS” while the domain is not ready
- An actions menu for showing details or deleting the domain
The layout changes into compact cards on smaller screens, but the available information and actions remain the same.
Step 1: Add the Subdomain
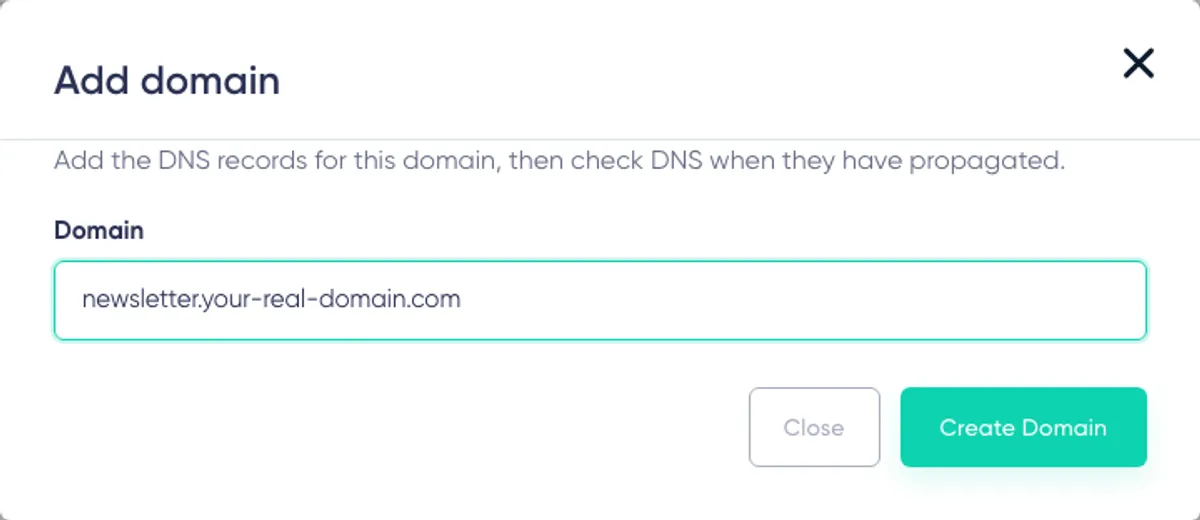
Click “Add domain”. Enter only the complete subdomain, for example:
newsletter.your-real-domain.com
Do not enter:
https://newsletter.your-real-domain.comnewsletter.your-real-domain.com/signup- An IP address
localhost- A root domain such as
your-real-domain.com - A hostname containing spaces or underscores
Maildroppa removes surrounding spaces, converts the name to lowercase, and removes a final DNS dot. Other invalid formats are rejected before the domain is created.
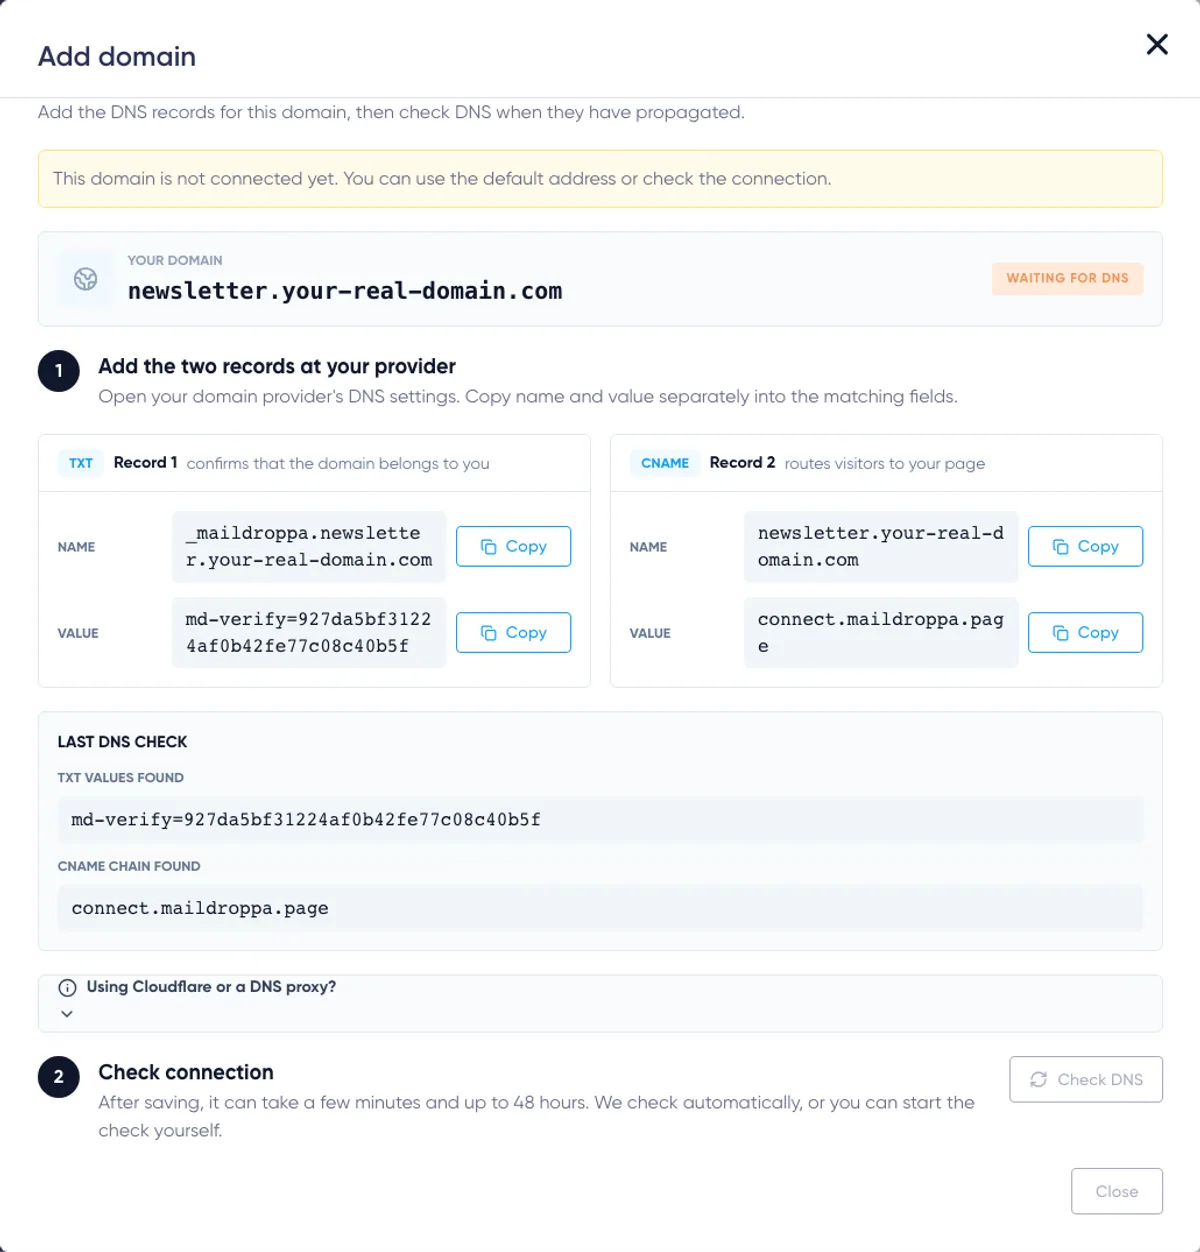
Click “Create domain”. Maildroppa creates an individual verification for this subdomain and displays the two DNS records required for the connection.
If the subdomain is already connected to your own account, Maildroppa returns the existing setup instead of creating a duplicate. If it is connected to another Maildroppa account, use another subdomain or contact support when the domain belongs to you.
Step 2: Add the Two DNS Records
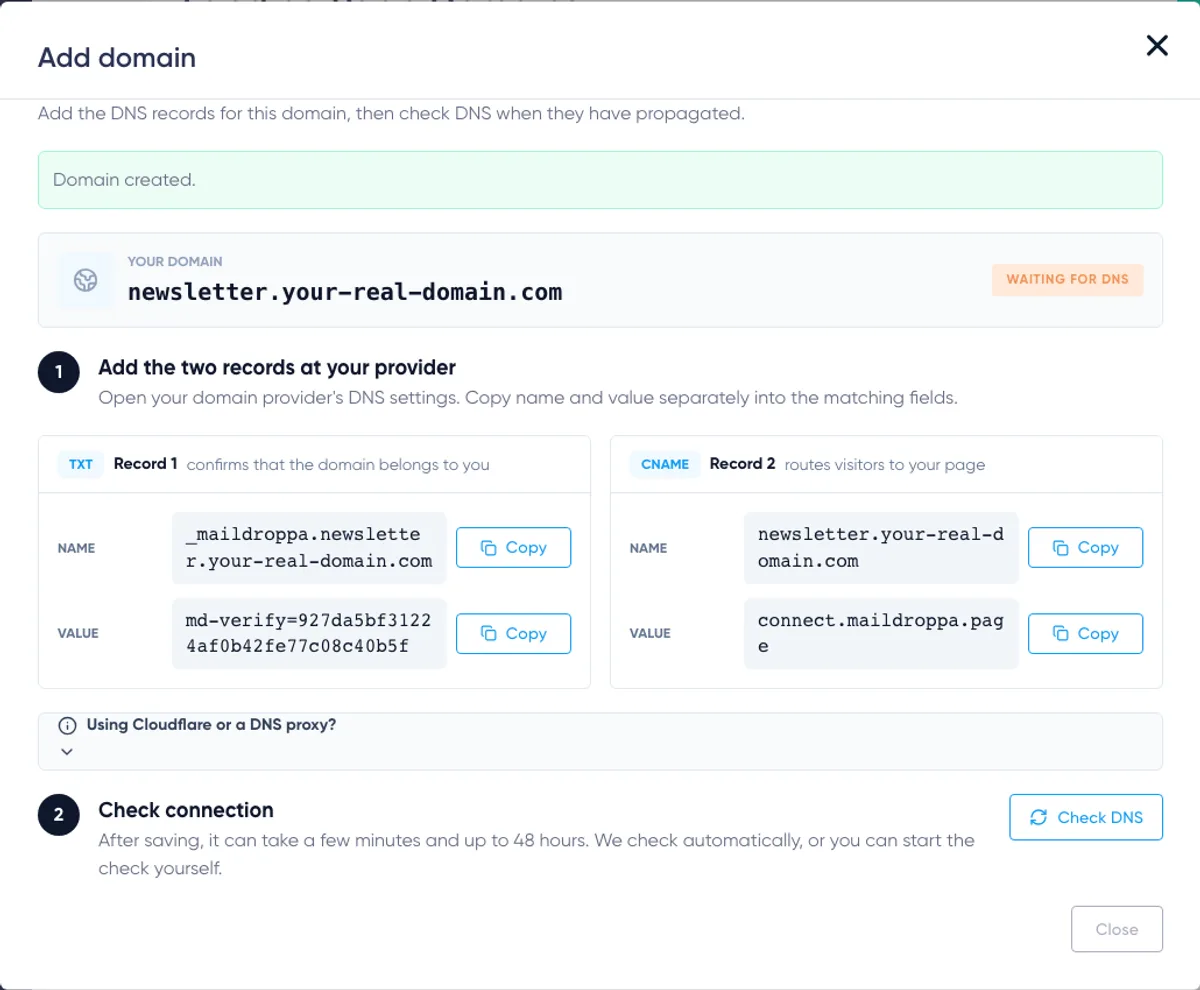
After creating the domain, open the DNS settings at the provider that manages your domain. Add both records exactly as Maildroppa displays them.
Each record has three parts:
- Type — TXT or CNAME
- Name — The hostname to which the record belongs
- Value — The verification value or routing target
Use the “Copy” buttons beside the name and value. Every domain receives its own values, so do not copy DNS details from another account, another domain, this guide, or an old screenshot.
Record 1: TXT Ownership Record
The TXT record confirms that the subdomain belongs to you.
Its name begins with _maildroppa and includes the connected subdomain. Its value begins with md-verify= and contains the individual verification token generated for this domain.
For a subdomain such as newsletter.your-real-domain.com, the record follows this pattern:
Type: TXT
Name: _maildroppa.newsletter.your-real-domain.com
Value: md-verify=your-individual-token
The pattern above is only an explanation. Copy the exact name and value displayed in your Maildroppa account.
Do not place the token on the normal subdomain itself. Maildroppa looks for it at the special _maildroppa hostname.
Other unrelated TXT records can usually remain in place. The important point is that the exact Maildroppa value is present at the exact name shown.
Record 2: CNAME Routing Record
The CNAME record routes visitors from your chosen subdomain to Maildroppa.
For a domain such as newsletter.your-real-domain.com, the CNAME name is the Landing Page subdomain itself. Its value is the Maildroppa target shown in the setup.
Type: CNAME
Name: newsletter.your-real-domain.com
Value: Copy the exact Maildroppa target displayed on the page.
The CNAME value is a hostname. Do not add https://, a path, spaces, or an IP address.
A hostname cannot normally have a CNAME and another routing record at the same name. If the chosen subdomain already has an A, AAAA, or different CNAME record, choose a different subdomain or remove the conflict only when you are certain the old service is no longer required.
Complete Names and Relative Names
DNS providers label their fields differently. A field may be called “Name”, “Host”, “Hostname”, or “Alias”.
Some providers expect the complete name displayed by Maildroppa. Others automatically append the main domain of the DNS zone.
For example, when you edit the DNS zone for your-real-domain.com, such a provider may expect:
_maildroppa.newsletterinstead of_maildroppa.newsletter.your-real-domain.comnewsletterinstead ofnewsletter.your-real-domain.com
The resulting public DNS name must still match the complete name shown in Maildroppa. If your provider displays a duplicated name such as newsletter.your-real-domain.com.your-real-domain.com, remove the automatically appended domain from the value you enter in the Name field.
Do not change the record Value to compensate for the provider's Name format. The Value must remain exactly as Maildroppa displays it.
Cloudflare and Other DNS Proxies
If Cloudflare or another service can proxy the CNAME, use “DNS only” while connecting the domain.
In Cloudflare, this is the gray cloud rather than the orange proxied cloud. A proxy can hide the real CNAME target from the DNS check, which prevents Maildroppa from confirming the connection.
The TXT record is not proxied. Add it normally.
Step 3: Wait for DNS Propagation
Save the records at your DNS provider. DNS changes are often visible within a few minutes, but they can take up to 48 hours to propagate.
Maildroppa checks domains in progress automatically. You can close the dialog or leave the settings page; the setup continues in the background.
The domain does not need to become ready during the same session in which you created it. Return to “Landing Page Domains” later to review its status.
Avoid repeatedly deleting and recreating the domain while DNS is propagating. Recreating it generates a new verification token, so an earlier TXT value will no longer complete the new setup.
Step 4: Check the Connection
Click “Check DNS” when both records have been saved.
Maildroppa checks the connection in stages:
- It looks for the exact TXT value to confirm ownership.
- It follows the CNAME connection and confirms that it reaches the expected Maildroppa target.
- It prepares and checks the secure HTTPS certificate for the subdomain.
- It marks the domain as ready when ownership, routing, and HTTPS are working.
If the records have not propagated yet, the domain remains pending. This does not mean that you need to create it again. Compare the displayed records with your provider, wait, and check later.
After a manual check, the button is briefly disabled and the page can show a countdown before another check is available. This pause prevents repeated DNS requests. Automatic checks continue independently.
When the connection is complete, Maildroppa shows “Domain verified” and changes the domain status to “Ready”. The “Check DNS” button is no longer shown for a ready domain.
Understanding Domain Statuses
The table uses a short status badge. During setup, more detailed text can explain the current stage.
Waiting for DNS
Maildroppa has not found both required DNS records yet.
The detailed state can be:
- Waiting for domain settings — The TXT ownership record has not been confirmed.
- Domain confirmed, connection still missing — The TXT record is correct, but the CNAME does not yet point to the expected target.
Open the DNS details and compare each name and value. If you just saved the records, allow more time for propagation.
Connecting
Maildroppa has found the required DNS connection and is preparing the secure public address.
The detailed state can be:
- Connection found, security is being prepared
- Secure connection is being set up
Do not change or remove the DNS records during this stage. You can publish the Landing Page through its standard Maildroppa address while waiting.
Ready
The TXT record, CNAME routing, and HTTPS connection are working. The domain can now be selected for a Landing Page.
Keep both DNS records in place. Removing or changing them later can make the domain unhealthy.
Check
The domain was ready before, but its DNS or secure connection is currently unhealthy.
Open the DNS details, check whether the records were changed, and run “Check DNS”. Existing public pages may be affected, so resolve this status promptly or publish them through the standard address until the connection is healthy again.
Failed
The setup did not complete after repeated checks, or a previously working connection remained unhealthy.
Check the displayed failure information and both DNS records. If the values are correct, wait for propagation and try the check again. When an old or incorrect setup cannot be repaired, remove the unused domain and connect it again with the newly generated records.
Viewing DNS and Check Details
Click the domain name, the DNS record count, or “Show details” in the actions menu to expand a domain.
The expanded table area shows the TXT and CNAME records again. You can copy each name and value without recreating the domain.
When you check a newly created domain in the setup dialog, Maildroppa can also show information from that check, including:
- The reason the connection did not pass
- TXT values that were found
- The CNAME chain that was found
This information helps identify the difference between a missing record and a record that exists with the wrong value.
For example:
- No found TXT value usually means that the TXT record is missing, saved under the wrong name, or not propagated yet.
- A found TXT value that differs from Maildroppa's expected value usually means that an old token or a copied value from another domain is present.
- An empty CNAME chain usually means that no public CNAME was found at the subdomain.
- A different CNAME target usually means that the subdomain still routes to another service or that a DNS proxy is hiding the expected target.
Using a Ready Domain for a Landing Page
Connecting the domain does not automatically move an existing Landing Page to it. You select the public address separately for each page.
Open the Landing Page in the Signup Form Builder and open “Publish”, “Publish changes”, or “Manage publication”. In the public address section:
- Open “Manage custom domain”.
- Select a domain whose status is “Ready”.
- Click “Use domain”.
- Enter the desired path, or use
/for the root of the connected subdomain. - Review the final HTTPS address.
- Publish the page or publish the address change.
Only ready domains can be assigned to a new Landing Page route. Domains that are still waiting or connecting remain visible in domain management but are not ready for publication.
Each path on a domain can be used by only one Landing Page. For example, one domain can host:
https://newsletter.your-real-domain.com/weekly-tipshttps://newsletter.your-real-domain.com/webinarhttps://newsletter.your-real-domain.com/summer-guide
Only one page can use /, and two pages cannot use the same path on the same domain.
You can publish without a custom domain at any time by choosing the standard Maildroppa address. You can also change from the standard address to a ready custom domain later.
For the complete publication workflow, see Building and Publishing a Landing Page.
Domains Added from the Builder
The Landing Page publication window and the Landing Page Domains settings page use the same domain list.
This means that:
- A domain started from the Landing Page builder also appears under “Settings” → “Landing Page Domains”.
- A domain connected in Settings can be selected later in the Landing Page publication window.
- DNS checks and status changes are reflected in both places.
The Settings page is the best place to review all domains in the account, compare their statuses, reopen DNS records, and remove domains that are no longer needed.
Deleting a Landing Page Domain
Open the three-dot actions menu beside the domain and select “Delete domain”. Confirm the deletion in the dialog.
Maildroppa prevents deletion while any Landing Page still uses the domain. This includes a domain selected in an unpublished draft and a domain used by a live public route.
To release a domain that is in use:
- Open every Landing Page that uses it.
- Open the publication settings.
- Choose the standard address or another ready domain.
- Publish the address change when the page is already live.
- Return to “Landing Page Domains” and delete the domain.
Deleting a domain from Maildroppa does not delete records at your DNS provider. After the domain is no longer used, remove its Maildroppa TXT and CNAME records manually if you no longer need them.
Do not remove the DNS records before moving live Landing Pages. Doing so can make their public addresses unavailable.
Troubleshooting a Domain That Is Not Ready
Check the Domain Format
The connected name must be a real public subdomain. Enter the hostname only, without a protocol or path.
Correct format:
newsletter.your-real-domain.com
Incorrect formats:
https://newsletter.your-real-domain.comyour-real-domain.comnewsletter.your-real-domain.com/formnewsletter_your-real-domain.com
Compare Every Copied Character
Compare the record Type, Name, and Value separately. Verification tokens are account- and domain-specific. A value that looks almost identical can still be wrong.
Check for:
- A missing
_maildroppaprefix on the TXT name - An old
md-verify=value - The main domain appended twice by the DNS provider
https://added to the CNAME value- Spaces or quotation marks copied into a value
- A CNAME that points to an old service
Check for Conflicting Records
The Landing Page subdomain must route through the displayed CNAME. An existing A, AAAA, or different CNAME at the same name can prevent the connection.
The ownership TXT record uses its own _maildroppa name and should not be placed on the CNAME hostname.
Disable DNS Proxying
Set the CNAME to DNS only during connection. This is especially important for Cloudflare's orange-cloud proxy, which hides the target Maildroppa needs to verify.
Allow Time for Propagation
Even when your DNS provider immediately shows the new records, public DNS resolvers can still return older information. Wait and check again later. Propagation can take up to 48 hours.
Use the Check Information
When the setup dialog shows the values Maildroppa found, use them to compare the public result with the expected records. A missing result and a wrong result point to different problems:
- Missing means the record is not publicly visible at the expected name.
- Wrong means a record is visible, but its value does not match the current setup.
Do Not Recreate the Domain Unnecessarily
Deleting and adding the same domain again changes its verification token. If you recreate it, replace the old TXT value with the new value shown by Maildroppa.
Contact Support with Useful Details
If the records have been unchanged for 48 hours and the domain is still not ready, contact support and include:
- The Landing Page subdomain
- Its current Maildroppa status
- The failure reason shown after checking the connection, if available
- The TXT values and CNAME chain Maildroppa found
- The name of your DNS provider
Do not send passwords, registrar login details, or private account credentials.
Recommended Setup Checklist
Before using a custom Landing Page domain, confirm that:
- You entered a subdomain rather than the root domain.
- The TXT name and individual verification value match Maildroppa exactly.
- The CNAME name and target match Maildroppa exactly.
- The DNS provider did not append the main domain twice.
- Any DNS proxy is disabled while the domain is being connected.
- The domain status is “Ready”.
- The Landing Page uses a unique path.
- You published the page after selecting the custom address.
- The final HTTPS link opens correctly.
- You tested the complete signup and Double Opt-in journey on the public page.
Once the domain is ready and the page is published, keep both DNS records in place and review the Landing Page Domains page if the public address ever stops working.
Ready to Send Better Emails?
Stop juggling bloated tools or overpriced plans. Maildroppa offers personal support, privacy-conscious controls, and powerful email marketing - starting free forever.
No credit card required. No time limit.