Contents
the email tool that makes email marketing simple


Signup Flows and Double Opt-in
Published: · Last updated: · By Marcus Biel
In brief
Learn how to manage Maildroppa Signup Flows with submit messages, Double Opt-in emails, redirects, confirmation pages, form assignments, and defaults.
A Signup Flow controls the complete Double Opt-in journey that begins when someone submits a Maildroppa signup form.
It defines what the visitor sees immediately after submitting the form, which confirmation email Maildroppa sends, and what happens after the confirmation link is clicked.
Every Landing Page, Embedded Form, Popup, and Slide-in is connected to one Signup Flow. Several forms can use the same flow, or a form can have its own flow when it needs a different subscriber experience.
How a Signup Flow Works
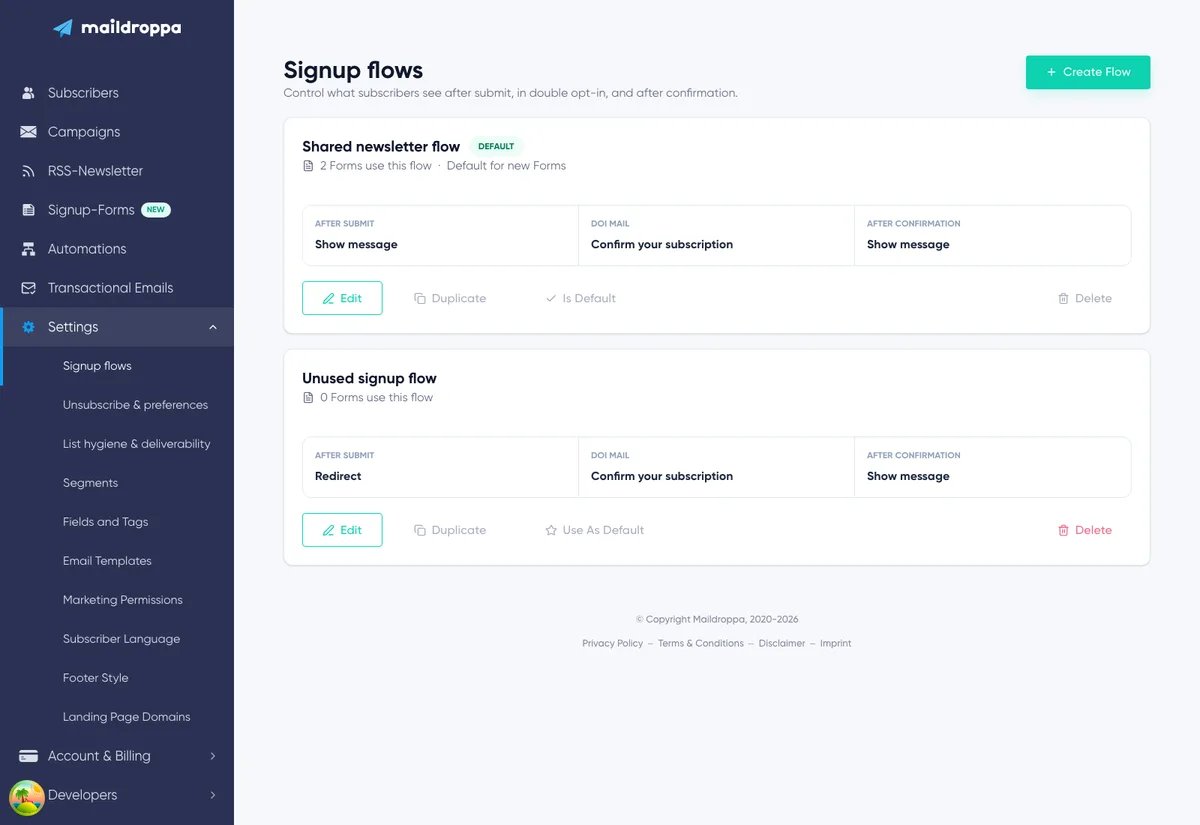
Every Signup Flow contains exactly three steps:
- After submit — The visitor submits the form. Maildroppa displays a message or redirects the visitor to an external HTTPS page.
- DOI mail — Maildroppa sends the Double Opt-in email containing the individual confirmation link.
- After confirmation — The subscriber clicks the confirmation link. Maildroppa completes the subscription and then displays a message or redirects the subscriber to an external HTTPS page.
These steps belong together. The first message should tell the visitor to check the inbox, the email should make the confirmation action clear, and the final response should confirm that the subscription is complete.
The Signup Flow does not control the form fields, form design, or hidden tags. Those settings belong to the Signup Form Builder.
Opening the Signup Flows Page
Open “Settings” and select “Signup flows”.
The overview shows every Signup Flow in your account. From here you can create a flow, review which forms use it, edit it, duplicate it, make it the default, or delete it when it is no longer in use.
Understanding the Signup Flow Overview
Each Signup Flow is shown in its own card.
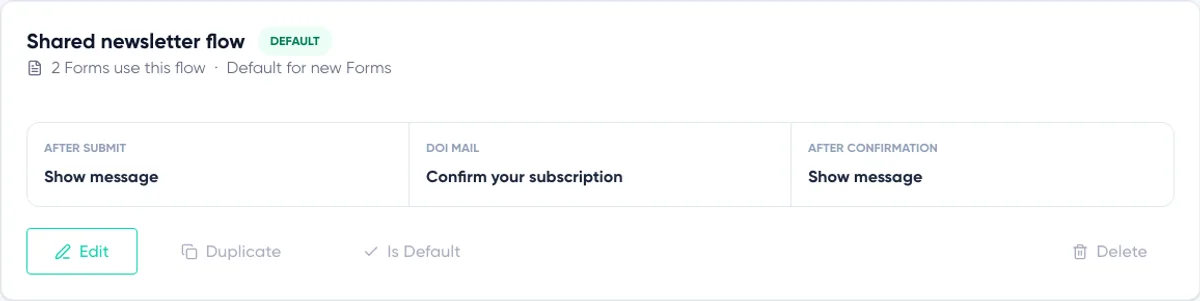
The card contains the flow name, its current usage, a summary of all three steps, and the available management actions.
Flow Name
The name identifies the flow inside Maildroppa. It is not shown to subscribers.
Use a name that describes the intended signup experience, such as “Standard Newsletter Flow”, “Webinar Registration Flow”, or “Product Waitlist Flow”. Clear names become important when several forms and Landing Pages use different confirmation journeys.
Default Badge
The “Default” badge identifies the flow automatically assigned when a new signup form is created.
Changing the default affects only forms created afterward. Existing forms keep their currently assigned Signup Flow.
Forms Using the Flow
The usage count shows how many forms and Landing Pages are currently assigned to the flow.
This number helps you understand the impact of editing or deleting it. A change to a shared flow can affect several signup experiences at once.
Three-Step Summary
The card summarizes the configured behavior for:
- After submit
- DOI mail
- After confirmation
For the page steps, the summary shows whether Maildroppa displays a message or redirects the visitor. For the DOI mail, it shows the configured email subject when available.
Creating a Signup Flow
Click “Create flow” in the upper-right corner of the overview.
Maildroppa creates a new flow named “New signup flow” and opens it in the editor. All three required steps are created with starting content, so you can immediately customize the journey.
Creating a flow from this overview does not automatically assign it to an existing form. After editing and saving it, select the flow inside the appropriate Signup Form Builder.
If you create a Signup Flow directly from a form, Maildroppa saves the form assignment and then opens the new flow for editing. This workflow is explained under
Editing a Signup Flow
Click “Edit” on a flow card to open the editor.
The editor begins with the flow name and usage count. If the flow is the default, it also shows the “Default” badge.
The flow name is required and can contain up to 120 characters. Changing the name does not change which forms use the flow.
The “Save” button becomes available after you make a valid change. It remains disabled when there are no unsaved changes or when a required value is missing or invalid.
If you try to leave the editor with unsaved changes, Maildroppa asks whether you want to stay or leave. Choose to stay when you still need to save the current work.

Editing a Shared Signup Flow
A warning appears when a flow is the default or affects multiple forms.
Saving a shared flow changes the signup journey for every form using it. Before editing, decide whether all of those forms should receive the same change.
Click “Duplicate before editing” when existing forms should keep their current experience. Maildroppa copies the name and all three steps, opens the duplicate, and leaves the original flow unchanged.
After editing the duplicate, assign it only to the form that needs the new journey.
This is useful when a standard newsletter flow is already used throughout the website but one campaign needs its own messages, confirmation email, or redirect.

Step 1: After Submit
“After submit” controls what happens immediately after the visitor sends the form.
At this stage, the email address has not yet been confirmed. The visitor still needs to open the Double Opt-in email and click its confirmation link.
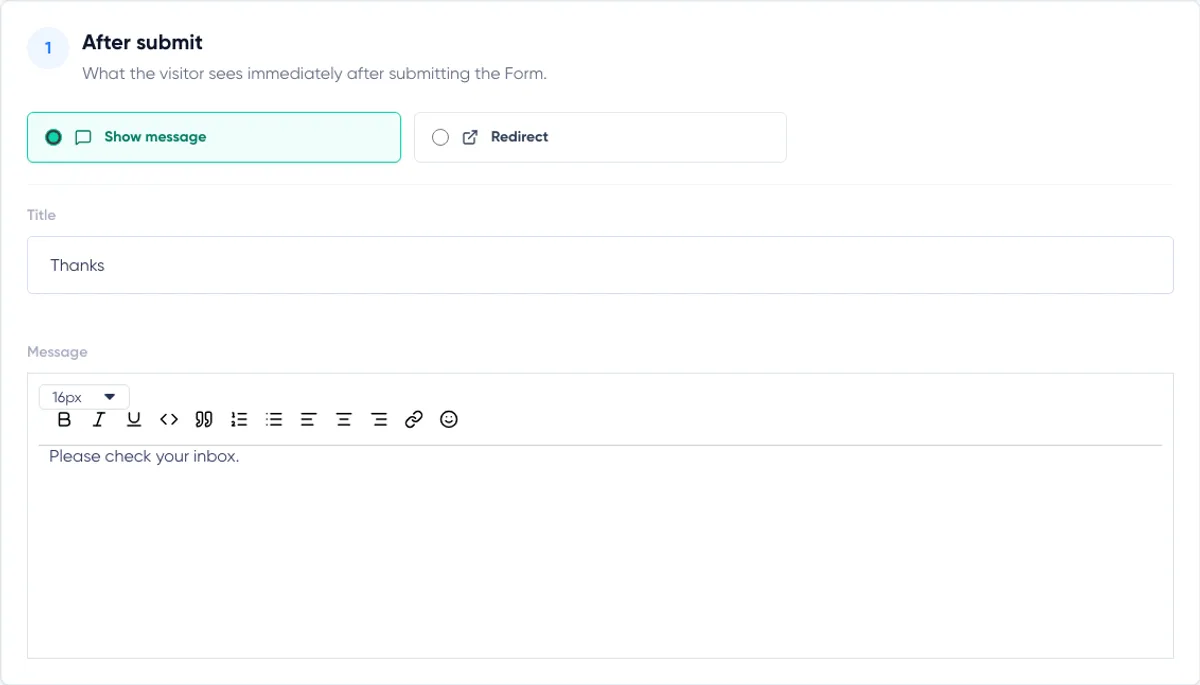
You can choose between “Show message” and “Redirect”.
Show Message
Choose “Show message” when the response should appear directly inside the Maildroppa form.
Enter a plain-text title and write the message in the editor. The editor supports useful formatting such as font size, bold, italic, underline, code, quotations, numbered and bulleted lists, text alignment, links, and emojis.
A good after-submit message should explain the next action clearly. For example:
Title: Check your inbox
Message: We sent a confirmation email to you. Open the email and click the confirmation link to complete your subscription.
Do not tell the visitor that the subscription is already complete. Until the confirmation link is clicked, the person is not yet a confirmed subscriber.
Redirect
Choose “Redirect” when the visitor should be sent to a page on your website after submitting the form.
Enter the complete destination URL, including https://. Maildroppa accepts only explicit public HTTPS URLs. Relative paths, HTTP URLs, protocol-relative URLs, and script URLs are rejected.
For example:
https://example.com/check-your-inbox
The destination page should still explain that the visitor needs to confirm the email address. A redirect after submission does not bypass Double Opt-in.
Step 2: DOI Mail
The DOI mail is the Double Opt-in confirmation email sent after the form is submitted.
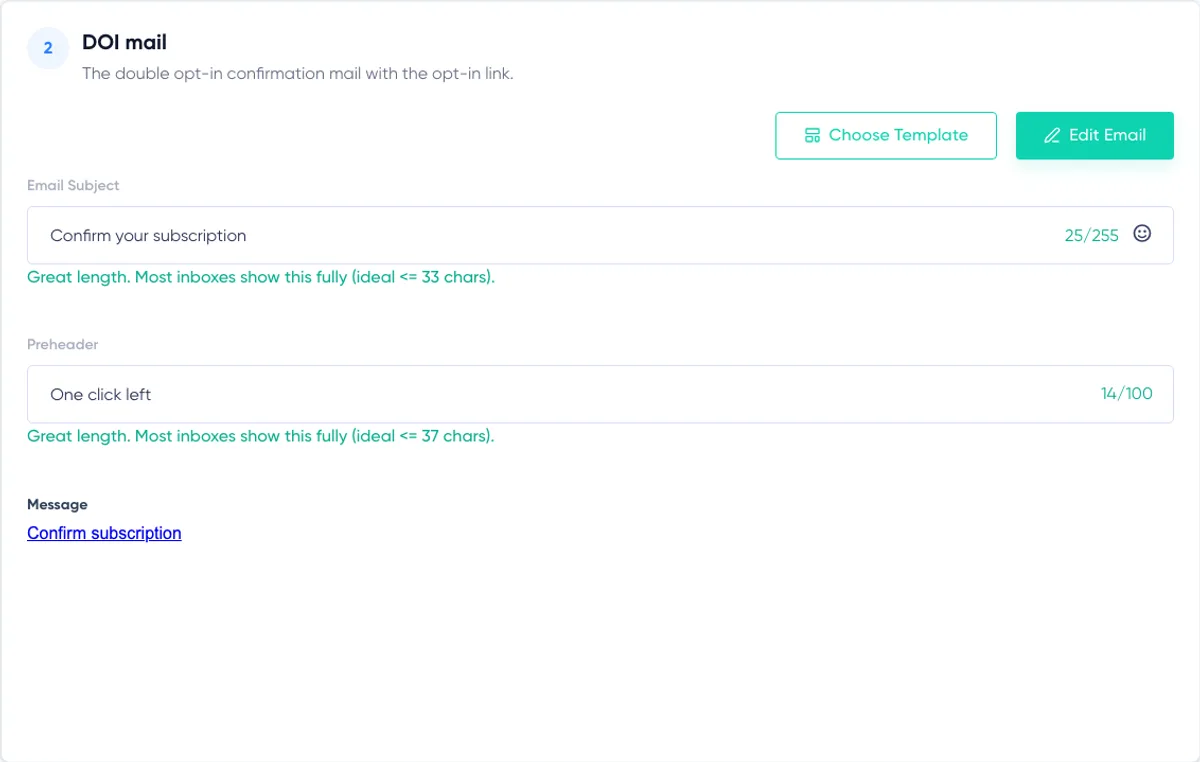
It must give the recipient a clear way to confirm the subscription. The email editor contains four main parts:
- Email subject
- Preheader
- Email design and content
- Required confirmation link
Email Subject
The subject is the first text most recipients see in the inbox.
Use a short and direct subject such as “Confirm your subscription” or “One click to join the newsletter”. Avoid language that makes the email look like an advertisement. The purpose of this email is confirmation.
You can add an emoji through the subject field when it supports the tone of your brand, but the meaning of the subject should remain clear without it.
Preheader
The preheader is the supporting text many email clients show next to or below the subject.
Use it to explain the required action, for example “Click the link to complete your signup”. The preheader should complement the subject rather than repeat it word for word.
Choosing a Template
Click “Choose template” to open the available confirmation-email templates.
Selecting a template replaces the current email content with that template and opens it for editing. If you already changed the current email, review the replacement carefully before continuing.
Confirmation-email templates are designed for the Double Opt-in use case and should already contain an appropriate confirmation action. Even so, verify the confirmation link before saving.
Editing the Email
Click “Edit email” to open the visual email editor.
You can change the text, layout, colors, images, and confirmation button while keeping the email focused on one task. Close the editor when you want to return to the complete Signup Flow.
The preview shown in the DOI mail step uses the currently saved or exported email design. Review it before saving the flow.
The email editor can provide personalization values based on the subscriber fields available in your account. Use personalization only when the corresponding information is collected reliably by the forms using this flow. Maildroppa rejects unknown personalization tags.
Keeping the Confirmation Link
The DOI mail must contain a clickable link whose destination includes the Maildroppa confirmation variable:
{{ confirmation_url }}
This value is replaced with the recipient’s individual confirmation URL when the email is sent.
The variable must be used as the URL of a text link or button. Showing {{ confirmation_url }} only as ordinary text does not create the required clickable confirmation action.
Do not replace this variable with a normal website URL. Without a valid confirmation link, recipients cannot complete Double Opt-in and Maildroppa will not save the flow.
Spam Check
When the DOI mail content changes, Maildroppa checks the email before saving.
If the content has a high spam score, the editor shows the spam-check result and saving can be blocked. Review the reported issues, adjust the subject or email content, and try again.
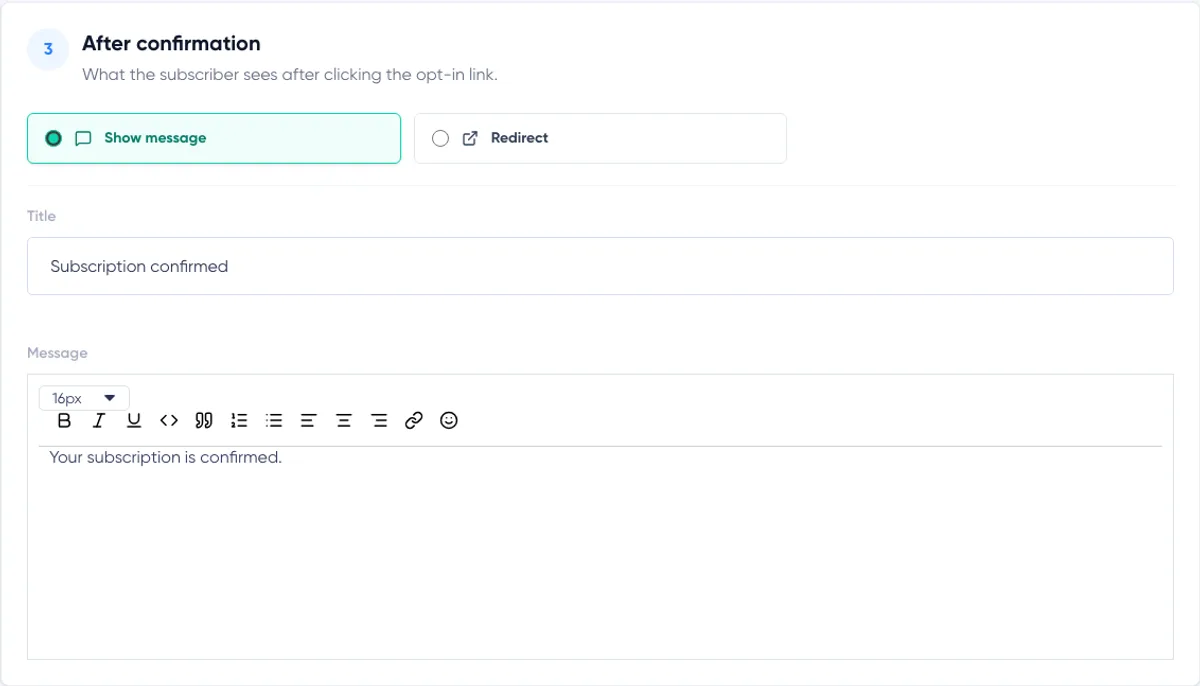
Step 3: After Confirmation
“After confirmation” controls what happens after the recipient clicks the confirmation link and Maildroppa completes the subscription.
At this point, it is appropriate to thank the subscriber, confirm that the signup is complete, and explain what happens next.
As in the first step, you can choose “Show message” or “Redirect”.
Show Message
Choose “Show message” to display a Maildroppa-hosted confirmation response.
Enter a plain-text title and a formatted message. For example:
Title: Subscription confirmed
Message: Thank you. Your email address has been confirmed and you are now subscribed.
You can include links to useful resources, your website, or the subscriber’s next step.
Redirect
Choose “Redirect” when confirmed subscribers should continue to a specific page on your website.
Enter a complete public HTTPS URL, for example:
https://example.com/subscription-confirmed
This page can welcome the subscriber, explain when to expect the first campaign, or provide the next relevant action.
The redirect happens only after the confirmation link has been processed. It is different from the redirect in the “After submit” step.
Saving and Validation
Click “Save” at the top of the editor after reviewing all three steps.
Maildroppa checks the complete flow before saving. The most important requirements are:
- The flow has a name with no more than 120 characters.
- All three required components are present.
- A displayed page message has a plain-text title and supported message content.
- Every redirect uses a complete public HTTPS URL.
- The DOI mail contains a clickable
{{ confirmation_url }}target. - Personalization tags used in the DOI mail are valid for the account.
- The DOI mail passes the required content and spam checks.
Validation messages appear near the affected field and, for important flow-wide problems, at the top of the editor. Resolve the issue before trying to save again.
When the save succeeds, Maildroppa confirms that the Signup Flow was saved.
When Changes Take Effect
Saved changes affect future signup attempts made through forms assigned to the flow.
Maildroppa keeps the confirmation journey captured when a signup attempt begins. If someone has already submitted a form and is waiting to click the DOI link, later edits do not replace that person’s in-progress confirmation content.
For Embedded Forms, Popups, and Slide-ins, the current saved flow is used when a new signup is submitted.
For a published Landing Page, changing its assigned Signup Flow creates an unpublished Landing Page change. Open the Landing Page, review the signup impact, and publish the changes before expecting the live page to use the updated flow.
Assigning a Signup Flow to a Form
Open a form in the Signup Form Builder. The builder header shows the currently assigned Signup Flow.
Open the Signup Flow control to:
- Review the three configured steps
- Select another existing flow
- Edit the assigned flow
- Create a new flow
Changing the selection becomes part of the form’s unsaved changes. Save the form to store the new assignment.
If the assigned flow is used by several forms, Maildroppa asks whether you want to edit the shared flow or create a separate flow for the current form.
Edit shared signup flow opens the existing flow. Saved changes affect every form assigned to it.
Create own signup flow duplicates the current flow, assigns the copy to the current form, and opens the copy for editing. A new form must be saved before it can receive its own flow.
The Signup Forms Overview and form-specific Builder guides explain how to create, publish, or embed the forms that use these flows.
Setting the Default Signup Flow
On the Signup Flows overview, click “Use as default” on the flow that should be assigned to newly created forms.
The selected card receives the “Default” badge. The previous default remains available but is no longer assigned automatically to new forms.
Changing the default does not move existing forms to the new flow. To change an existing form, open that form and select the desired flow manually.
Duplicating a Signup Flow
Click “Duplicate” on a flow card to create a complete copy.
The duplicate contains the same after-submit response, DOI mail, and after-confirmation response. Maildroppa opens the copy in the editor so you can rename and customize it.
The duplicate is not automatically the default and is not automatically assigned to the same forms as the original.
Duplicating is the safest way to create a variation without changing forms that already use the original flow.
Deleting a Signup Flow
You can delete a Signup Flow only when it is no longer needed and nothing important depends on it.
The delete action is unavailable when the flow is the default or a form still uses it. Maildroppa can also reject deletion when the flow is referenced by an automation or an in-progress confirmation.
Before deleting a flow:
- Select a different default flow if necessary.
- Assign every connected form to another flow.
- Remove any automation reference to the flow.
- Allow in-progress confirmations to finish or expire.
Click “Delete” and confirm the flow name in the dialog. Deletion permanently removes the flow. Duplicate it first if you may need the content later.
Where the Other Subscriber Settings Are
The Signup Flows editor is intentionally limited to the three-step Double Opt-in journey.
At the bottom of the editor, “Where are the other old tabs?” links to the areas that now own the remaining subscriber lifecycle settings:
Welcome email — Welcome emails are now created as automations. This separates the required Double Opt-in confirmation email from optional marketing or onboarding messages sent after confirmation.
Re-engagement — Re-engagement settings are under Deliverability and List Hygiene.
Unsubscribe — Unsubscribe request and response settings are managed on the Unsubscribe settings page.
Lead Magnet delivery is also not configured in the Signup Flow editor. Configure delivery through the relevant automation and its email content.
Testing a Signup Flow
Before using a flow for an important campaign, test the complete journey with a real form:
- Assign the flow to a test form or duplicate an existing form and flow.
- Submit the form with an email address you can access.
- Verify the after-submit message or redirect.
- Check the DOI mail subject, preheader, design, sender information, and confirmation button.
- Click the confirmation link.
- Verify the after-confirmation message or redirect.
- Confirm that the address appears as a confirmed subscriber in Maildroppa.
- If the form applies hidden tags, verify those tags as well.
Testing all three steps together is the best way to find unclear wording, broken redirects, missing confirmation actions, or unexpected changes caused by a shared flow.
Ready to Send Better Emails?
Stop juggling bloated tools or overpriced plans. Maildroppa offers personal support, privacy-conscious controls, and powerful email marketing - starting free forever.
No credit card required. No time limit.