Contents
the email tool that makes email marketing simple


Customize Unsubscribe Pages
Published: · Last updated: · By Marcus Biel
In brief
Learn how to customize Maildroppa's unsubscribe request and response pages, style the confirmation action, show a final message, or add an HTTPS redirect.
The Unsubscribe Preferences page controls what subscribers see when they use the Maildroppa unsubscribe link in an email.
It contains two connected pages. The first page asks the subscriber to confirm the unsubscribe request. The second page confirms that the unsubscribe has been completed or redirects the subscriber to a page on your website.
These settings are shared across your account. You configure the unsubscribe journey once rather than assigning different unsubscribe pages to individual forms, campaigns, automations, or Signup Flows.
How the Unsubscribe Journey Works
The complete page-based unsubscribe journey has four parts:
- A subscriber clicks the unsubscribe link in a Maildroppa email.
- Maildroppa opens the Unsubscribe request page. The subscriber is still subscribed at this point.
- The subscriber clicks the automatically generated unsubscribe button or text link on that page. Maildroppa processes the unsubscribe.
- Maildroppa opens the Unsubscribe response page or redirects the subscriber to the HTTPS URL you configured.
The two-page journey gives subscribers a clear confirmation step. Opening the first page alone does not complete the unsubscribe. The required action on that page performs it.
The unsubscribe request and response pages are separate from the signup experience. Signup messages, Double Opt-in emails, and confirmation pages are managed under Signup Flows.
Opening Unsubscribe Preferences
Open “Settings” and select “Unsubscribe & preferences”.
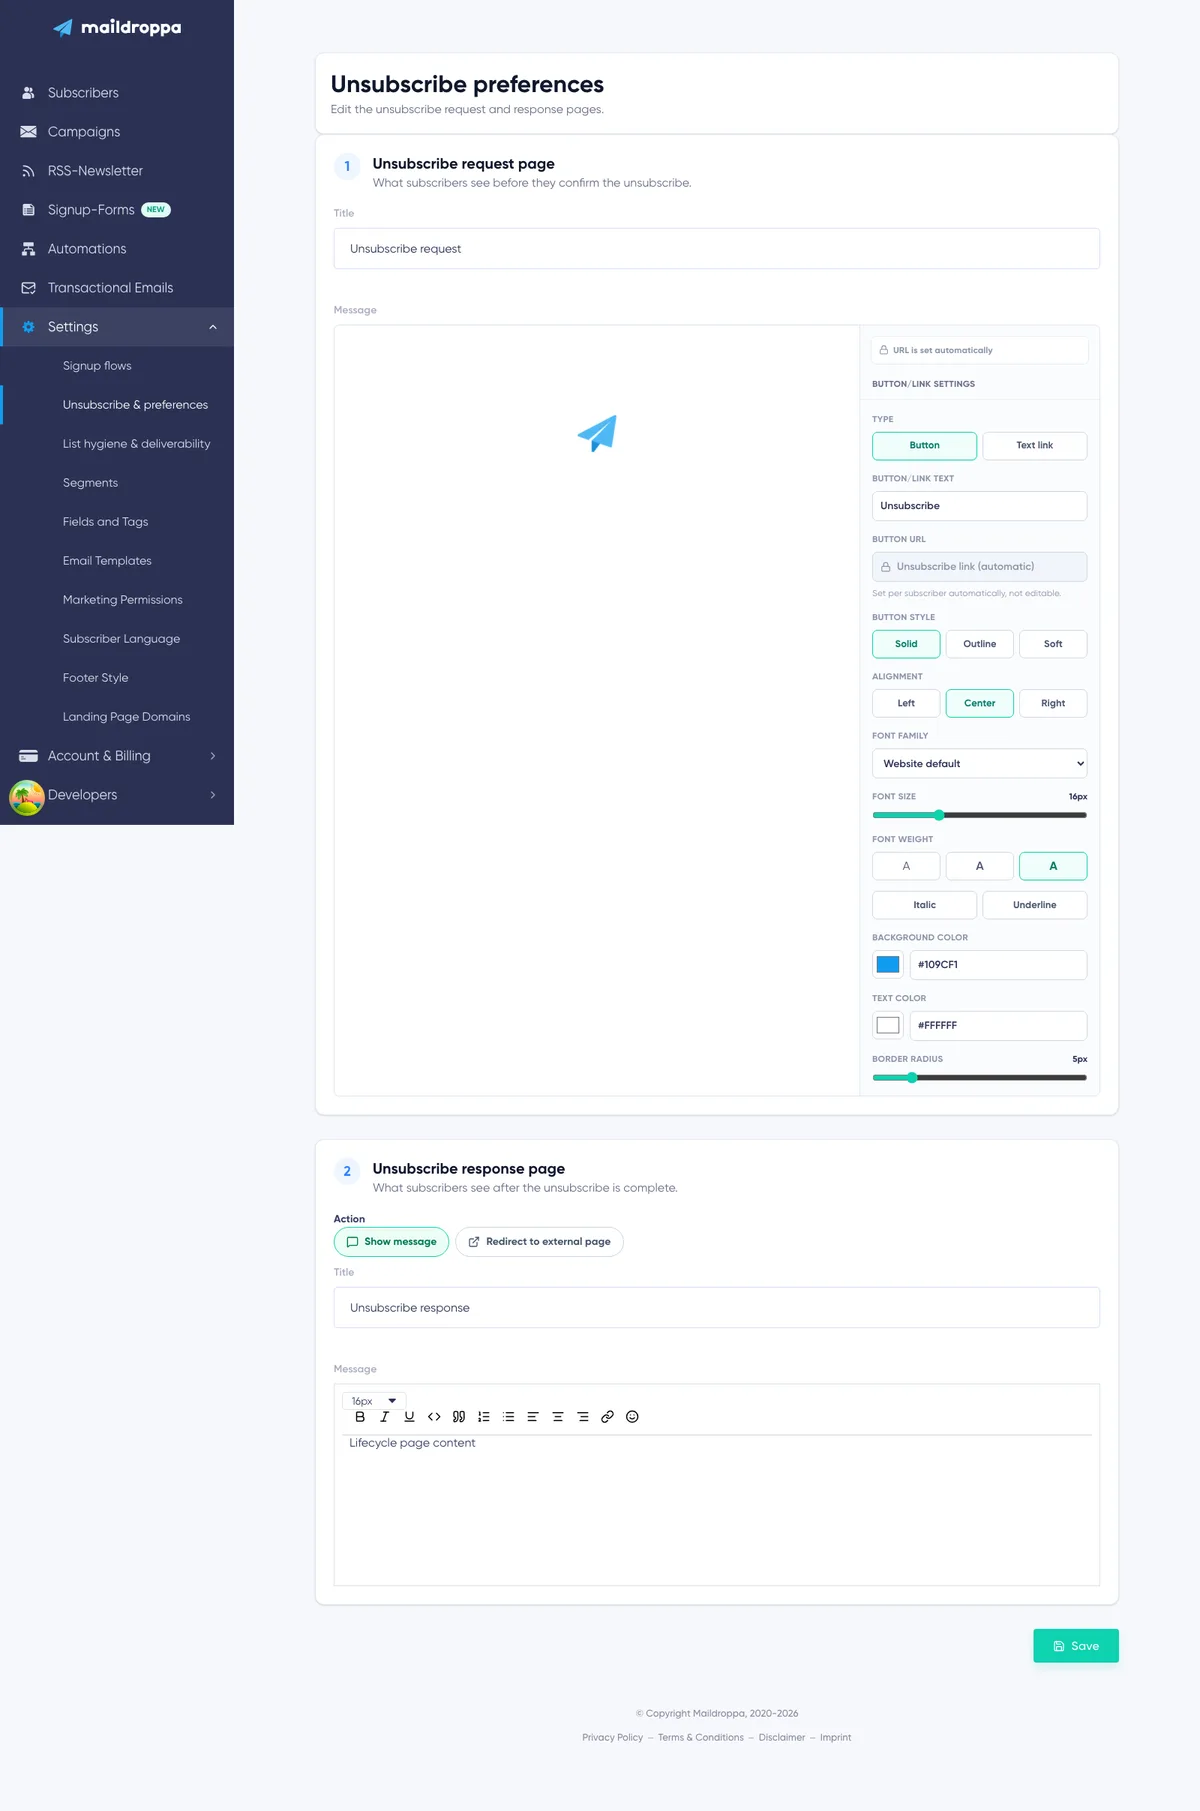
The page title is “Unsubscribe preferences”. Below the introduction, the editor shows two numbered cards:
- Unsubscribe request page
- Unsubscribe response page
The order reflects the order in which subscribers see the pages. A single “Save” button at the bottom saves the settings for both steps.
Understanding the Account-Wide Settings
Unsubscribe Preferences are not connected to a particular signup form or Signup Flow.
When Maildroppa opens an unsubscribe page, it selects the settings belonging to your account. This means that changing either page can affect unsubscribe journeys originating from different campaigns and automations.
Use wording that makes sense for your complete email program. Avoid mentioning a specific newsletter, lead magnet, campaign, or automation unless all subscribers who can reach the page received that type of content.
There is no separate publishing step. Once both pages have been saved successfully, the saved version is available for subsequent unsubscribe page loads.
Step 1: Unsubscribe Request Page
The Unsubscribe request page is the page subscribers see before the unsubscribe is completed.
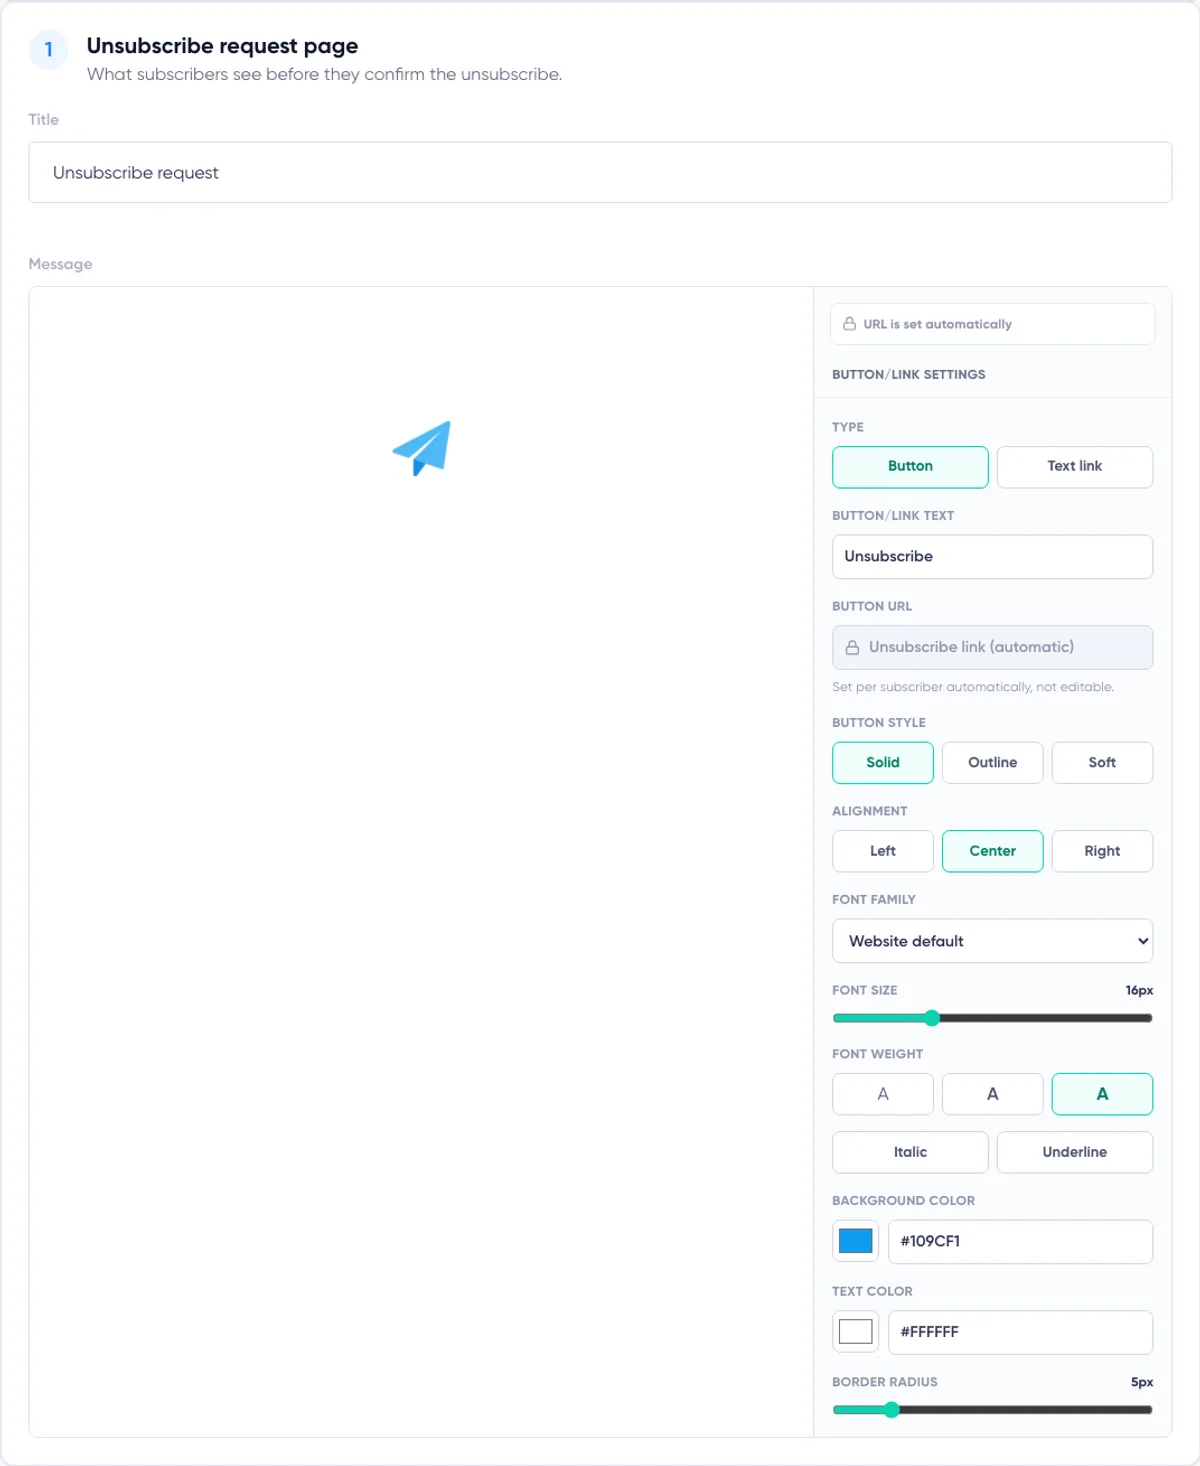
Its main purpose is to explain what will happen and provide one clear confirmation action. It contains three editable parts:
- Title
- Message
- Unsubscribe button or text link
Title
The title appears at the top of the request page.
Keep it short and make the decision clear. Suitable examples include:
- Confirm your unsubscribe
- Do you want to unsubscribe?
- Leave our mailing list
Avoid a title such as “You have been unsubscribed” on this first page. The unsubscribe is not complete until the subscriber clicks the confirmation action.
Message
Use the message to explain the action without adding unnecessary friction.
For example:
Title: Confirm your unsubscribe
Message: Click the button below to stop receiving marketing emails from us.
The message editor supports text formatting such as font size, bold, italic, underline, quotations, lists, alignment, links, and emojis. Use formatting to make the page easier to read, but keep the unsubscribe action easy to find.
Do not make the confirmation wording ambiguous. A subscriber should understand that clicking the action will unsubscribe the corresponding email address.
The Required Unsubscribe Action
The request page includes a special unsubscribe action. You can display it as a button or a text link and change its label and design.
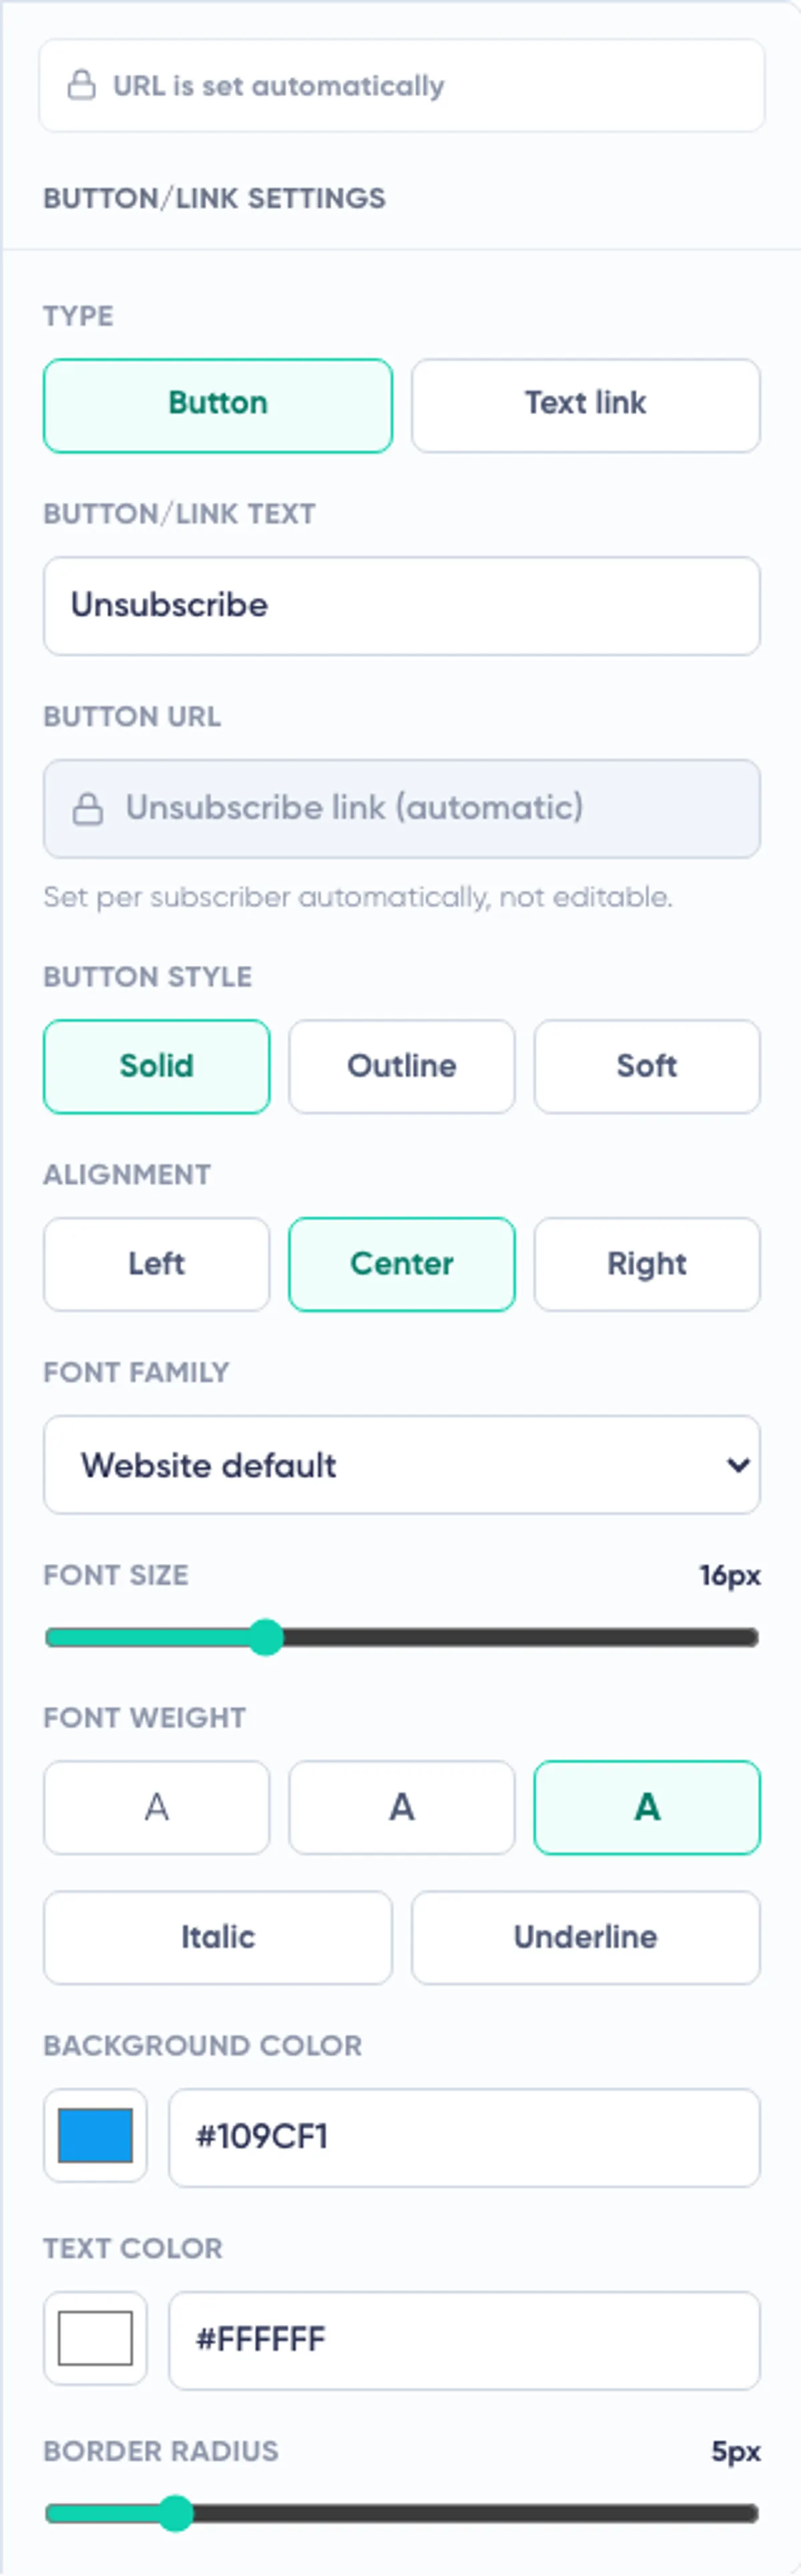
Its destination is controlled by Maildroppa. The settings panel therefore shows “URL is set automatically” and the locked value “Unsubscribe link (automatic)”. The URL cannot be edited.
Maildroppa sets the correct destination for the individual subscriber when the page is used. Keeping this URL automatic prevents the action from being replaced with an ordinary website link that would not complete the unsubscribe.
You do not need to paste a subscriber URL, campaign URL, or template variable into this field.
Choosing Button or Text Link
Under “Type”, choose how the unsubscribe action should appear:
Button gives the action a larger, more prominent appearance. This is usually the clearest choice when the page has more than one sentence of supporting text.
Text link displays a simpler inline-style action. It can be appropriate for a very minimal page, but it should still be easy to see and select.
Switching between the two types changes the appearance, not the purpose or destination of the action.
Button or Link Text
The “Button/link text” field controls the visible label.
Use direct wording such as:
- Unsubscribe
- Confirm unsubscribe
- Stop marketing emails
Avoid vague labels such as “Continue”, “Submit”, or “Click here”. The subscriber should know the result before selecting the action.
Button Style Presets
When “Button” is selected, you can start with one of three presets:
Solid uses a filled button with high contrast.
Outline uses a light background with a colored border and text.
Soft uses a light tinted background with colored text.
The presets provide a quick starting point. You can continue adjusting the available colors and typography afterward.
Alignment and Typography
The action can be aligned to the left, center, or right.
You can also choose the website default font or select Arial, Georgia, or Courier New. The font size can be set from 10 to 30 pixels, and three font weights are available. Italic and underline can be switched on independently.
Both button and text-link types have an editable text color.
When the button type is selected, you can additionally change the background color and set the corner radius from 0 to 30 pixels. A radius of 0 creates square corners. A higher value creates a more rounded button.
For accessibility, choose text and background colors with clear contrast. The confirmation action should remain recognizable without relying on color alone.
Step 2: Unsubscribe Response Page
The Unsubscribe response page controls what happens after Maildroppa has processed the confirmation action.
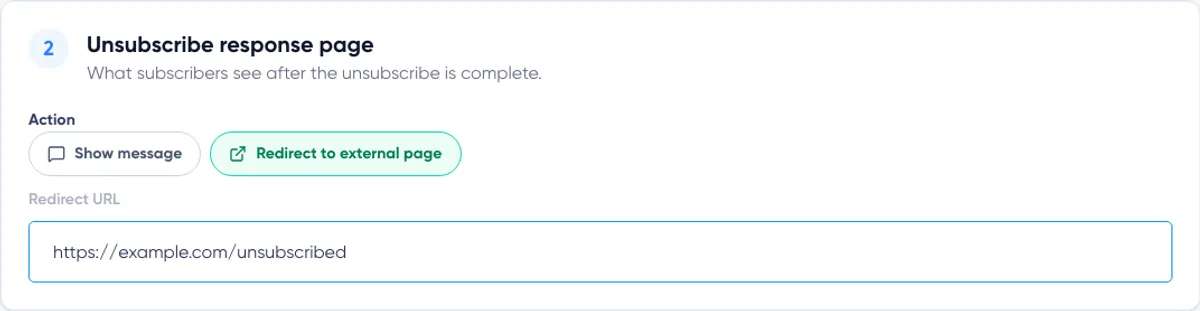
Under “Action”, choose one of two outcomes:
- Show message
- Redirect to external page
This choice affects only the second step. The request page always remains a Maildroppa page because it must contain the automatic unsubscribe action.
Show Message
Choose “Show message” when you want Maildroppa to display the final response directly.
Enter a title and a message that clearly confirm the result. For example:
Title: You have been unsubscribed
Message: Your unsubscribe request has been completed. You will no longer receive marketing emails from us.
The message editor supports font size, bold, italic, underline, code formatting, quotations, numbered and bulleted lists, left, center, and right alignment, links, and emojis.
You can use a link to help the subscriber return to your website or contact support. Keep it secondary to the confirmation. The main message should make it immediately clear that the unsubscribe was successful.
Do not ask the subscriber to click another link to finish. The unsubscribe has already been processed before this response appears.
Redirect to External Page
Choose “Redirect to external page” when the final response should be hosted on your own website.
Enter the complete destination URL, including https://. For example:
https://example.com/unsubscribed
Maildroppa accepts an explicit HTTPS URL. An HTTP URL, relative path, protocol-relative URL, script URL, or malformed address is rejected.
The redirect page should confirm the completed unsubscribe as soon as it opens. Do not make confirmation dependent on another form submission or another button click.
A useful redirect page can include:
- A clear unsubscribe confirmation
- A link back to your website
- Contact information for support
- An optional, non-blocking explanation of how someone can subscribe again later
The redirect should not disguise the result or pressure the subscriber to remain subscribed.
Choosing Between a Message and Redirect
Use “Show message” when you need a simple confirmation and do not want to maintain a separate page.
Use “Redirect to external page” when you already have a branded confirmation page, need additional context, or want the final page to use your website navigation and design.
Both options complete the same unsubscribe process. The difference is only what the subscriber sees afterward.
Saving the Unsubscribe Preferences
Click “Save” at the bottom of the page after reviewing both steps.
The Save action covers both the Unsubscribe request page and the Unsubscribe response page. When the complete save succeeds, the confirmation “Changes saved.” appears.
Changes are not saved automatically. Save before leaving the page.
While saving, both editors are temporarily disabled. Wait for the success confirmation before making more changes or leaving the page.
Validation and Common Save Problems
The most important requirements are:
- The Unsubscribe request page must keep its automatic unsubscribe action.
- The action URL is system-managed and cannot be replaced with a custom URL.
- When the response action is “Redirect to external page”, a valid complete HTTPS URL is required.
- Page content and configuration must stay within Maildroppa's supported limits.
If a redirect URL is empty, Maildroppa shows “Redirect URL required”.
If the value is not a supported HTTPS URL, Maildroppa shows “Redirect URL invalid”. Correct the address and click “Save” again.
If the page settings cannot be loaded, use “Retry”. If the problem continues, reload the application and try again before editing, so you do not work from incomplete settings.
If the unsubscribe URL appears locked, this is expected. Change only the visible action text and style; Maildroppa supplies the functional destination automatically.
When Changes Take Effect
Saved changes apply account-wide to subsequent loads of the Maildroppa unsubscribe journey. You do not need to republish signup forms, Landing Pages, campaigns, or automations.
An email that has already been sent can still open the current saved unsubscribe pages when its valid unsubscribe link is used. This is because the page content is loaded when the subscriber follows the link, rather than being stored as part of the email design.
The first page and second page are also loaded at different moments. A subscriber can therefore see the currently saved request page when opening the link and the currently saved response behavior when confirming the unsubscribe.
What Happens to the Subscriber
Opening the Unsubscribe request page does not change the subscriber's status.
When the subscriber selects the automatic confirmation action, Maildroppa processes the unsubscribe. A confirmed subscriber is no longer eligible for future marketing emails from the account.
The response message or redirect is shown after the request has been accepted. It should communicate the result clearly, but changing the response text does not change the unsubscribe itself.
If an already unsubscribed recipient uses the link again, Maildroppa can still return the configured response without creating another unsubscribe. This keeps the journey safe to repeat and gives the recipient a clear result.
Testing the Complete Journey
Review the editor carefully before saving, especially the difference between the request wording and the completed-response wording.
For a complete end-to-end test, use an email address you control as a confirmed subscriber and send that address a real Maildroppa campaign or automation email. Then:
- Open the unsubscribe link in the received email.
- Confirm that the request-page title, message, and action design are correct.
- Click the unsubscribe action.
- Confirm that the final message appears or that the browser opens the correct HTTPS page.
- Verify the subscriber's status in Maildroppa.
This is a real unsubscribe test. The controlled address will be unsubscribed when you click the confirmation action. Subscribe it again afterward if you need to continue using it for marketing-email tests.
Recommended Copy Structure
The two pages should use different wording because they represent different states.
Request Page Example
Title: Confirm your unsubscribe
Message: Select the button below if you no longer want to receive marketing emails from us.
Button/link text: Unsubscribe
Response Page Example
Title: You have been unsubscribed
Message: Your request has been completed. You will no longer receive marketing emails from us.
The request page uses future-oriented wording because the action is still pending. The response page uses completed wording because Maildroppa has already processed the action.
How This Differs from Signup Flows
Signup Flows control what happens when a visitor submits a signup form, receives the Double Opt-in email, and confirms the subscription. Different forms can use different Signup Flows.
Unsubscribe Preferences control the opposite journey: how an existing subscriber confirms that they want to leave and what appears after the unsubscribe. There is one shared pair of unsubscribe pages for the account.
The Signup Form Builder controls form fields, form design, hidden tags, and the Signup Flow assigned to a form. It does not control the unsubscribe request or response pages.
Keeping these settings separate allows you to update the account-wide unsubscribe experience without editing every form or signup journey.
Ready to Send Better Emails?
Stop juggling bloated tools or overpriced plans. Maildroppa offers personal support, privacy-conscious controls, and powerful email marketing - starting free forever.
No credit card required. No time limit.